This guide covers 2 methods to upgrade a BMX bottom bracket and crank.
Method 1: Substitute a 1 piece crank and bearings for a lighter spindle and separate crank arms
Method 2: Replace the 1 piece crank and bearings with an adapter and cartridge (sealed) bearings (and separate crank arms).
First up, we’ll answer to some general questions.
WHAT IS A BMX BOTTOM BRACKET?
A BMX bottom bracket consists of several components.
1. The BB Shell
A hollow tube at the intersection of the key tubes geometrically speaking:
- downtube (headtube to BB shell)
- seattube (houses seat post)
- chainstays (rear dropout to BB shell)
The BB shell is the essential building block, a bottom bracket’s “housing” if you like.
The BB shell is also the foundational point in terms of frame geometry—the lowest point supporting the key front, vertical, and rear-facing tubes.
2. The Bearing Assembly — Bottom Bracket Types
There are several bearing types.
Key Point: each setup allows a different type of crank to be mounted to it.
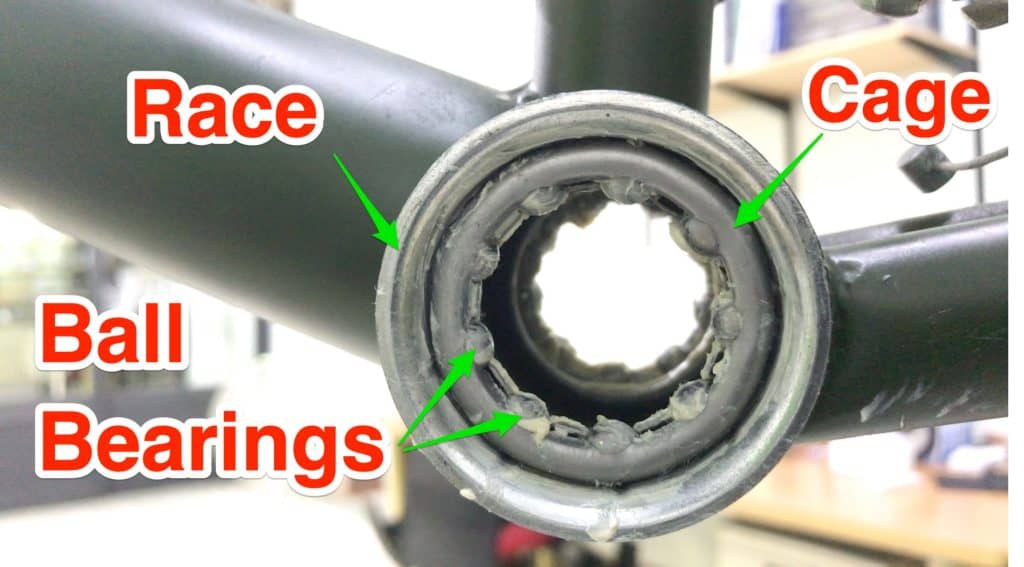
The simplest setup consists of bearing cups functioning as bearing races with (unsealed) bearings mounted in a cage seated in the drive and non-drive side races or simply American.
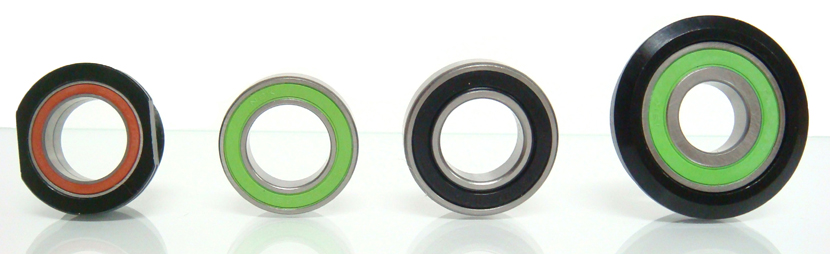
Then you have sealed bearings pressed or threaded (not common) directly into the BB shell.
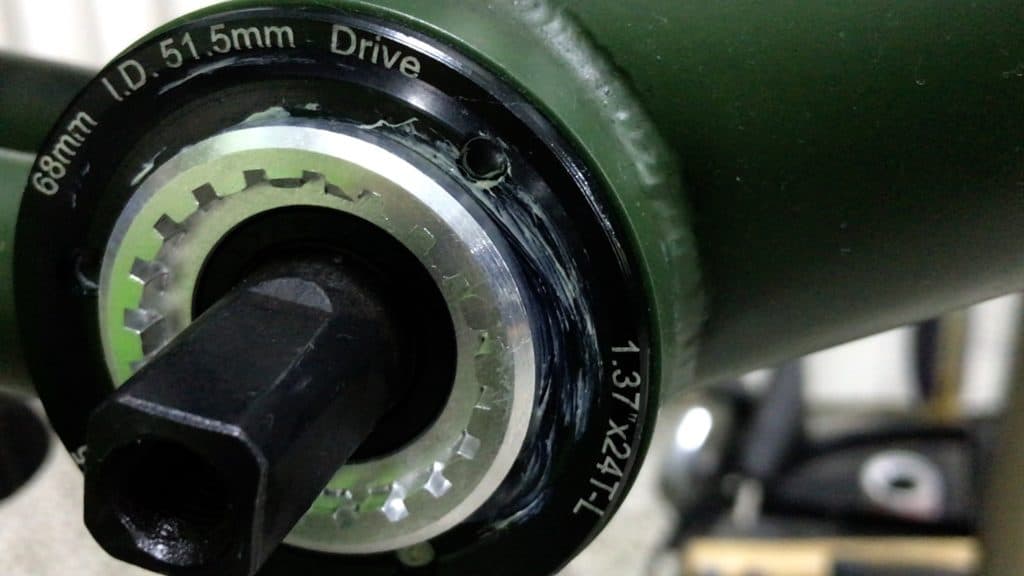
A further variation is a bearing cartridge threaded into an adapter pressed into the BB shell.
Here we see a standard English-threaded square taper bottom bracket mounted into an American BMX BB shell adapter.
3. The Spindle
Often called an “axle”. But it’s not.
Axle: remains stationary while the bearings rotates around it. All wheels have axles for example.
Spindle: spins with the bearing. All bottom brackets have spindles.
BOTTOM BRACKET/CRANKSET COMBINATIONS
There are three possibilities.
One Piece Crankset
The simplest, entry-level crankset with bearing cups housing ball bearings in a cage.
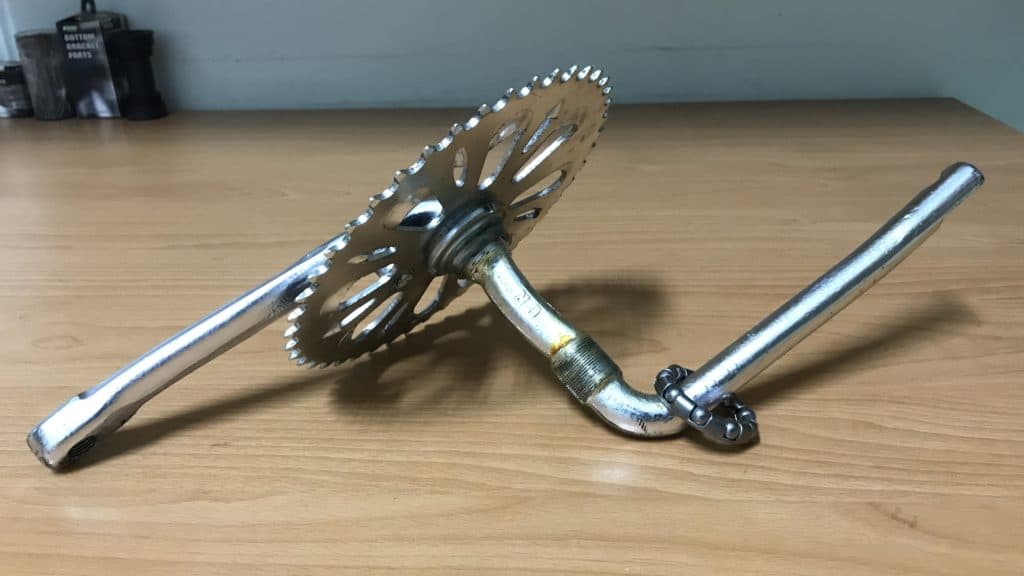
Crank and spindle form one continuous piece—heavy and cumbersome.
The rig also overly complicates changing your chainring.
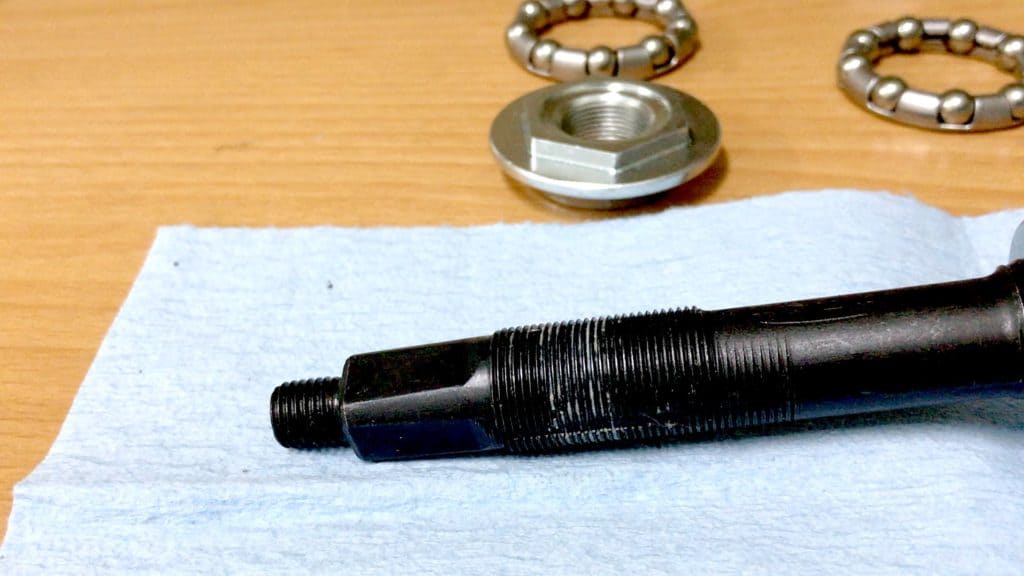
Square Taper
Substitute a 150 mm spindle with the same bearing setup for your original 1 piece crankset. In other words a 3 piece crank.
You get a lighter rig that looks better — a lot better in fact.
Even better, with an adapter you can install a square taper cartridge BB giving you smoother running and easier-to-maintain sealed bearings.
Splined
Instead of the cartridge’s four tapered faces and the crank’s tapered square, spindle and crank slot together via splines.
The spindle OD needs to match the (sealed) bearing’s ID for you to make this setup work.
WHAT SIZE BOTTOM BRACKET DO I NEED FOR MY BMX?
Everything depends on your BB shell’s size. The specific value you need to know is the internal diameter. (Check out the post on Bottom Bracket Standards for an overview of bottom brackets generally).
This ID measurement corresponds to the OD (outer diameter) value of the correct bearing.
American: 51mm
Mid (size): 41mm
Spanish: 37mm
Euro: 31mm
Note that your bottom bracket choices are constrained by the type of crank you have, assuming you are not also changing the crank.
A key reason to change to a new type of BB is to be able to run a different type of crank.
BMX BOTTOM BRACKET TOOLS
The tools you need depend on what you need to do. And that depends on what sort of bottom bracket/crank setup you’re running.
The more high-tech your setup, the more specialized your tools.
A generally useful toolset for the workshop is a (chrome vanadium) socket set.
If your range of bike work or maintenance is limited, that is you know exactly what sized nuts and bolts you work with, you can purchase the driver and then each socket as required.
You can do without the set.
One Piece Crankset Tools
No special tools required to work on this crankset.
Make sure you have a pair of crescent wrenches (“adjustable” wrench or “shifting spanner” depending on your geographical location): one 300mm and one 250mm wrench should be enough.
You’ll also need a decent sized flat-tip screwdriver plus any sort of hammer for loosening the bearing ring. We’ll cover that shortly.
Square Taper Crank Tools
You’ll need specialized tools here.
No sweat though, because each is available on Amazon or even at your local bike shop.
The local mechanic certainly has the tools for any work that your square taper rig needs of course.
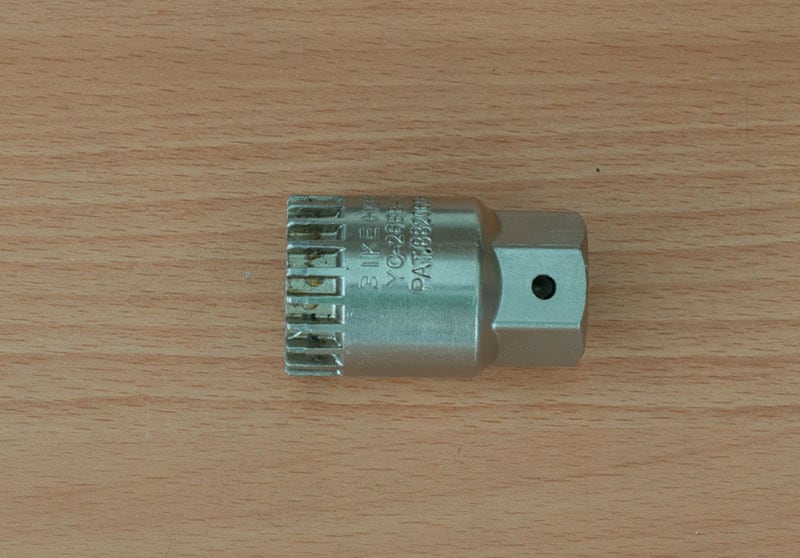
This splined drive fits a cartridge bearing, enabling installation or removal.
Prepare to head to the bike shop if you lack this piece. You can’t install or remove the cartridge without a splined drive.
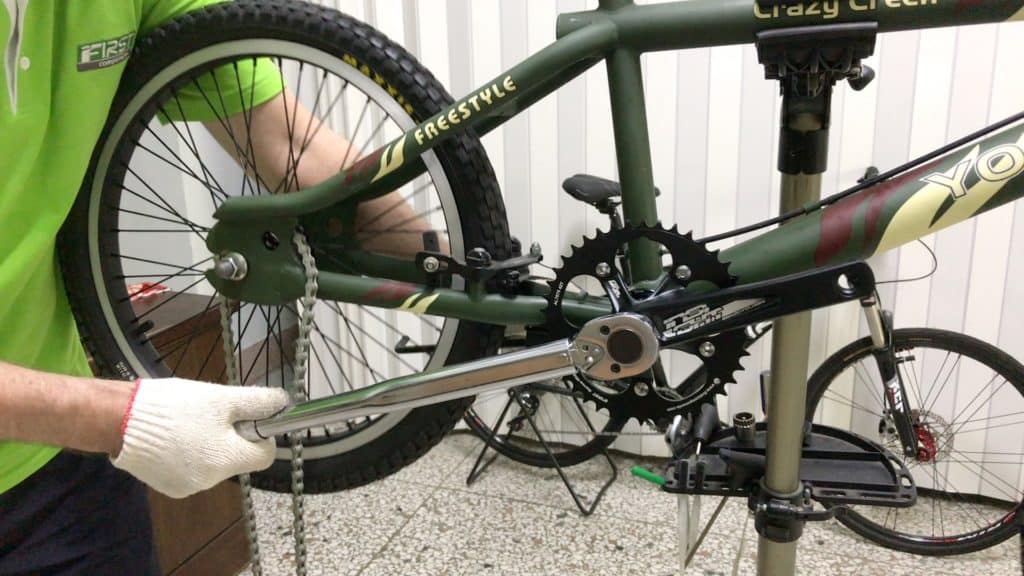
A long-handled wrench helps a lot in getting the crank bolts tight enough.
Make sure it also fits the splined drive so you’ll have no problems tightening or loosening a cartridge bottom bracket to tolerance.
You can get away with using a socket wrench. Best to extend the handle for leverage though. Use an old seatpost or length of pipe.
A crank puller is necessary to remove your cranks. You can get these with integrated handles or just the unit, as pictured—your crescent wrench will drive the bolt.
Spline Spindle and Crank Tools
A long handled wrench comes in handy for the crank bolts.
You could go with a standard socket wrench. Just check the bolts periodically for looseness.
Because tightening them properly is so much easier with the long handled wrench, you should try to get one for your essential tool kit.
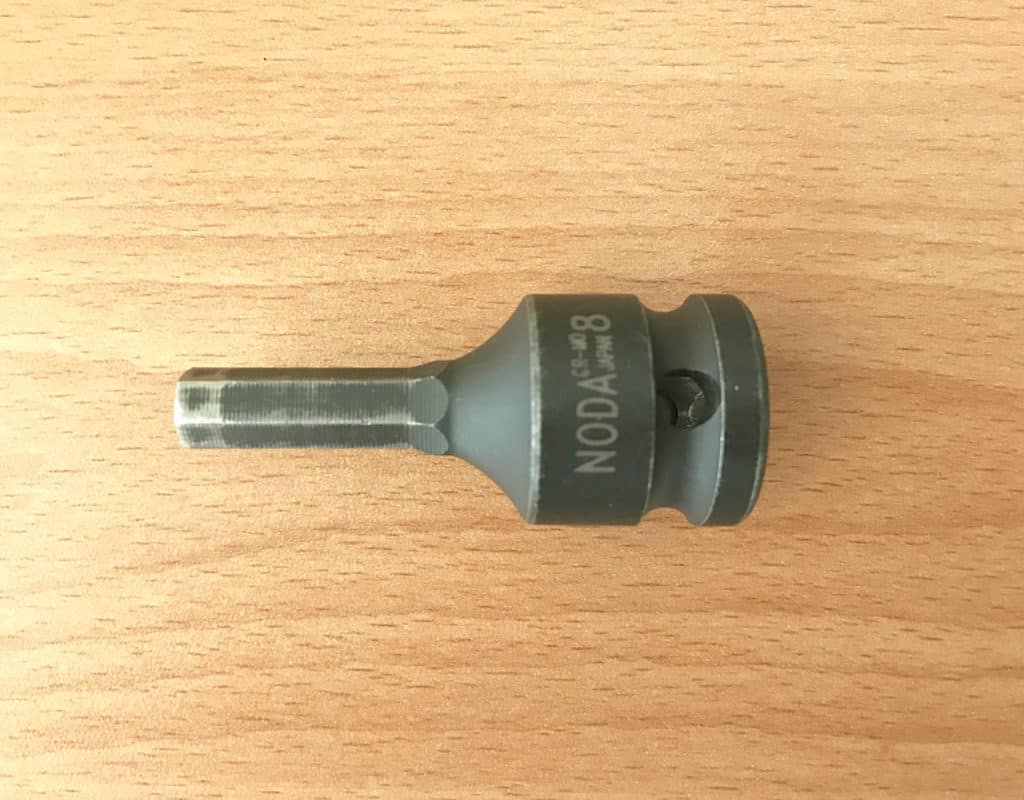
You’ll also need an appropriately sized hex drive for loosening and tightening the crank bolts.
BMX BOTTOM BRACKET REMOVAL
Let’s move step-by-step through the first procedure: replacing the bearings as well as the one piece crank with one spindle and separate cranks.
Both procedures described below are covered in our video on the same topic if you would prefer to watch that.
Clear the Chain
Loosen the wheel nuts using a 19 mm socket.
Loosen the left side first. The wheel pulls to the left due to the chain tension which now immediately slackens.
Then loosen the right side, allowing the wheel to move all the way forward in the horizontal dropouts.
You are now able to lift the chain clear of the chainring.
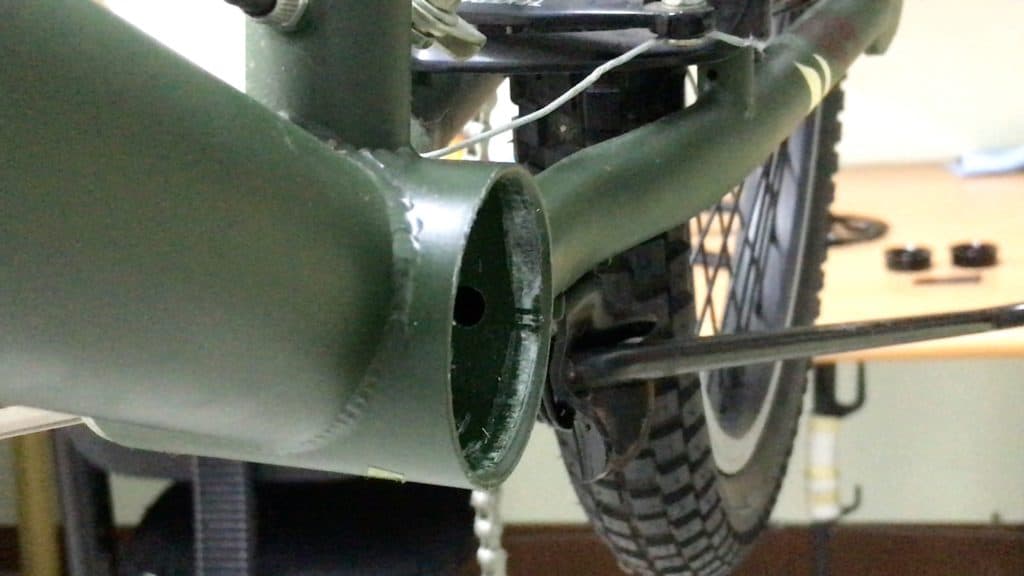
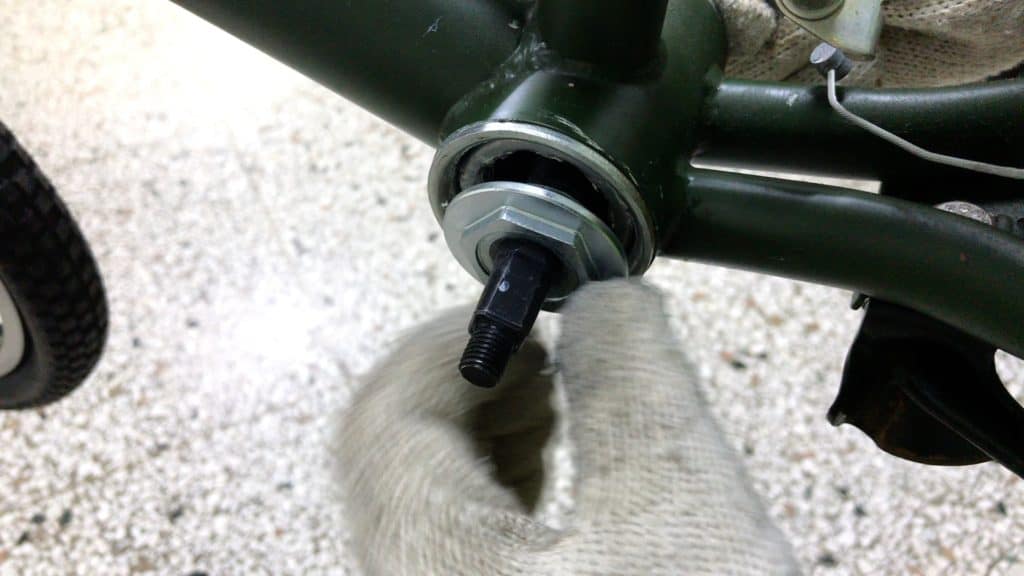
One Piece Crank Removal
An adjustable wrench is the right tool for this job.
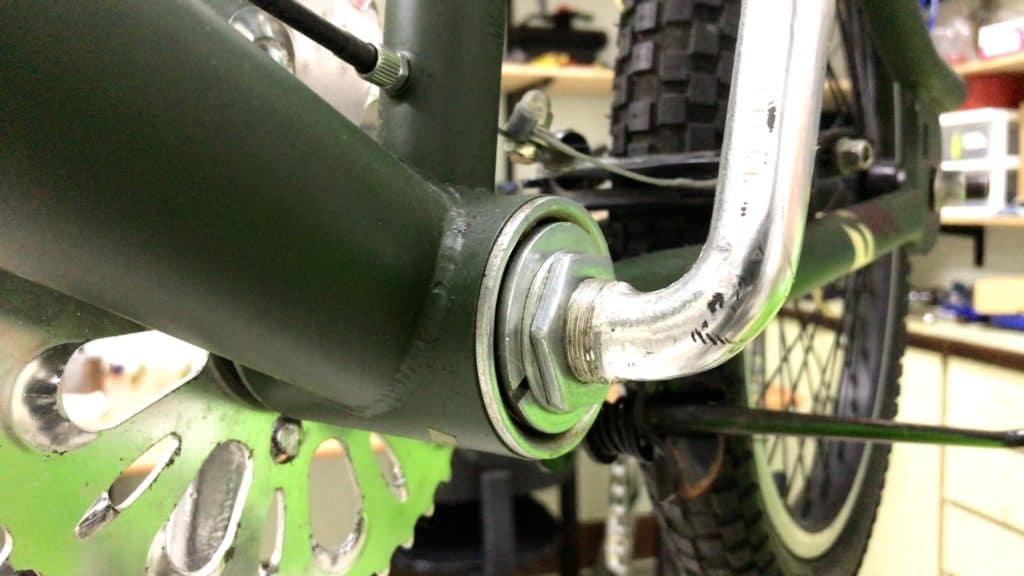
The locknut and bearing ring hold the crankset and bearing assembly together.
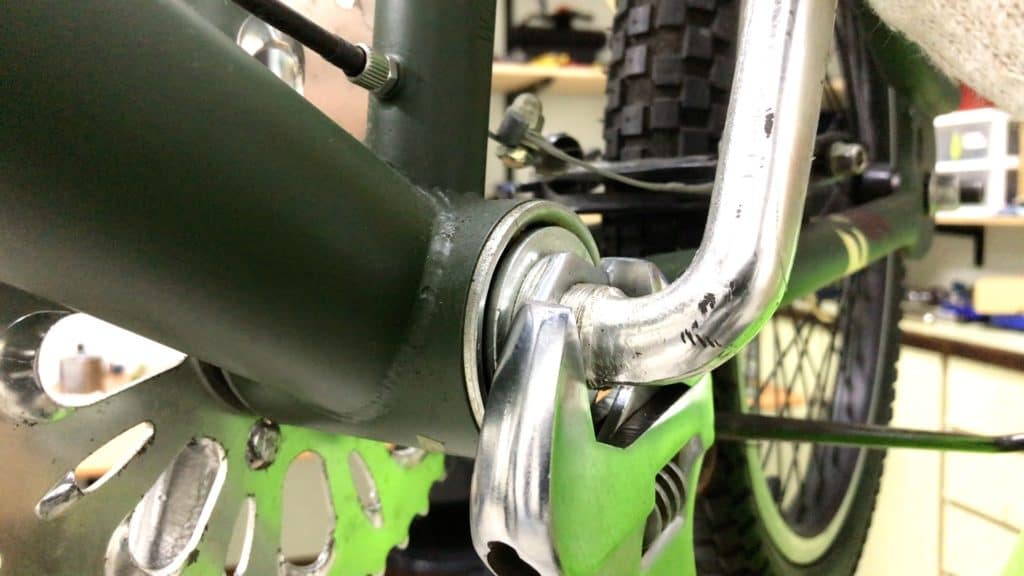
The wrench adjusts to fit both the locknut and the bearing ring.
Loosen then remove the lock ring and the washer separating it from the bearing ring.
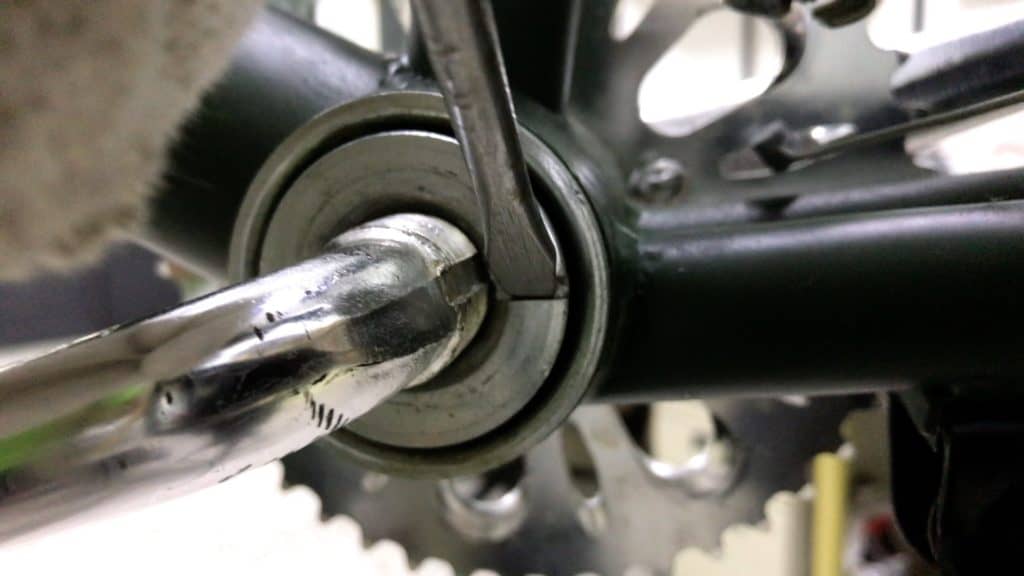
Use a standard or flat screwdriver plus a hammer to loosen the bearing ring.
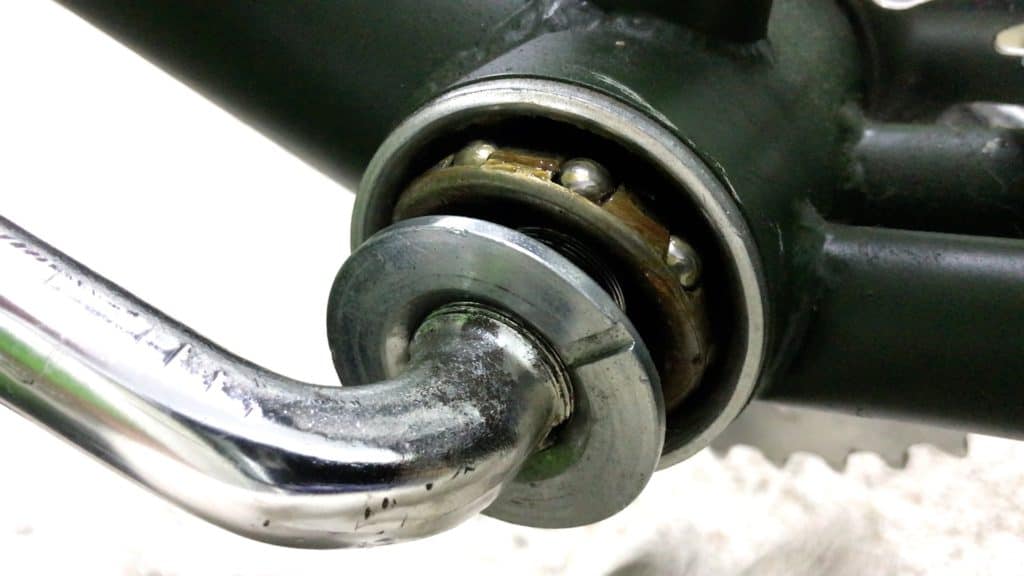
Position the screwdriver tip in the slot. A few light taps loosens the ring enough to remove it by hand.
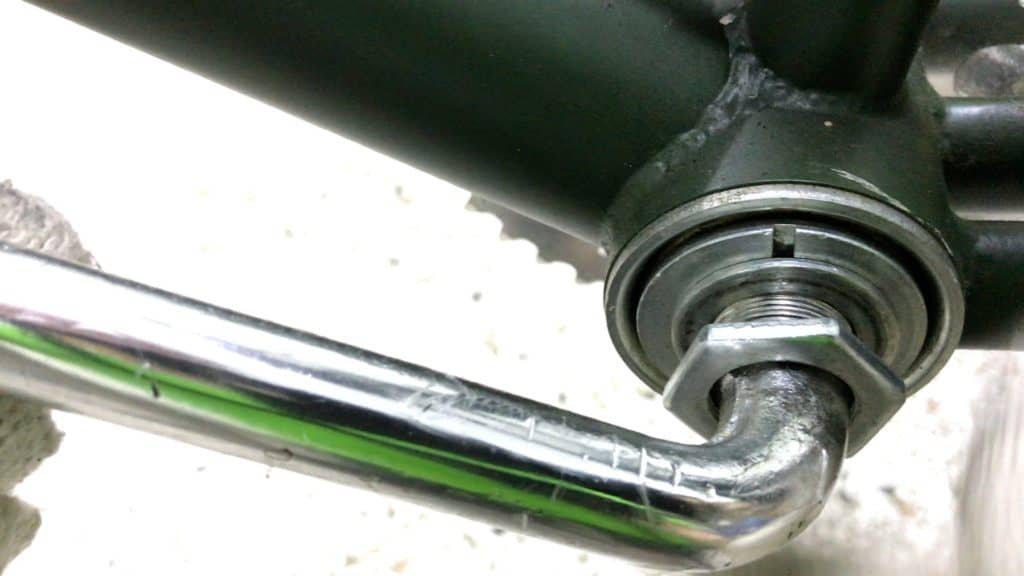
As you screw the bearing ring along the crank and spindle, the whole assemblage loosens.
Slide the bearing ring and the old bearing off the crank.
Then slide the crank along with the remaining bearing through the bottom bracket shell.
Mind the chainring during the process.
Don’t touch or impact the frame with a chainring tooth as you maneuver the crank’s left side bend through the bottom bracket shell.
If you have an old frame (with an old paint job), it probably doesn’t matter. But you don’t want to mess up painting and decals that are still in good condition.
BMX BOTTOM BRACKET INSTALLATION — SPINDLE & BEARINGS KIT
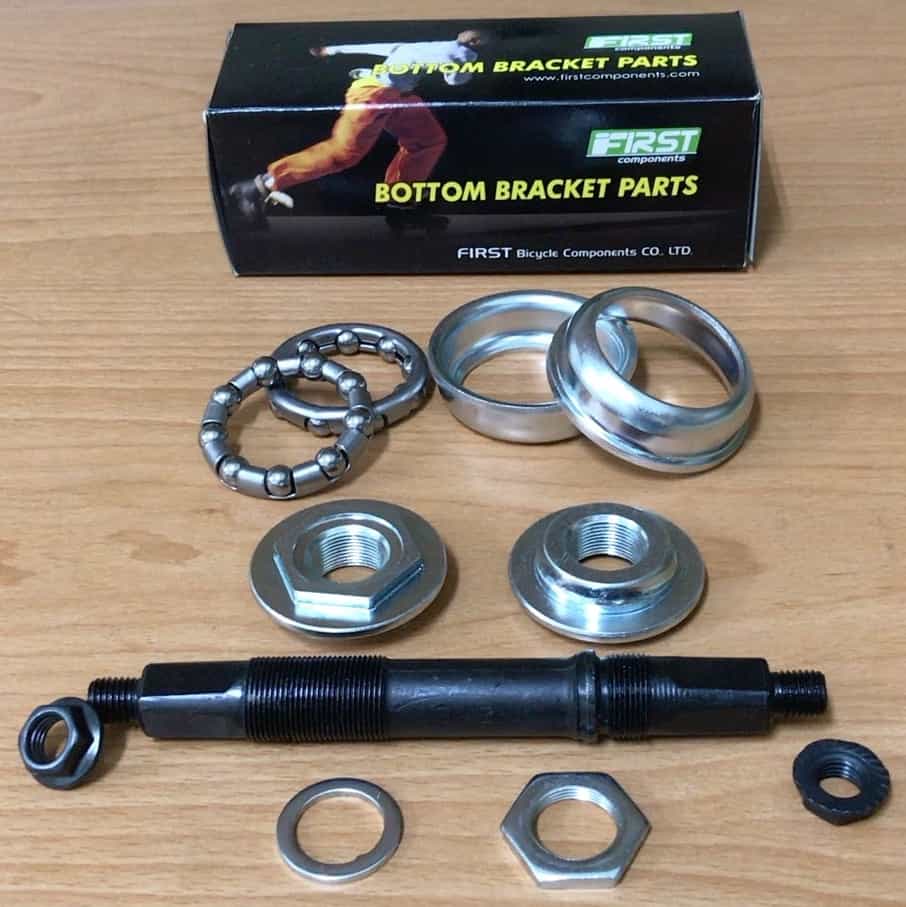
First up we’ll demo fitting a square taper spindle to the existing bearing setup.
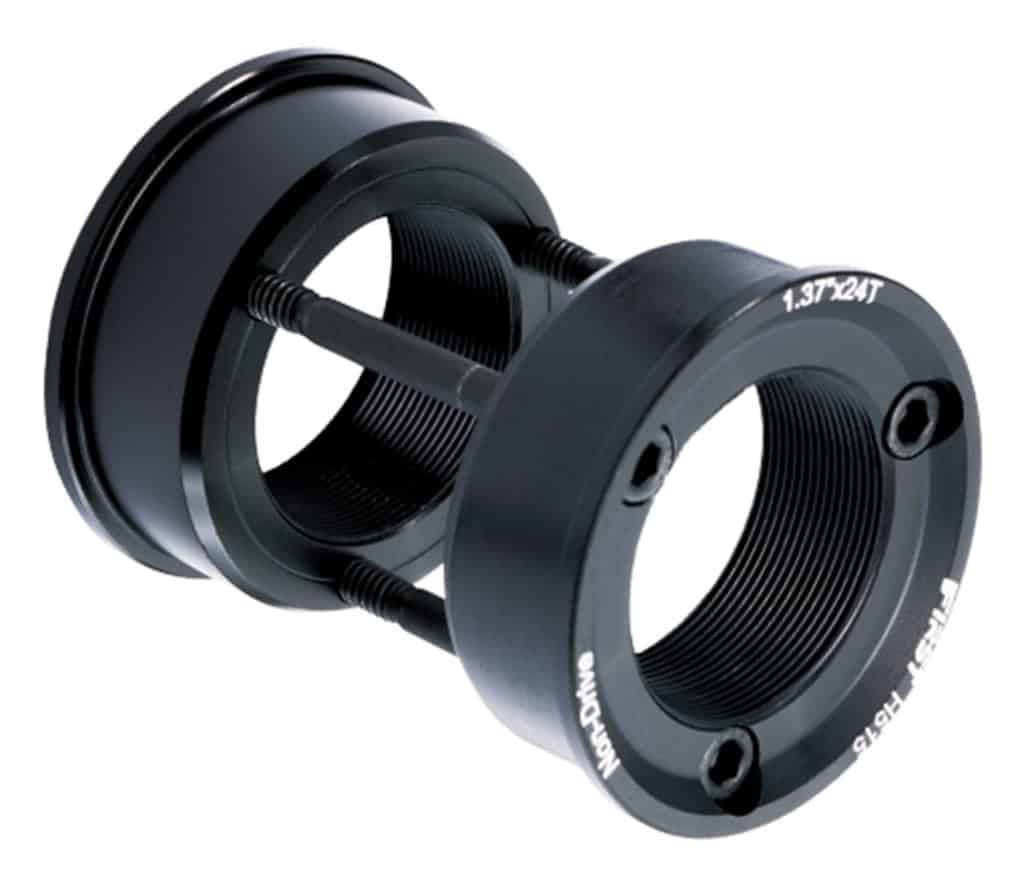
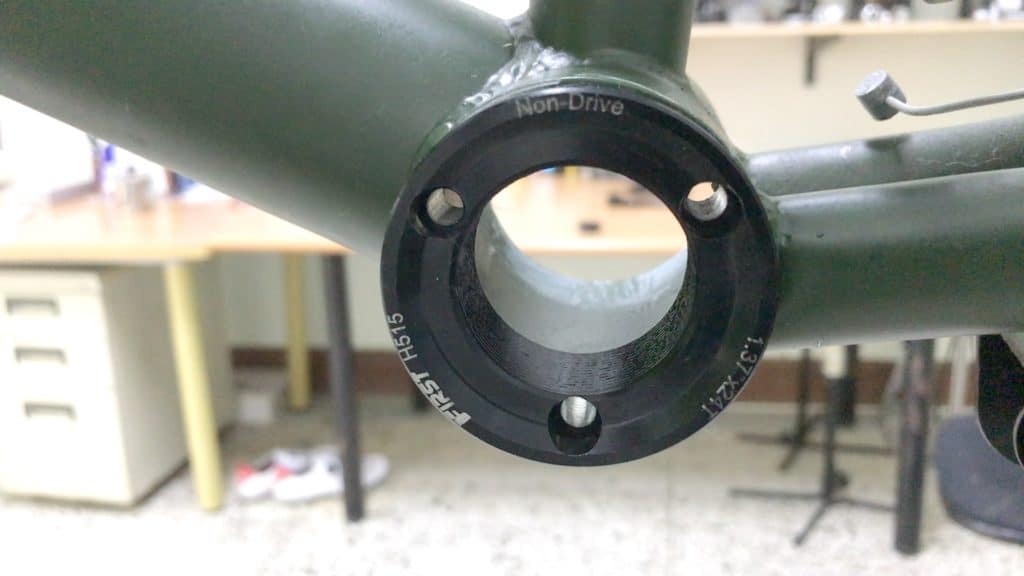
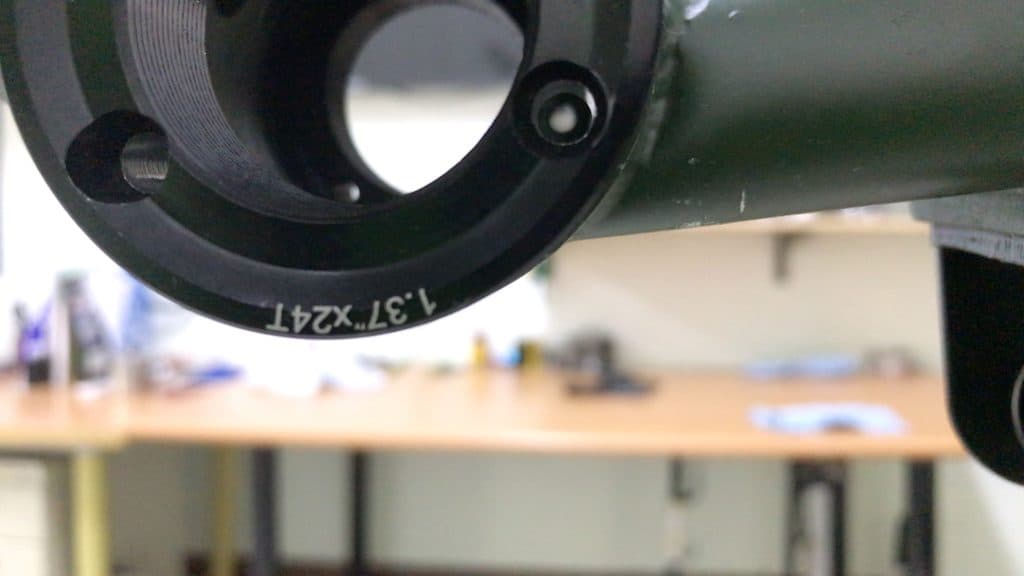
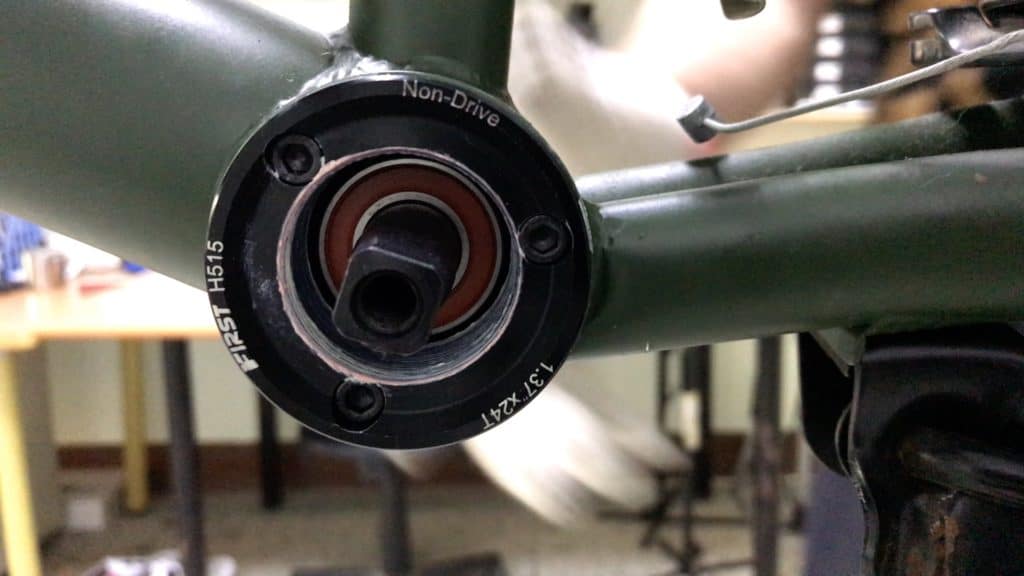
The second method uses First Components H515 press-fit adapter.
You install the (BSA compatible) adapter into the bottom bracket shell, then install a cartridge bottom bracket in the adapter.
(Check out the post on Bottom Bracket Conversion Kits.)
How the Spindle and Bearing Setup Works
You screw bearing rings onto the spindle thread, one on each side.
Each bearing cage rests against each bearing; the bearings rest against the bearing cups functioning as a bearing race.
Tightening the bearing rings holds the assemblage together and holds the bearings firmly against the race.
Adequately greased and maintained, these bearings will give years of reliable service.
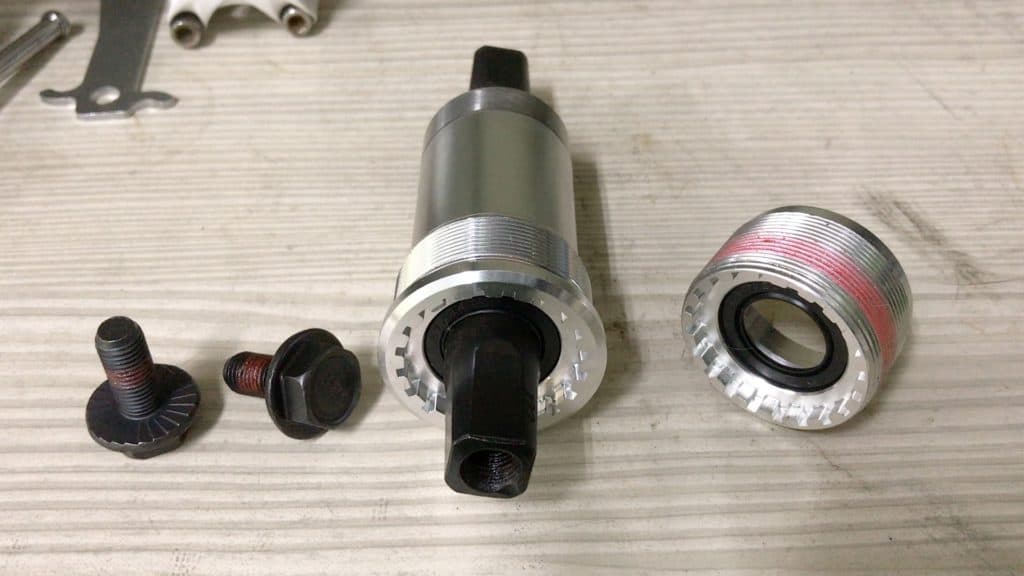
Bearing and Spindle Preparation
This is the bottom bracket kit we’ll be installing.
In what follows, I’ll lay out how everything fits together and the best way to go about it.
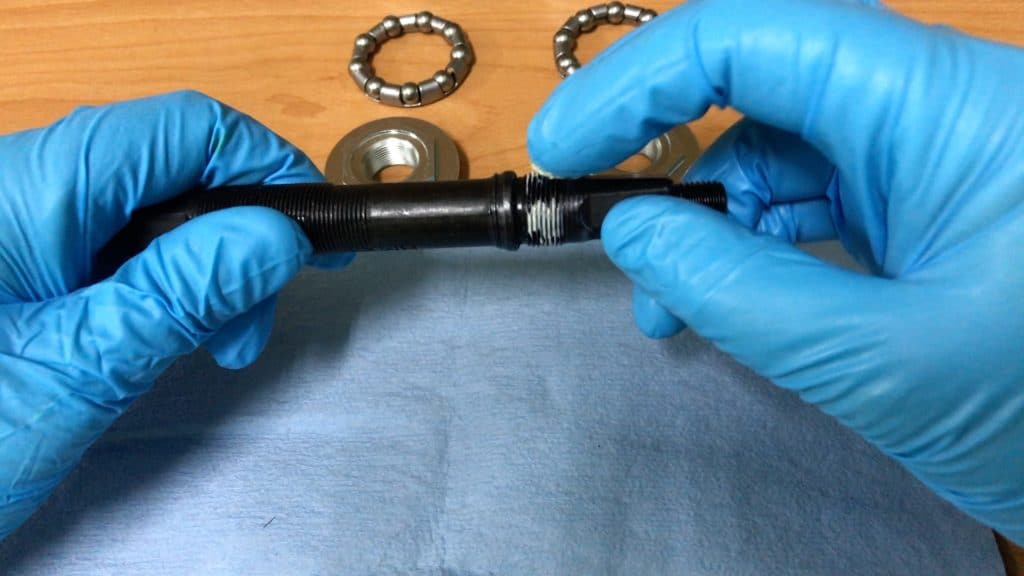
Start with the spindle’s drive side with a smear of grease on the threads.
Then screw the bearing ring onto the spindle.
Give the bearing cups a wipe to clear any old grease and dirt away.
These bearing cups are in very good condition so, although the bearing kit comes with new cups, there is no need to remove the old and install the new.
We’ll be replacing the bearings though with the ones from the kit.
Having cleaned the cups, apply a new coat of grease.
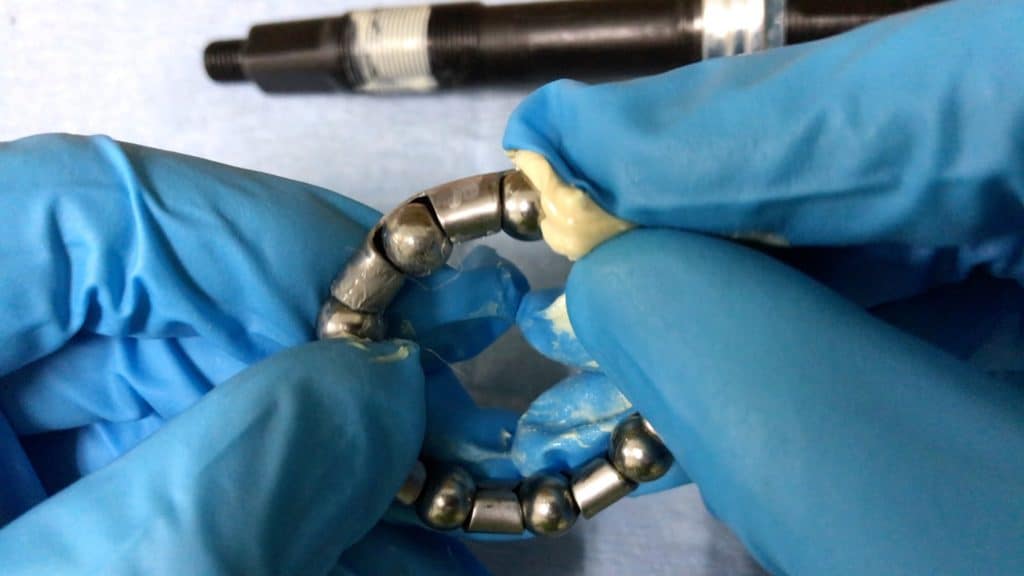
Apply plenty of grease to the bearing. Push the grease into the gap between the bearing cage and each bearing.
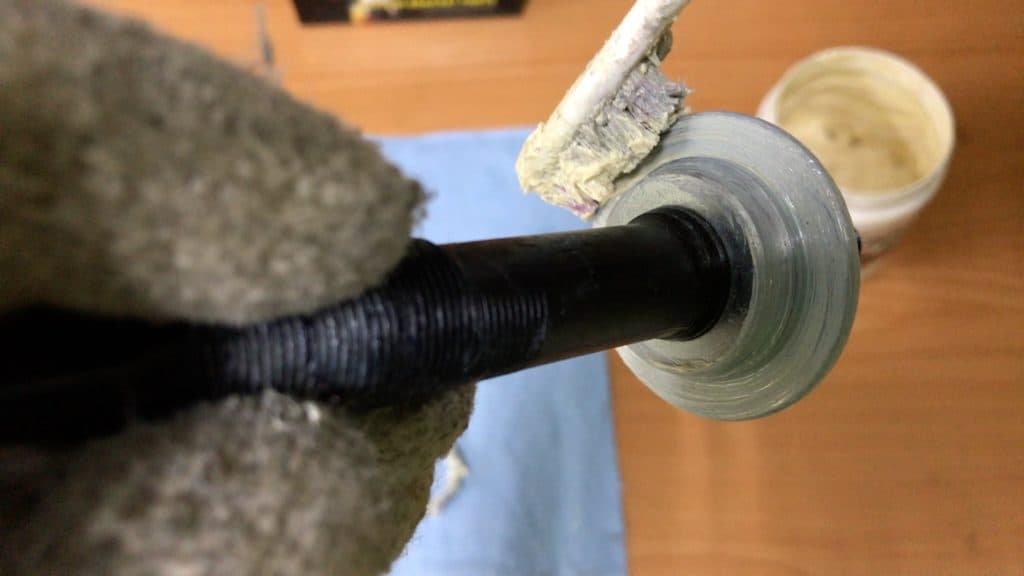
Grease the bearing ring you attached to the spindle earlier.
You should also grease the left, non-drive side bearing ring along with the spindle thread on that side.
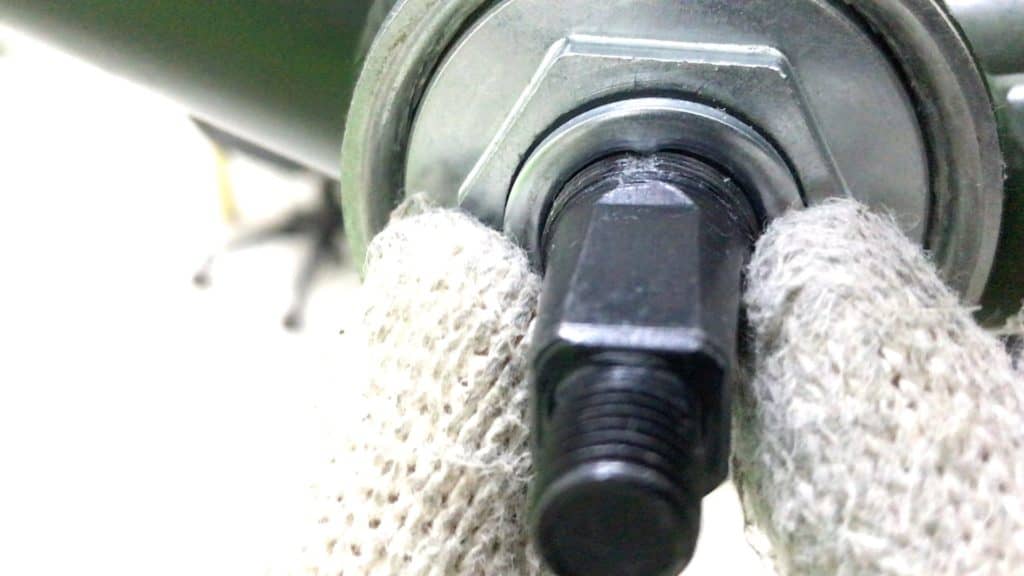
Bearings & Spindle Installation
Firstly install each side’s bearing into the bearing cup on that side.
Install the spindle with the bearing ring into the drive side.
Install the left bearing ring onto the spindle. Then begin to tighten it against the bearing.
Getting the balance between tightness and looseness here is important. If the ring is too tight, the bearing along with the spindle will not rotate freely.
If the ring is too loose there will be movement. A loose crank will place more stress on the bearings, causing premature wear. It will, minimally, be noisy to ride.
You can possibly get it right just using your hand. Best, though, to fine-tune the tightness using the crescent wrench. Make sure
- there’s no play
- the spindle is not too stiff when you turn it
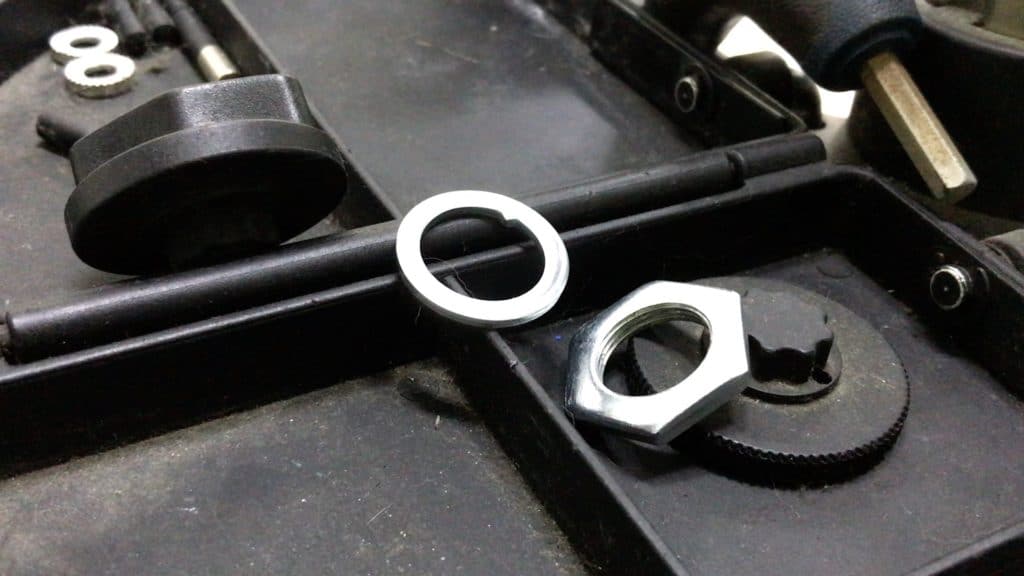
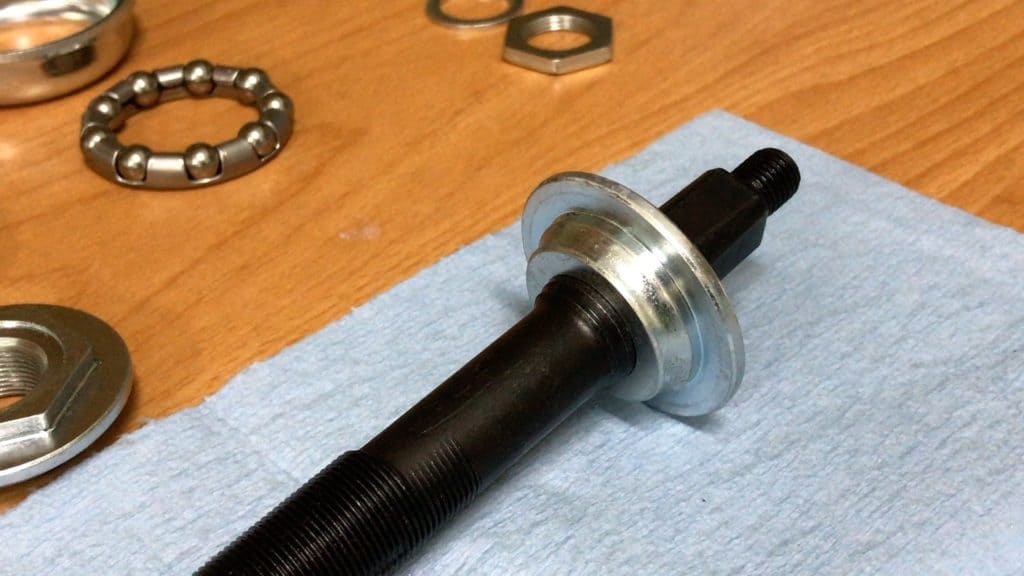
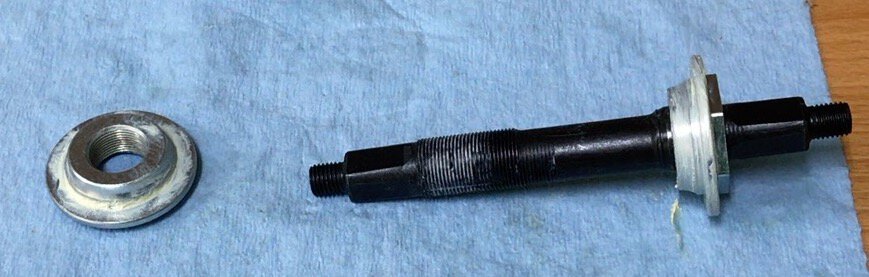
Washer and locknut installation completes the whole procedure.
The washer ‘s spur prevents it from rotating on the spindle. You will not be able to slide the washer into position unless you run the spur along the spindle’s corresponding groove.
Tightening the lock ring with a crescent wrench takes two wrenches. Or the correctly sized open-end wrenches
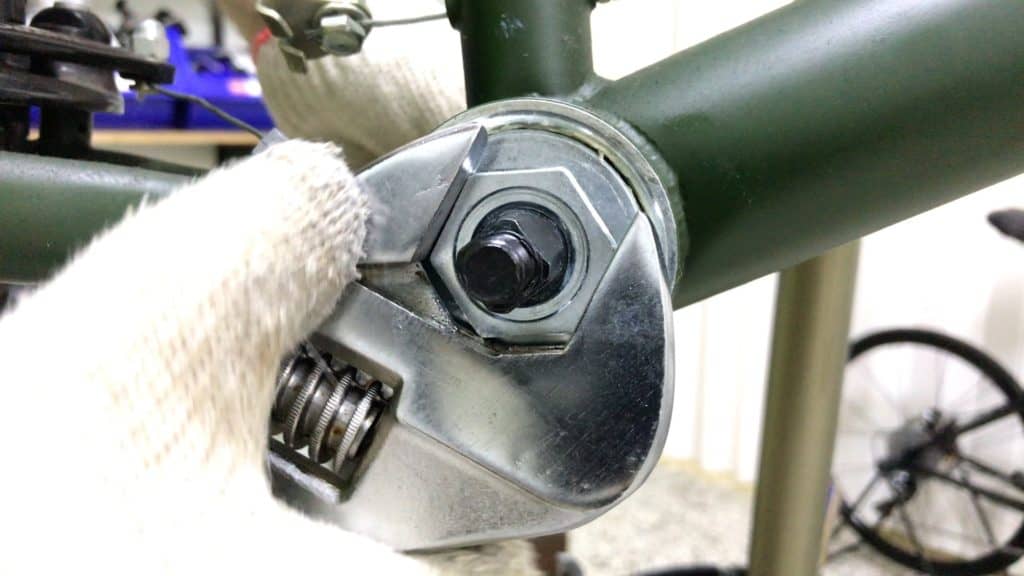
One wrench anchors the drive-side bearing ring.
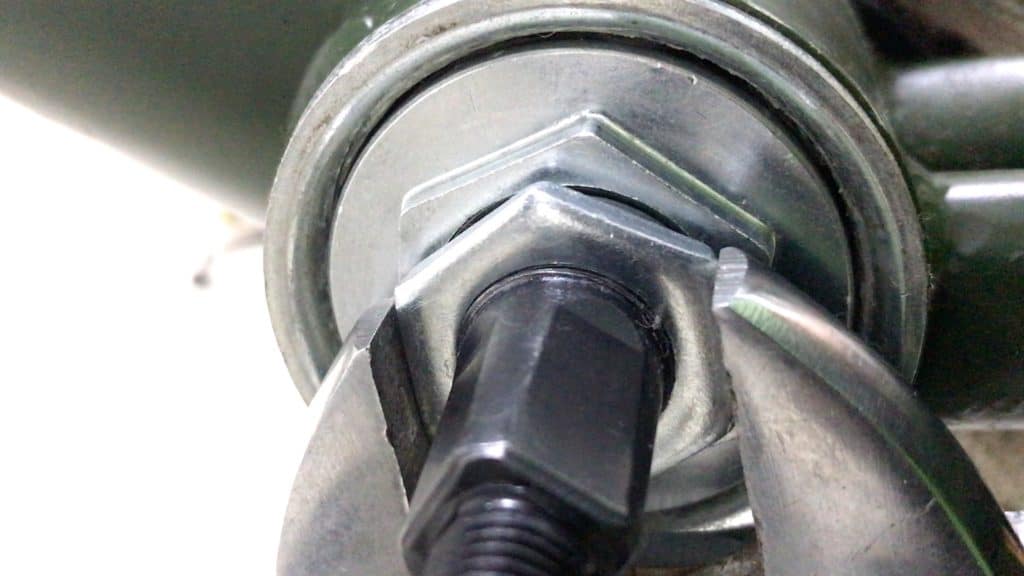
The non-drive side wrench tightens the lock ring against the washer.
Ideally you would have a cone or headset spanner able to slot onto the bearing ring hexagon (on the very inside) holding it in place.
Nevertheless you can get the locknut firmly secured with this method.
Regularly checking the crank and locknut for any looseness or play is a good habit to develop, by the way.
You’ll potentially save yourself lots of unnecessary bother through the years.
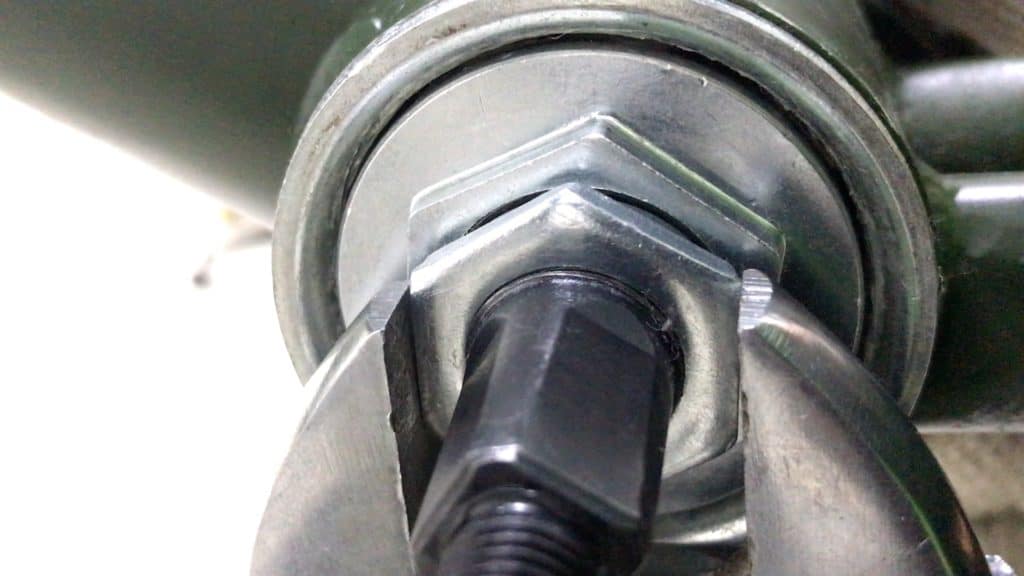
Crank Installation
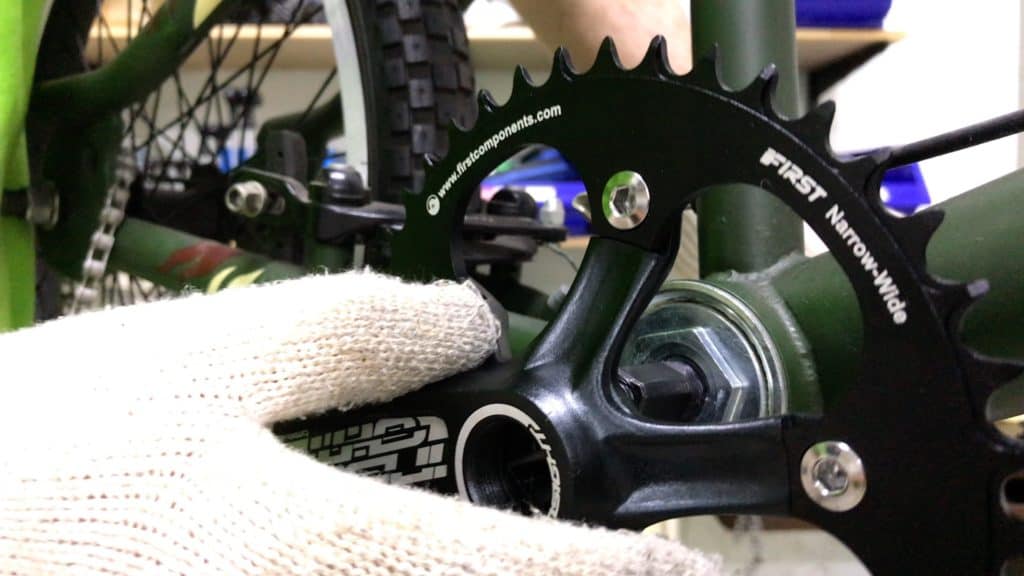
Slip the crank onto the spindle.
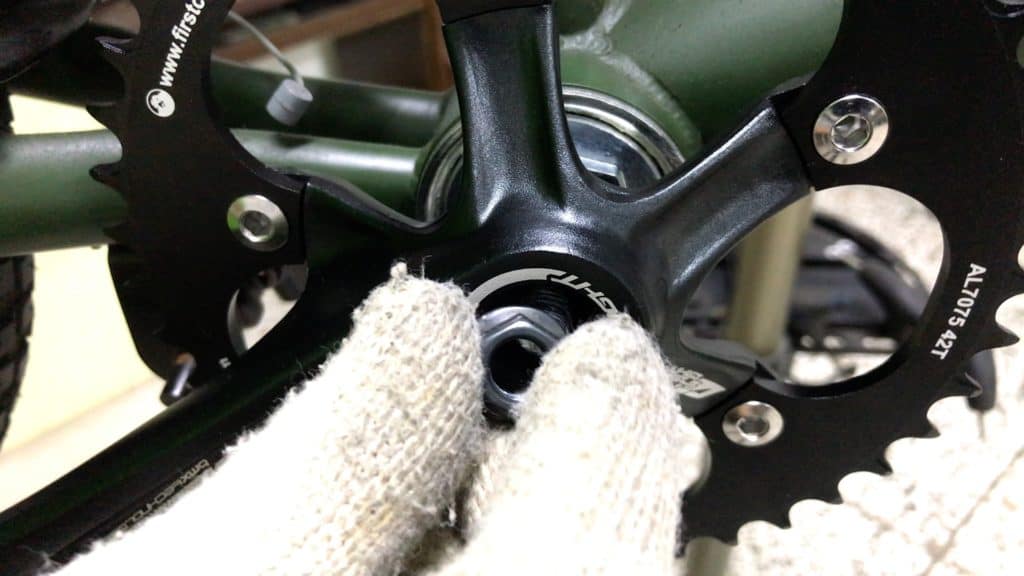
The crank bolts screw onto, not into (as with a cartridge bottom bracket), the spindle.
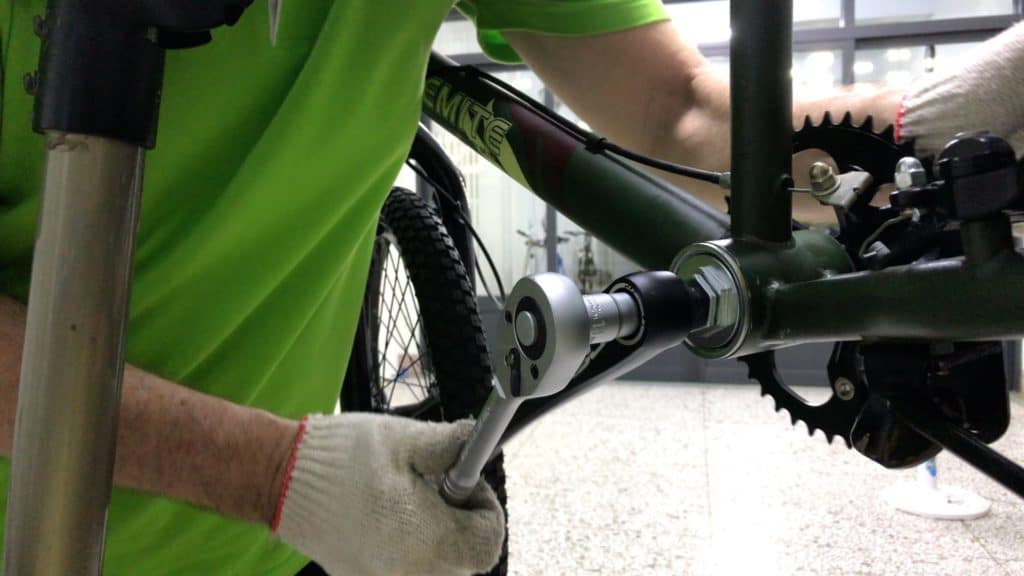
A 14 mm socket used with a socket wrench will get the bolts tight.
You’ll achieve a higher torque a lot easier with a longer-handled wrench, though.
Better still is a torque wrench set at around 48 Nm.
The bolts are unlikely to loosen at this setting.
Nevertheless, periodically check these bolts for any signs they might be working loose.
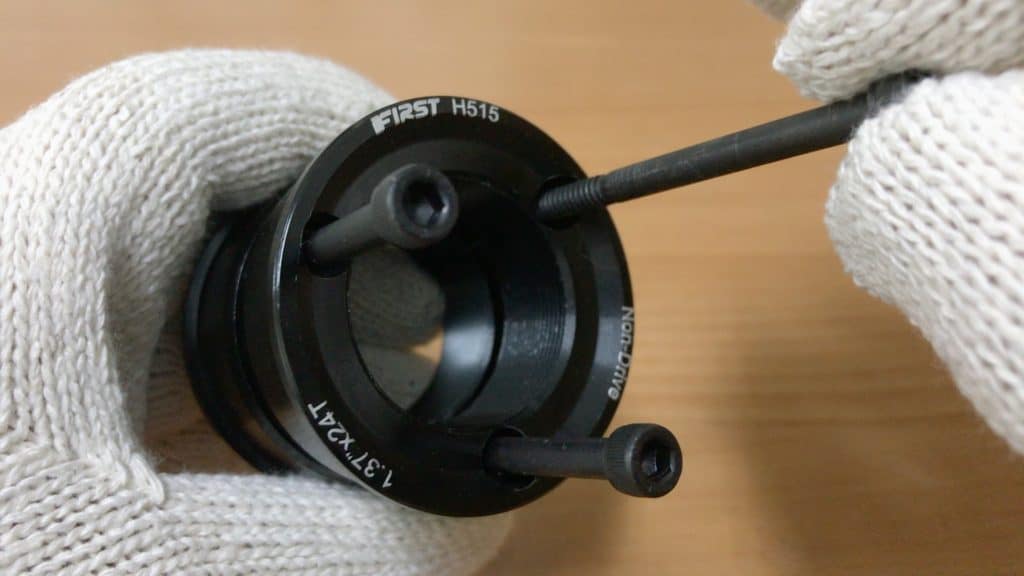
BMX BOTTOM BRACKET INSTALLATION — H515 ADAPTER & CARTRIDGE BB
In the second BMX one piece bottom bracket and crankset upgrade method, we’ll firstly install this adapter, designed to fit an American BMX BB shell.
This standard cartridge bottom bracket fits into the adapter just as it would an English threaded (BSA) bottom bracket.
Complete the setup by installing the cranks as above.
Preparing the Adapter
The adapter works through being pressed into the bottom bracket cups.
This may sound like a press-fit type of solution. Whilst this is not strictly speaking press fit, it works in a similar way. The difference is the fit is not so tight.
The bolts thread into the drive-side cup. Upon tightening, the cups are pulled into the BB shell.
Removal is exactly the same as bearing cup removals, which we’ll look at in the next section.
Preparing the H515 adapter requires removing each bolt.

This adapter is disassembled, ready to be installed.
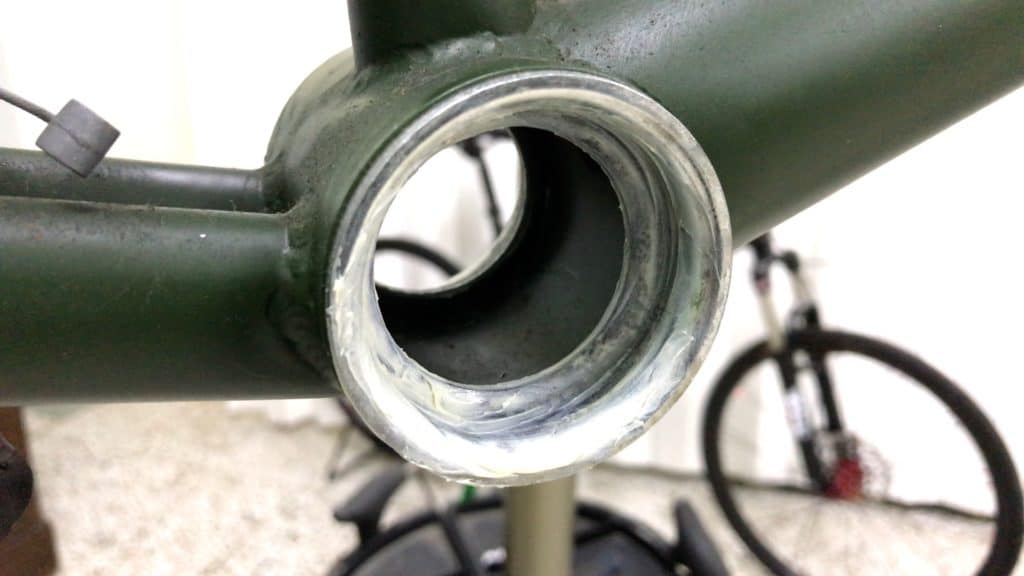
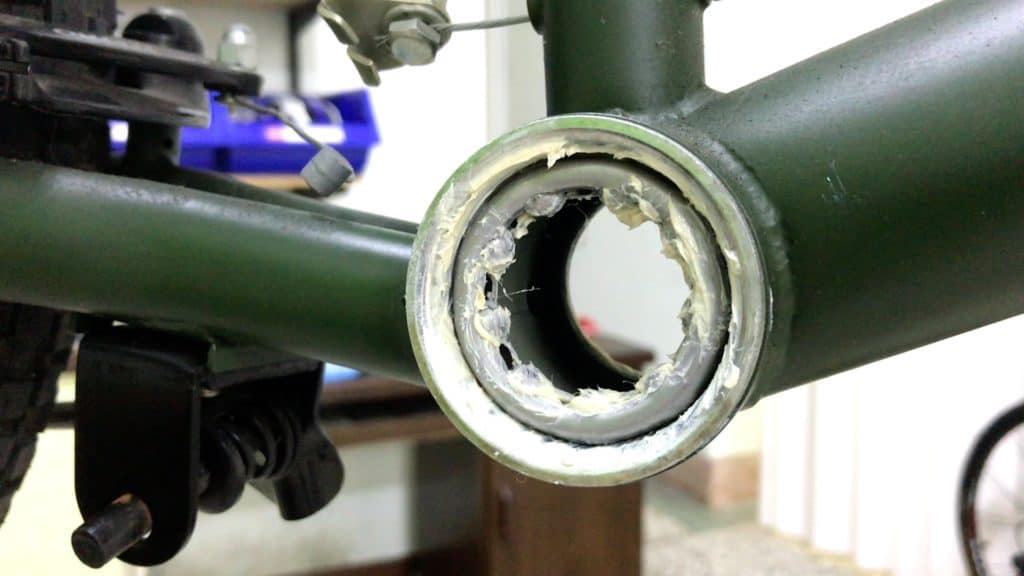
Before we can go ahead with the installation, the bearing cups must be removed.
Bearing Cup Removal
Imagine we’ve returned to the point of having removed the one piece crank and bearings.
Because the adapter sits in the BB shell with the bb cartridge inside it, the bearing cups must be removed to make way for the cups.
A long screwdriver with a hammer would do, or a sufficiently long cold chisel.
Apply force in a circular motion from the opposite side, through the bb shell, on the inside surface.
A few taps at one point. Then move clockwise, or counter-clockwise applying similar force at various points all the way around.
Keep going until the the cup pops, or drops, out.
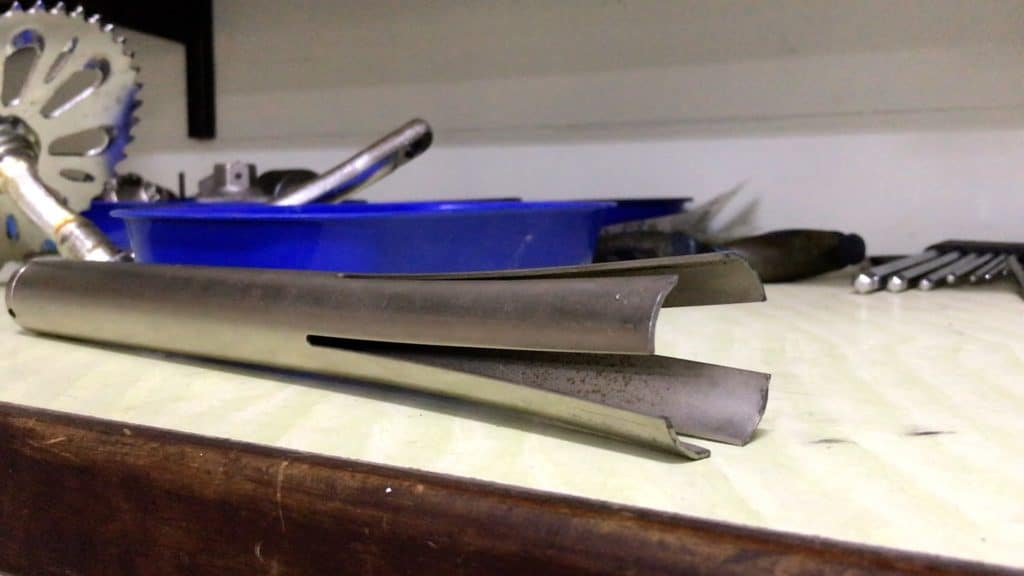
The best tool to use is a bearing cup removal tool.
This one is for removing semi-integrated headset bearing cups—fits perfectly, great for the job.
A press-fit bottom bracket removal tool such as offered by Park Tool will also do the job.
This tool’s advantage is in the even pressure applied across the bearing cup.
The blades contract into the BB shell as you draw the tool in. Then they snap open as they pass beyond the bearing cup’s inside edge, locking into the bearing cup’s inside circumference.
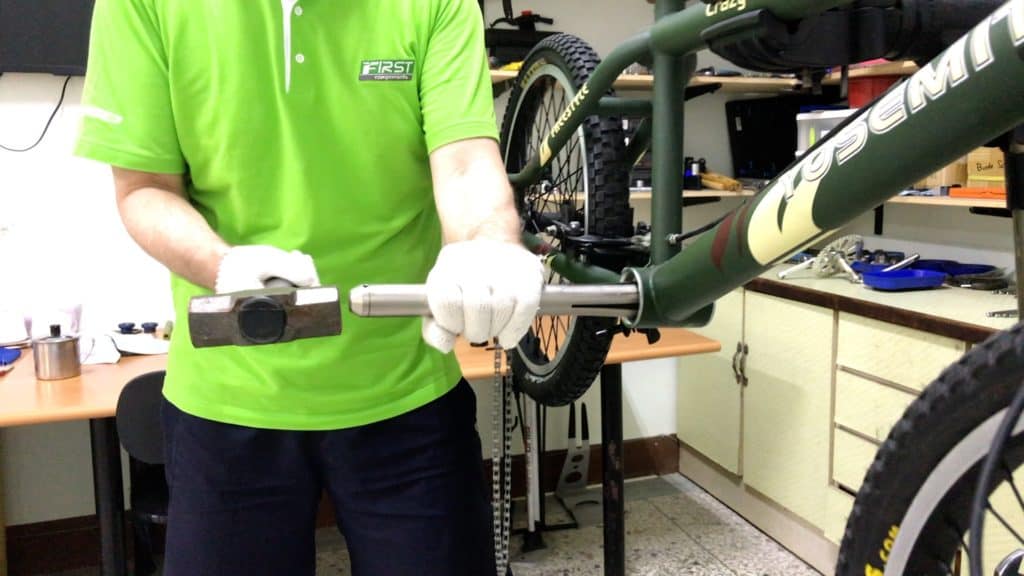
Bearing cups are firmly anchored inside the BB shell, so a heavy hammer providing solid contact means controlled blows accurately delivered.
Unlike the earlier method of tapping successively right around the circumference one point at a time, the tool’s blades simultaneously contact more than 50% of the inside surface.
A solid hit moves the whole bearing cup out several millimeters at a time. Two or three blasts the cup right out of the shell.
Installing Adapter Cups
Install the non-drive side cup first.
The bolts thread through into the drive side—you will need to line up the drive side holes with the non-drive side.
With a smear of grease in the BB shell, you can push the cup in a few millimeters with very little resistance.
Use a rubber mallet or a light hammer over a piece of towel or padding to protect the bearing cup surface. Tap the cup into place.
Place the drive-side bearing cup in the BB shell in the same way.
Push the cup a little way in, but not too far, so you can still rotate it left or right.
Line the threaded holes up with the non-threaded holes on the other side and rotate to get them more or less right.
When you push the first bolt through and begin to screw it into the drive-side cup, it may seize.
This means the holes are not quite aligned: the bolt is not square to the drive-side hole. Adjust as necessary and continue until the bolt is almost completely in place.
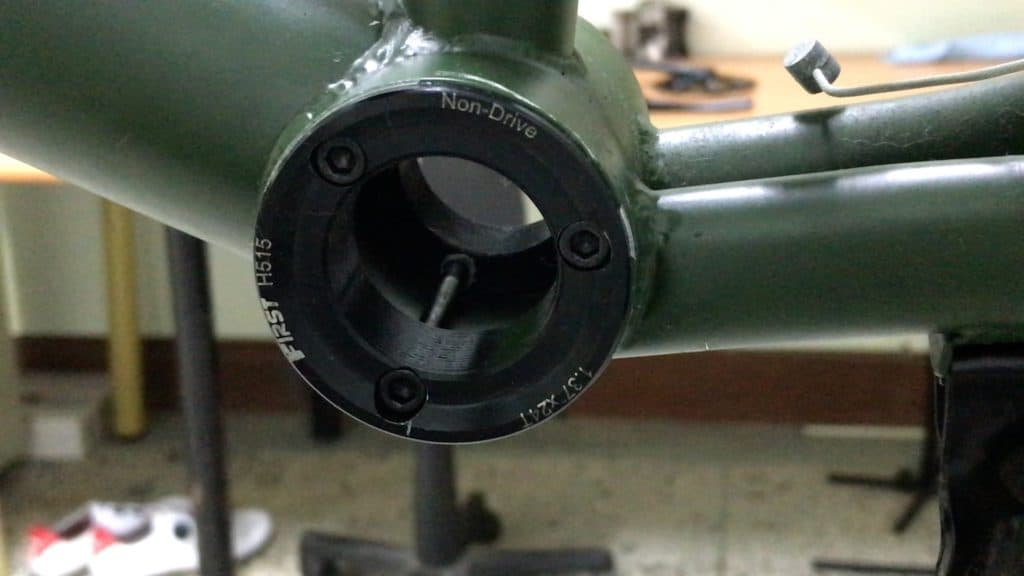
Put the other bolts in place, then tighten all bolts with a 4 mm Allen wrench. This pulls both cups all the way into the BB shell.
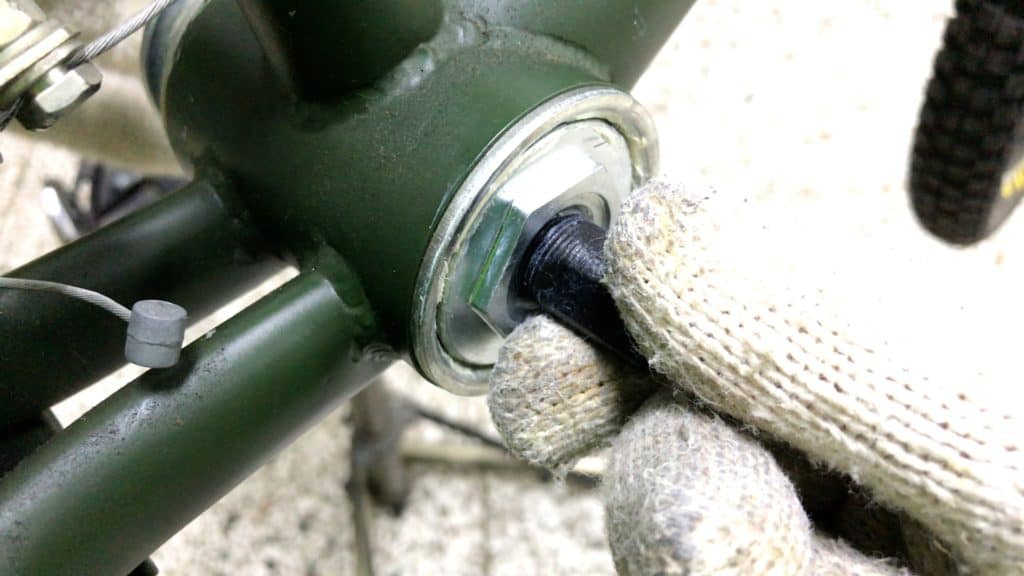
Installing the Cartridge Bottom Bracket
Grease the cartridge bottom bracket threads, the lock ring, along with the crank bolts.
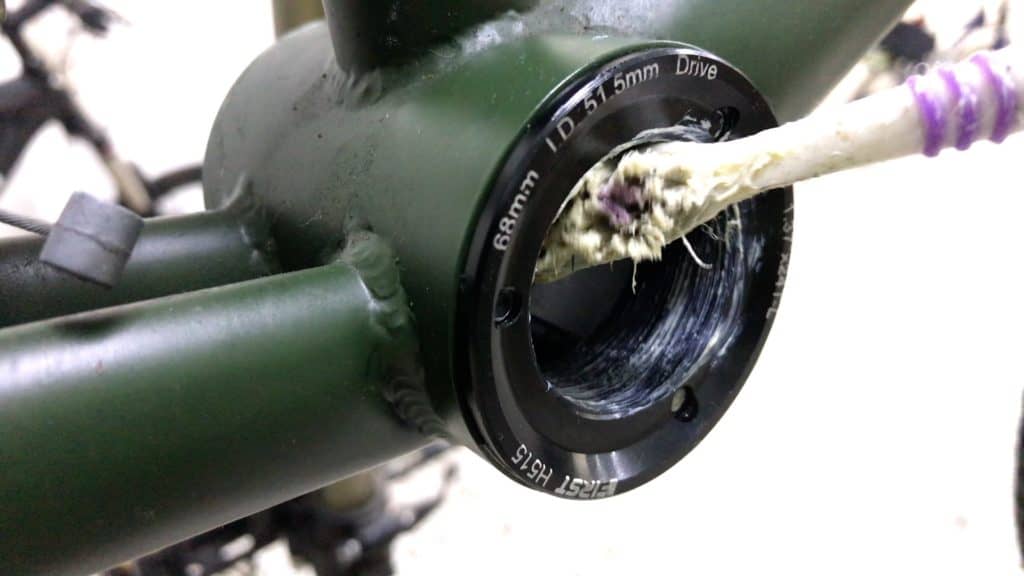
Grease the adapter cup threads as well. A light smear is all you need.

Screw the cartridge body in from the drive side.
As with any threaded bottom bracket, avoid cross-threading. Ensure the cartridge is sitting perfectly in the the adapter threads.
Once the cartridge is finger-tight, screw the lockring into the non-drive side until it is also finger tight.
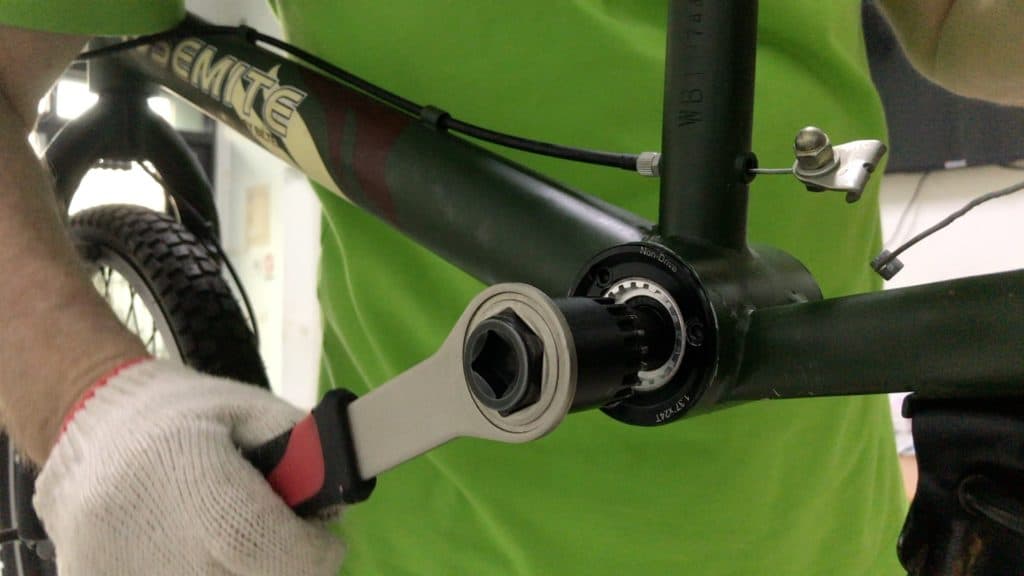
Tighten as much you can. Avoid exceeding 50 Nm, an extremely high torque anyway. You’ll unlikely you’ll get past 45 Nm except with a long-handled wrench.
With the cranks slipped over the cartridge spindle’s tapered ends, secure the crank bolts and tighten. 50 Nm is also the limit.
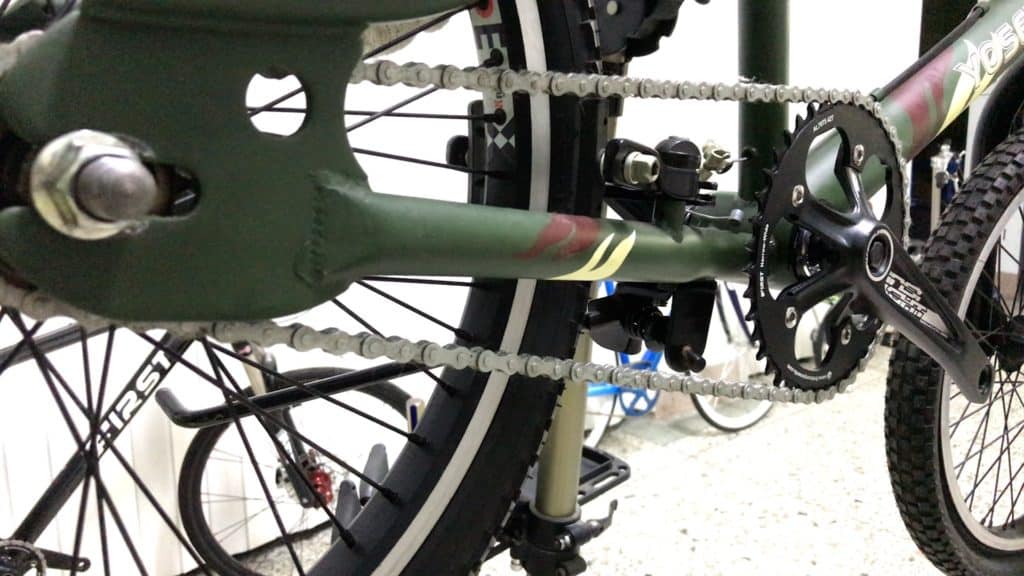
Replace the chain, tighten and align the rear wheel. Tighten the wheel bolts.
Congratulations!
You or your customer now have a robust new bottom bracket and crank setup.
You’ll find this 3 piece setup lighter as well as easy to maintain.
1 thought on “BMX Bottom Bracket & Crankset – From 1 Piece to 3 Piece (2 Techniques)”
How can I learn more about doing this?
I want to remove the integrated Prowheel crankset/triple chainring that is “all in one” – that came on my “Vilano Diverse 3.0” Hybrid bike.
The triple rings now riveted on the 104/64 BCD spider and whatever BB is used – just suck. I want components that can be swapped out individually.
I would like to keep the Prowheel 170mm taper fit cranks, but take out the rest of the BB bearing junk and those riveted triple chainring assemblies – and then replace all of that with replaceable individual components. Maybe the 4-arm spider can be reused – but if not – replace it too!
I am OK staying with the current BCD of 104/64 mm – and am thinking about using 48T/34T/24T gear chainrings (and also meed a guard of some kind).
Everyone I have talked to so far at other online sources is saying “go to a bike shop” – and refuses to give any real encouragement or help.
We had a great LBS 20 yrs ago in our area – and back then I bought my Trek road bikes and my Klein MTB. I wish I still had those bikes now! But that was many years ago and I was younger and a bit more fit.
Anywsy – the 2 shops we have in driving distance now are rip offs – and do not give out any info. Very sad in the people skills dept.
I have most of the tools for all bike maintenance and I will buy the ones I don’t have. I am also meticulous about detail. I truly believe that I could DIY this nicely – if just given the instruction.
Your site seems perfect and refreshingly friendly as a help.
So to sum it up for you: I want to buy an excellent conversion consisting of a sealed cartridge bearing BB that can attach to a spider, triple rings, using my cranks, (and a new chain) to make my 3×8 a very fine and smooth machine.
Could you tell me if this is what your article is about? I enjoyed reading your information.
Thank you!!