Is the advent of the press fit bottom bracket the most sorry chapter in the history of BB design?
Some would say yes.
Without a doubt.
Others are more forgiving to the point of swearing that press fit is the ultimate system.
Conversations can become heated, at any rate.
Laying out the evolution of the press fit bottom bracket from its introduction in the mid 2000s, I list and describe the main brand interpretation of the PFBB standard since then.
Press fit is probably here to stay—but the future may well belong to threaded designs as threads make a comeback in the form of T47.
CONTENTS
- From Threads to Press Fit
- Press Fit Bottom Bracket Types
- What’s Wrong with the Press Fit Bottom Bracket?
- Installing a Press Fit Bottom Bracket
- Removing a Press Fit Bottom Bracket
- When Should you Replace a Press Fit Bottom Bracket?
- Can You Replace a Press Fit Bottom Bracket with a Threaded BB?
FROM THREADS TO PRESS FIT
In the beginning, there were threads.

Threads are yet another engineering wonder we can thank the Ancient Greeks for.
Two helically extended surfaces slides against each other—friction locks them together. (A little grease between the surfaces ensures they can be unlocked of course…).
A simple, and efficient, marvel of engineering.
Thus, threads cut into a bottom bracket bearing cup, or cartridge, match those cut into the bottom bracket shell; both sides slide together in perfect harmony.
The thread-less press fit concept had precursors in headset design and one-piece cranks.
Headset bearing installation and later, maintenance, was made easy when all bearings were contained in cups pressed into the head tube.
Removing the threads from the bike frame’s bottom bracket shell in order to fit a cup was clearly the next step to take—probably inevitable you might say.
And once the first press fit bottom bracket revolution commenced (BB30), there was an explosion of standards with new designs appearing at least every other year.
Press Fit Rules on Mid to High End
Press fit bottom brackets together with threaded BBs make up the majority of BBs on bikes.
Across the board (city, commuting, trekking, cargo, kids, entry level road and mtb) threads rule.
But on mid to high end road bikes, the press fit bottom bracket rules.
Press fit bottom brackets were the great innovation.
The trouble is, an engineer’s ‘innovation’ is more often than not a cyclist’s “Noooo….come on. Get real!” lament.
Creative engineers are necessary. But even more necessary are engineers tuned into cyclists’ needs and—more important again—their wants.
Consumers buy what they want more than what they need.
As the T47 threaded standard steadily gains support from the big brands, though, the wheel has literally almost come full circle.
PRESS FIT BOTTOM BRACKET TYPES
Cannondale was the first brand to bring a press fit bottom bracket to market in 2006 in the form of BB30.
Playing catch-up, as well as striving to recitfy BB30’s flaws, a bunch of other brands went on a development spree, resulting in a diverse group of press fit BB solutions hitting the market over the next few years.
Press fit bottom bracket standards can be divided into two groups:
- sealed bearings installed directly into the BB shell (5 standards)
- sealed bearings installed in cups which are then installed into the BB shell (5 standards)
Bearings Directly Installed
The press fit bottom bracket designs into which sealed bearings are directly installed into the BB all use a C-clip to retain and square the bearing inside the BB shell apart from Trek’s BB90/95.
With a C-clip
- BB30
- BB30A & BB30-83 Ai
- OSBB (Road),
- BB Right (Direct fit),
Without a C-clip
- BB90/95
BB30’s subsequent bad press centered on the the creaking reported by many cyclists
The key consideration is correct installation, which depends a clean install.
The BB shell and each component must be spotless: not a spec of direct; not a grain; nothing.
If the specifications on the initial factory install were not strictly within tolerance (and tolerances are extremely tight with press fit bottom brackets compared to threaded models), then there will be problems out of the gate.
Otherwise a strict standard of cleanliness must be observed on all maintenance, from routine re-greasing to changing sealed bearings.
Then adequate amounts of grease or loctite hopefully eliminate the
Of course, dirt gets in and grease deteriorates over time.
So any owner of a bike using direct fit press fit bearings should be prepared to follow a regular maintenance regime.
Purchasing the dedicated tools and getting DIY experience in all aspects of maintenance will pay huge dividends. (Or if not DIY, a local bike shop….either way, maintenance is crucial).
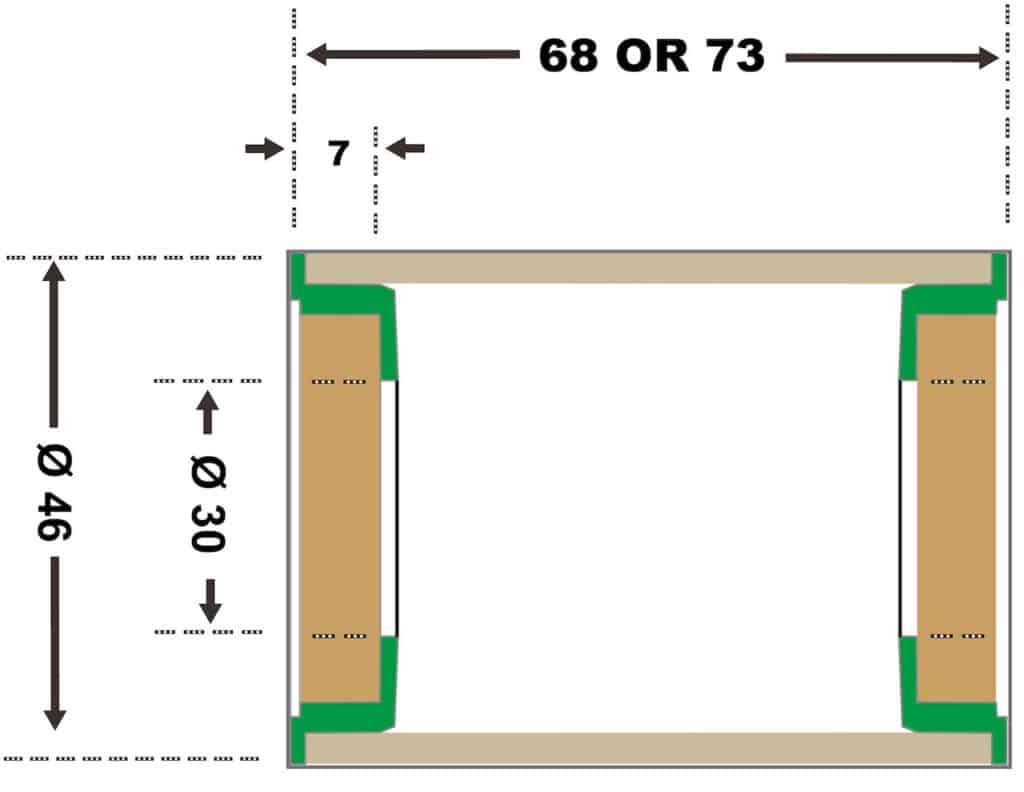
BB30
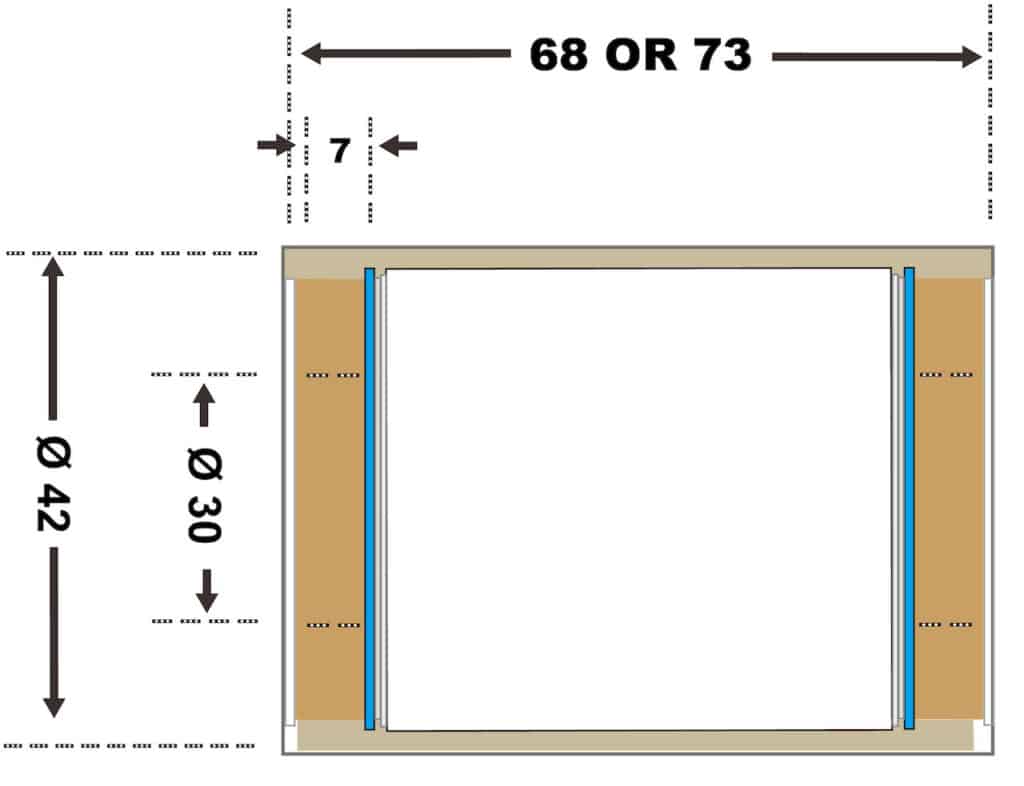
- 30mm diameter spindle
- 68mm wide BB (road)
- 73mm wide BB (mtb)
- 42mm BB shell internal diameter
- 7mm wide sealed bearing
The key benefit was the introduction of a 30mm spindle which delivered a lighter and stiffer crank compared with 24mm.
A 30mm diameter spindle resists twisting and distortion much more than a 24mm diameter spindle.
Increasing the BB shell’s internal diameter to 42mm also allowed much larger down tubes and seat tubes.
Bringing the bearings back inside the bottom bracket also made a smaller Q factor possible, depending on crank design.
However, sealed bearings that are not retained in a cup will inevitably move under the huge stress placed on BB shells and bottom brackets.
The solution was to bring back bearing cups.
BB30A & BB30-83 A
Cannondale’s BB30A (A=‘asymmetric’) employs a BB shell that’s 5mm wider than BB30 on the driveside—an asymmetrical standard (BB30A: A=‘asymmetric’) that allows for wider spaced bearings and aims for enhanced spindle support.
BB30-83 A increases BB shell width to 83mm.
BB30, asymmetric or otherwise, has been a controversial standard from the start with no shortage of both advocates and detractors—overcoming the disadvantages of ‘unsecured’ bearings installed directly into the bottom bracket shell is a tricky business.
BB90/95
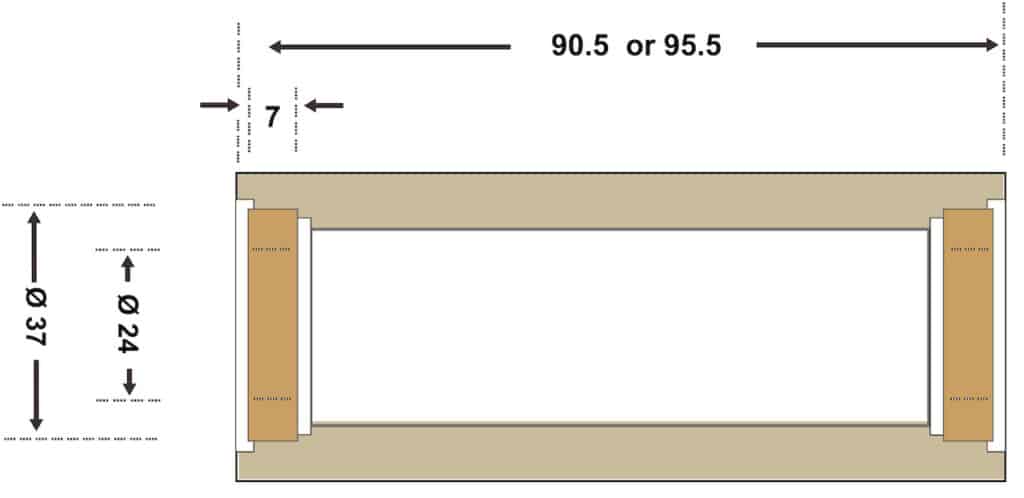
- 24mm diameter spindle
- 90mm wide BB (road)
- 95mm wide BB (mtb)
- 37mm internal diameter BB shell
- 7mm wide sealed bearing
Hot on the heels of Cannondale’s 2006 BB30 innovation,Trek delivered their own press fit bottom bracket standard to the market the following year.
The super-wide moulded carbon BB shell allowing for super-sized down tubes and seat tubes gave us the beefy bottom brackets that defined the revolution in carbon throughout the latter part of the noughties.
An advanced carbon frame design was monocoque (most others were lugged carbon) with an oversized bottom bracket.
(You might remember alloy frames similarly adopting oversized down tubes—although alloy made it impractical to reproduce the OS bottom bracket, for a short time carbon seat stays were popular)
The BB shell internal diameter can be thought of as a compromise between BB30’s 42mm and the old ‘BSA’ standard of 34mm.
There’s no room for a 30mm diameter spindle; but the all-carbon construction allows maximum frame stiffness where it counts the most.
Reduced distortion in the BB region channels energy that would otherwise dissipate into the ether, into extra watts for the drivetrain.
In a sign of the times, Trek has abandoned press fit on the Domane and returned to threaded in the form of T47 which gives you beefy tubes and large bearings without the usual press fit bottom bracket headaches. (And there is no shortage of cyclists and mechanics alike celebrating this development).
A useful examination of BB90 in the context of changing the sealed bearings:
OSBB (Road)
Specialized’s version of BB30 to be distinguished from the other OSBB version produced for mountain bikes, which is actually a form of PF30 (see below).
BBRight (Direct fit)
Four years after BB30’s debut in 2006, Cervelo introduced the BBRight standard having asymmetry as its organizing principle.
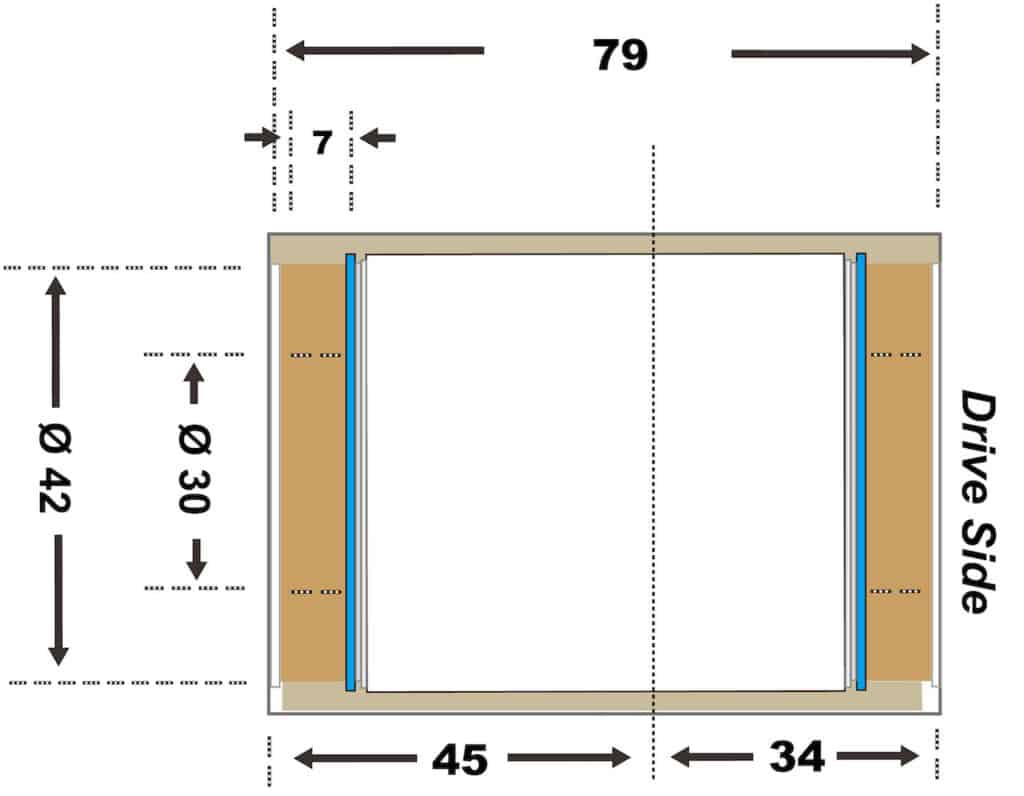
- 30mm diameter spindle
- 79mm wide BB shell (road)
- 42mm BB shell internal diameter
- 7mm wide sealed bearing
The distinctive feature is the 11mm added to the non-drive side—(see discussion below).
Bearings in Cups
You would think retaining or ‘bracing’ sealed bearings in cups would solve the problem of movement and thus noise.
After all, outboard bearing BBs, the design immediately preceding press fit BBs, were mounted in rock-solid cups.
The difference is the threads: threaded cups lock to threaded BB shells, and movement only occurs if threads are stripped (due to incorrect initial installation or a botched maintenance install).
I’ll cover that issue in the next section.
The press fit bottom bracket models using cups with pre-installed sealed bearings are:
PF30, BB86/92, OSBB (Mountain), BBRight (press fit), BB386 EVO, and BB392 EVO.
PF30 and BB86/92 evolved into the most widely adopted press fit bottom bracket forms. So I’ll start with them
BB86/92
Cannondale’s introduction of BB30 in 2006 seems to have galvanized Shimano into a response which came in the form of the BB86/92 standard.
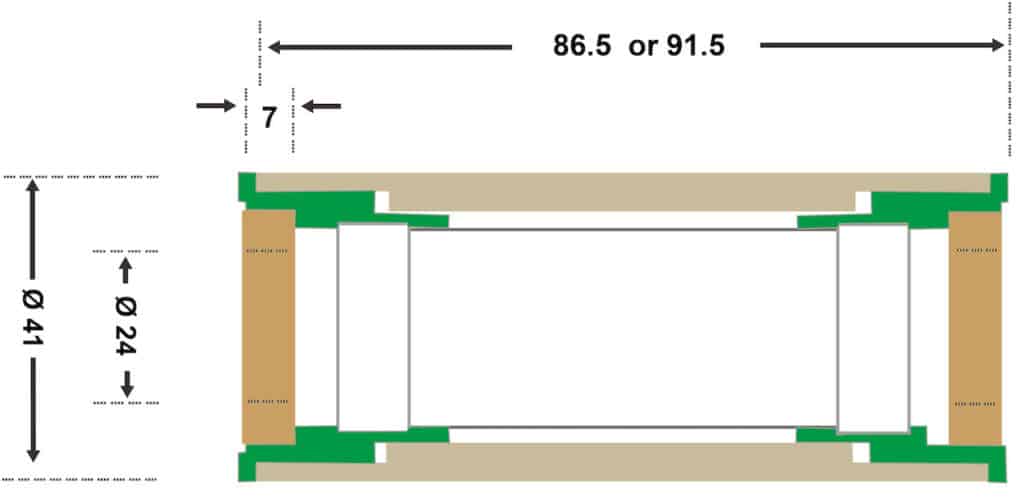
- 24mm diameter spindle
- 86/92mm wide BB shell (road/mtb)
- 41mm internal diameter BB shell
- 7mm wide sealed bearing
Using less material than outboard threaded designs, manufacturing tolerances were also more forgiving. (PF30’s major issue was extreme sensitivity to widespread variations in BB shell manufacturing tolerances across brands which I discuss below).
Out of all the press fit bottom bracket standards, this one has turned out to be the least troublesome of the non-proprietary standards.
BB86/92 is also occasionally labelled PF86, PF92, PF24 (referencing the spindle), PF41 (referencing the BB shell ID).
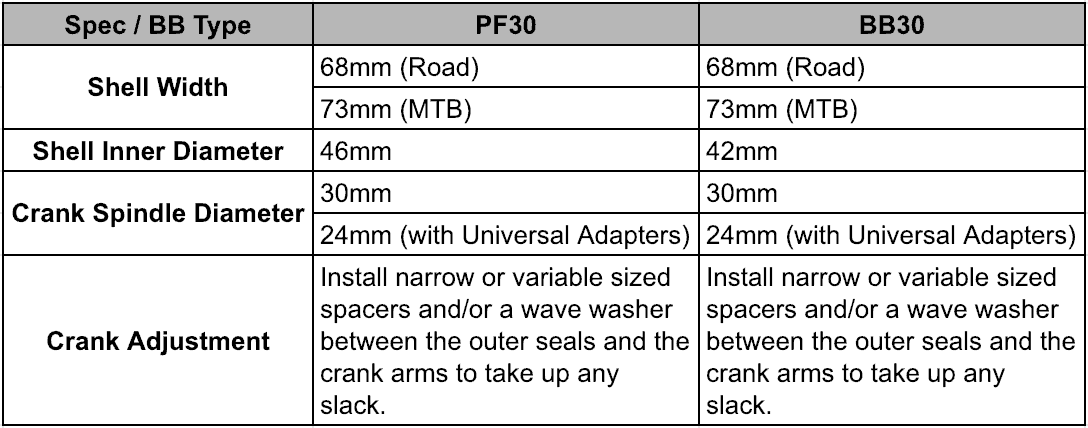
Press Fit (PF) 30
SRAM brought this standard to market in 2009 aiming to rectify BB30’s problems.
- 30mm diameter spindle
- 68/73mm wide BB shell (road/mtb)
- 46mm BB shell internal diameter
- 7mm wide sealed bearing
So, what’s the difference between BB30 and PF30 (an oft-asked question)?
Superficially not much.
The tie which binds them together is the 30mm spindle.
What separates them, of course, is that the sealed bearings installed in cups which are, in turn, installed into the BB shell—And the much larger BB shell internal diameter of 46mm vs 42mm.
Although PF30 was a supposed answer to BB30’s woes, it soon gained a reputation for noise and has similarly attracted criticism over the years. I discuss these issues below.
PF30A and PF30Ai
- 30mm diameter spindle
- 73/78mm wide BB shell (road/mtb)
- 46mm BB shell internal diameter
- 7mm wide sealed bearing
This design brings asymmetry to the PF standard—although only for Cannondale bikes.
Cannondale added 5mm to the non-drive side, the intention being to increase stiffness. It also complements the Cannondale off-center rear triangle and wheel setup by allowing shorter seat stays.
OSBB (Mountain)
Specialized’s specialized version of their OSBB for road bikes, which is basically PF30.
- 30mm diameter spindle
- 68/73mm wide BB shell (road/mtb)
- 46mm BB shell internal diameter
- 7mm wide sealed bearing
BBRight (Press Fit)
Same idea as the direct fit version, the difference being bearings in 46mm OD cups.

- 30mm diameter spindle
- 79mm wide BB shell (road)
- 46mm BB shell internal diameter
- 7mm wide sealed bearing
Hambini’s video is a great explication of BBright shows the differences between BB30, PF30, and BBRight
BB 386/392 EVO
FSA were a little late to the press fit bottom bracket party, but arrive they did in 2011 with the BB386/92 EVO, a variation on PF30.
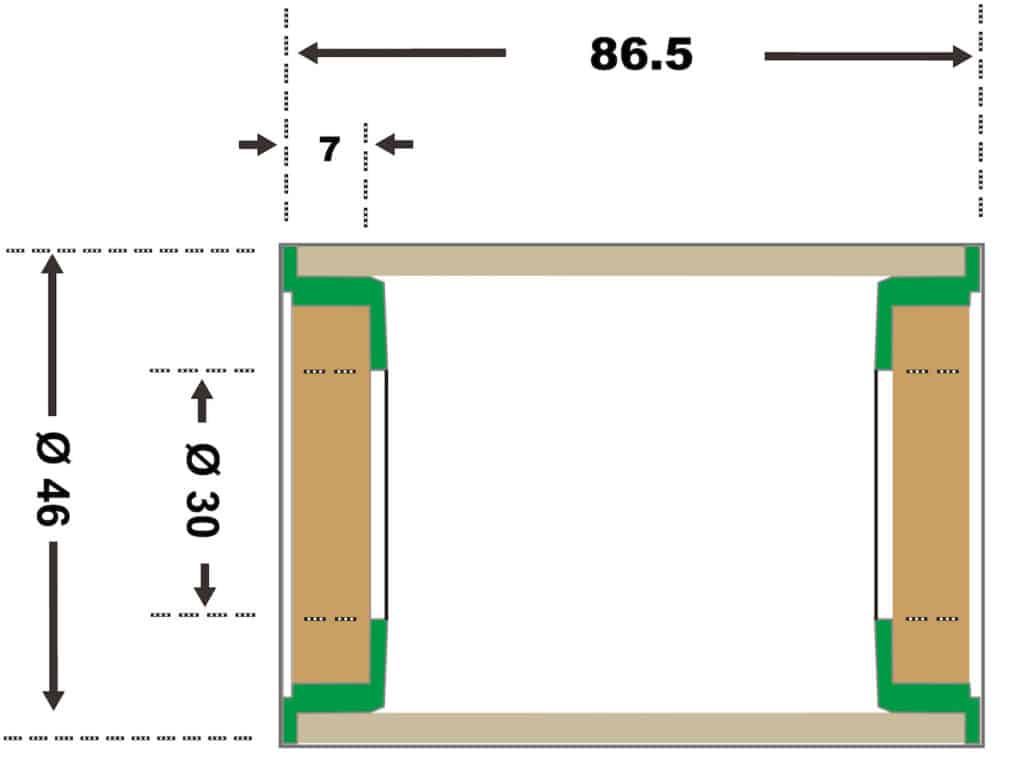
- 30mm diameter spindle
- 86/92mm wide BB shell (road/mtb)
- 46mm internal diameter BB shell
- 7mm wide sealed bearing
WHAT’S WRONG WITH THE PRESS FIT BOTTOM BRACKET?
From an exasperated user’s viewpoint it’s probably a case of ‘if something’s not broken, then don’t fix it’.
Threads worked fine for decades and they still work just fine.
The arrival of press fit introduced a number of problems that did not exist with threaded BBs.
And then there are hordes of cyclists who swear by their press fit rigs, having never had a problem with them. Ever.
Press Fit Bottom Bracket Creaking & Manufacturing Tolerances
You can think of press fit as a vast simplification of the threaded interface as consisting of multiple interlaced micro-surfaces where slight ‘errors’ or imperfections that stray from tolerance are cancelled out over the number of threads per inch.
Threads roughly cut into BB shells (frame makers outsource this procedure to specialist workshops) will accept a threaded BB right out of the box 999 times out of 1000.
Running a die like through the threads ensures a smooth cup-to-BB shell fit 9,999 times out of 10,000.
With press fit, the outer surface of the bearing race (direct fit) or bearing cup must be machined to exacting tolerances to ensure a close enough fit to the outer bearing race whilst still allowing the bearing or cup to be installed.
The problem is that there is wide variation in tolerances across BB shell manufacturers and (especially) where BB shells are layered up in a monocoque carbon frame.
A few tenths of a millimeter makes all the difference in the fit between
- a 6806 bearing outer race and BB shell
- a bearing cup’s OD and BB shell ID
Slight gaps mean that those surfaces may move under the extreme stresses that bottom brackets are subject to, gaps which can also widen over time.
That’s often the source of creaking (eliminating bearing failure and other possible sources such as pedal-axle-to-crank movement first of course).
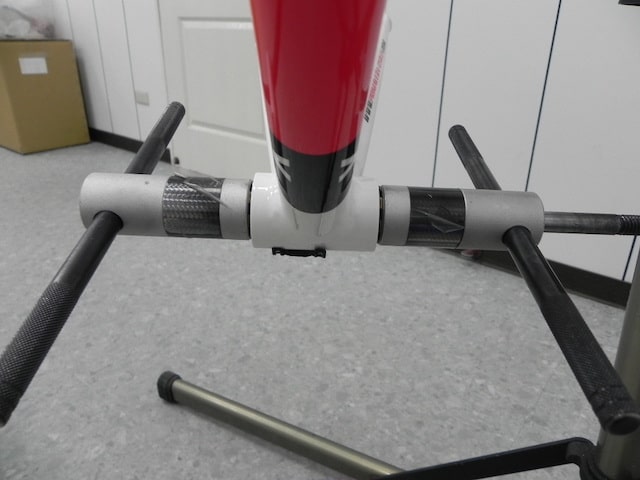
INSTALLING A PRESS FIT BOTTOM BRACKET (Tools & Techniques)
The technique is the same and the tools similar for either directly installing sealed bearings, or sealed bearings in cups, into the bottom bracket shell.
Prepare surfaces so they are spotlessly clean (more of an issue for directly installed bearings).
Then use a simple tool to press-in the bearing or the bearing cup.
Directly Installed Bearings
The key is cleanliness and adequate grease.
It’s really important to ensure that the BB shell is spotless—any dirt at all increases the likelihood of creaking sooner than later.
Install the C-clips then sit the (generously greased) sealed bearings on the threshold of the BB shell.
Fit the discs of a tool similar to this into the inner diameter of the sealed bearing’s inner race.
Turn the bolts to press-in the bearings.
Great video from SickBiker covering the key points.
Bearings in Cups
The good news is that installing a press fit bottom bracket cup can done without a specialized tool.
The truth is we modern cyclists and mechanics are quite spoiled given the range of tools available to us.
Back in the day a basic set of wrenches, a hammer, a screwdriver or two, and maybe a cold chisel, enabled us to assemble and maintain our bikes.
A specialized tool, though, makes difficult jobs much easier; plus you can get the easy jobs (the vast majority of installs) done a lot quicker as well.
Hammer and Block of Wood
Not the recommended method by a long shot—I include it here for the sake of being thorough.
The procedure is valid for press fit bottom bracket models with bearings in a cup, not those pressed directly into the frame (eg. BB30, BB90/95).
The idea is to install a press fit bottom bracket by means of a block of wood and a hammer.
You place one broad face of the wood across a bearing cup sitting on the threshold of a BB shell.
A few light hammer blows on the wood (never directly on the cup of course) ‘presses’ the bearing cup into position.
You can use a rubber mallet directly on the cups themselves in lieu of wood, as long as the fit of the cups to the BB shell is not too tight.
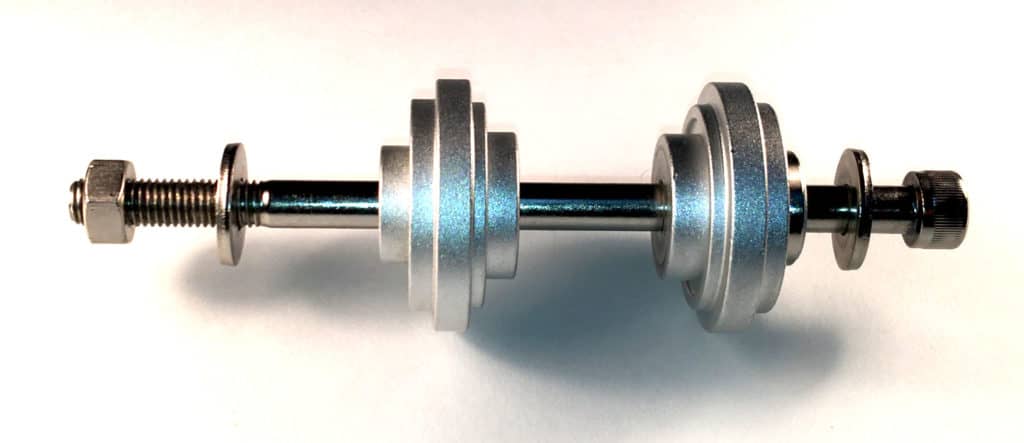
Simple Disc Press Tool
An easier way to go is to get a cheap press fit tool.
This one fits the 30mm internal diameter of the 6806 sealed bearings used in both direct fit press fit and bearing cups.
The reverse side of each disk fits the 24mm bore of conventional cranks, so you’re covered for those as well.
For an All-in-One Solution to installation and removal, see the next section.
Self-installing press fit
A solution requiring one tool which comes free with the BB—a self installing, self-extracting PF30.
The cups thread into each other in the center.
All you need is one tool (supplied).
Just like the old days, when you simply screwed a bottom bracket into position, or screwed it out.
REMOVING A PRESS FIT BOTTOM BRACKET (Specialist Tool Mandatory)
Anyone using block of wood, or a length of wood at any rate, or a cold chisel together with a hammer can remove a bearing cup.
However, where bearings or bearing cups have been gently pressed into the BB shell, they should also be gently removed in the same way.
The bulk of the advice you’ll hear is to use an impact tool.
- It’s not an elegant solution
- You can damage components
Impact Tools Rule (unfortunately)
The same method of removing a bearing cup from a semi integrated or threaded head set using a flared removal tool is the widely adopted method of extracting press fit bearings and bearing cups from the BB shell.
If you don’t intend to reuse the bearing or bearing cup, then that’s ok since any damage from the tool on the bearing or cup, or when the bearing or cup strikes the floor (they tend to break free suddenly), doesn’t matter.
It’s not ok if there’s any chance you may reuse either bearing or bearing cup.
If you install a bearing or cup using a press fit action, you also should perform a press fit extraction.
And a tool set that enables both installation and extraction has also got to be the way to go…
The BB30, BB86/92 Bearing Removal (and installation) All-in-One Solution
Although BB30 bearing removal and installation is not demonstrated in the video, the mechanism for removal and installation works in the same way.
- Install and Remove bearing 6805 (25 x 37 x 7mm)
- Install and Remove bearing 6806 (30 x 42 x 7mm)
- Install and Remove Press Fit BB R92/T86
- Install and Remove R30 (Converter for BB30 to BB24)
The PF30 (and compatible) Bearing Removal (and installation) All-in-One Solution
The PF30 toolset targets 46mm BB shells.
- Install and Remove bearing 6806 (30 x 42 x 7mm)
- Easy Assembly and Disassembly for Press Fit BB Adapter O.D. 46mm
- Assembly and Disassembly for End Face of Frame Shell Bigger than BB Adapter Flange O.D. 52mm
FAQ
When Should You Replace a Press Fit Bottom Bracket?
Answering this question firstly depends on asking the prior question of why you would replace a PFBB.
Is there a problem with the:
- bearing cup(s)?
- the bearing(s)?
- the whole damn thing?
1 .Bearing cups are tough and the only reason you’re probably thinking about ‘replacing’ them is due to noise. Make sure the source of the noise is, truly, the bottom bracket. If you’ve eliminated frame noise, headset, or pedal (axle) noise, then remove, clean, re-grease or apply compound, then re-install.
2. Check the sealed bearings for dirt or lack of grease. Clean and re-grease. Or replace.
3. If you’re itching to escaping the press fit madness, the way to do that is covered in the next section.
Can You Replace Press Fit with Threaded?
Yes.
The solution is to use adapters.
Our article on Bottom Bracket Conversion kits gives you all the info if you prefer text.
Final Comments
The press fit bottom bracket is well established and will be with us (probably) for ever in some form.
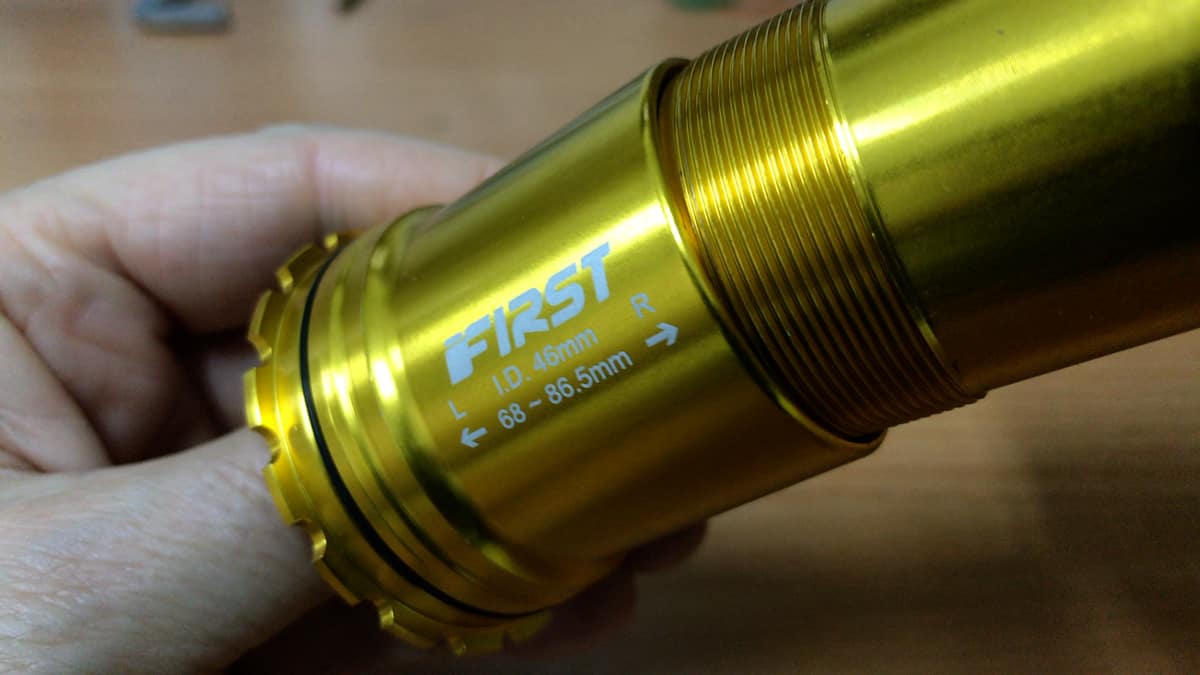
For cyclists not concerned with adding a few extra grams, the T47 standard is a promising development: large bearings in cups threaded into the BB shell—so we come full circle.
Otherwise a well-maintained press fit bottom bracket will—in most cases—provide decades of service.
If not, a conversion to threaded is always an option.
1 thought on “Press Fit Bottom Bracket (Standards, Tools, Techniques & More)”
I have a fat boy frame and someone has taken out the entire crank and both peddles so I need to know what exactly I need to fix the inside of the crank and both peddles please amd thank you