A (non-ebike) modern road or mountain bike has either a threaded bottom bracket or press fit bottom bracket—those are the choices.
Press fit BBs were, arguably, a solution to a non-problem with threaded BBs.
Consistent dissatisfaction with press fit has seen a return to threaded bottom brackets and the increasing uptake of T47 threaded BB standard by leading brands.
Read on or click through the Contents to access the detailed sections in this unique look at the enduring and dependable threaded bottom bracket.
CONTENTS
‘BSA’ – The original threaded bottom bracket standard
T47—The return of the threaded bottom bracket?
Threaded Bottom Bracket Preparation (esp useful for bike professionals)
Installation
Maintenance
THE ORIGINAL THREADED BOTTOM BRACKETS – BSA & ITALIAN
Two types of threaded bottom bracket are most commonly used, with the first, BSA, the most widely adopted. Italian threaded come a distant second and have likely already been overtaken by T47.
BSA
We go into detail about BSA bottom brackets elsewhere; but here’s the story in brief.
Interlocking threaded surfaces is modern engineering’s foundational method for assembling complex wholes out of parts.
And although bicycle component design is becoming more modular, particularly in e-bikes, threaded surfaces are still the way to bind parts to each other.
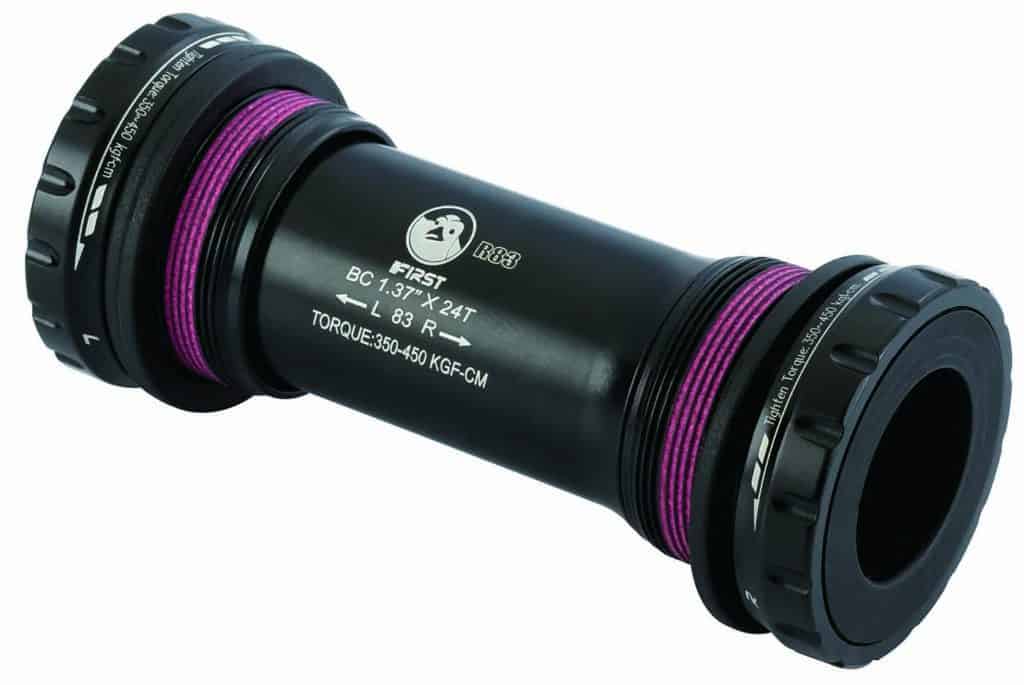
‘BSA’ is the common reference to the English threaded bottom bracket the production of which came to be dominated by the British company, Birmingham Small Arms.
Not that bicycle tech purists will tell you to not use ‘BSA’ to refer to this standard—BSC, or British Standard Cycle, or BS for short, is the correct usage they sternly advise.

The British domination of the standard makes perfect sense as the modern safety bike is a British design invented in the isles from where it took over the world.
Italian Threaded Bottom Brackets
The Italian standard has existed as a long-standing conventional threaded alternative to the English threaded—a left-hand thread—drive side.
Older bikes on which Italian threaded can be found include Cinelli. One contemporary brand still using Italian is Colnago.
The key difference is a right-hand thread on the drive side bearing cup and an outer diameter of 36mm (vs 34.8mm on English-threaded).
The technical argument against a right hand thread is the problem of precession where crank rotational forces can loosen the cup.
Even though Italian threaded BBs are rarely used on contemporary bikes, they are still widely available for the brands which do.
T47 THREADED BOTTOM BRACKET
Chris King developed the T47 standard in 2015 as a solution to a decade of reported issues with press fit BBs, from BB30 through to PF30.
Now, there are as many cyclists who defend press fit designs as there are those who complain about them.
Most cyclists have never experienced any issues with press fit and most of those who have don’t care about the creaking when it occurs.
So the ‘problem’ does not exist for a sizable portion of cyclists.
PF30 reversed BB30’s direct placement of sealed bearings in a 42mm BB shell by re-inserting them into cups which were then pressed into a 46mm shell, expanding the internal diameter by 4mm.
Creaking bottom brackets continued to be a problem, however, because the real issue was frame manufacturers’ variable BB shell tolerances coupled with variability in bottom bracket bearing cups’ external diameters—a few micrometers can make a hellava difference.
What, then, if you cut threads into a 46mm BB shell nominally meant for a PF30 BB?
Firstly, you’ve got room inboard and even outboard which can accommodate the biggest bearings possible, thus extending their life.
Hambini has built his Youtube career on criticizing the big brands for their lack of attention to frame tolerances.
He argues the fault is not with press fit as a design, but manufacturers’ sloppiness.
He has responded by coming up with his own bottom bracket design, marrying the most precisely machined alloy bearing containers with the high quality bearings.
The question is, though, what practical advantage is gained from such high tolerances?
If a BB shell is out of shape, a perfectly machined bottom bracket won’t help.
Although it’s early days for T47, expect to see increasingly greater adoption the deeper we get into the 2020s.
THREADED BOTTOM BRACKET PREPARATION
In an ideal world you take a new threaded bottom bracket and, with a little grease plus the right wrench, install it into a new bike as an initial assembly, or into an existing bike, without complications.
The potential problems to be aware of in the real world are:
- cross-threading a threaded bottom bracket’s cups or BB cartridge into the BB shell
- mutual mis-alignment of external or ‘outboard’ bearing cups
Threads and Faces
Frame factories usually outsource the cutting of threads into the bottom bracket shell, and 99/100 times, the threads will be good—you can smoothly install a BB without snags.
Tapping the threads, nevertheless, eliminates the 1% of defective threads.
You are spared the hassle of wondering why a particular BB unit is so hard to turn in the shell leading to the question: “Have I cross-threaded this?”
Clean, and therefore square, faces are also important.
In sum, proper threaded bottom bracket preparation means a mandatory session of tapping and facing.
(Note also that a BB shell with stripped threads can often be repaired by re-cutting the bottom bracket shell).
Threads
Faulty threads on BB cups or cartridges are extremely rare due to super-precise manufacturing processes and techniques employed by modern factories.
But you may need to prepare for possible imperfections in the bottom bracket shell by following the steps below, or at least understanding the basic how and why of the process.
Because the tool required is prohibitively expensive and takes an experienced hand to work it properly, a bike shop pro is the one to carry out the procedure, unless you have the resources (the tool and the skill) to DIY.
At any rate, you’ll find knowing what he does, and how he does it, extremely useful as a bike owner.
Faces
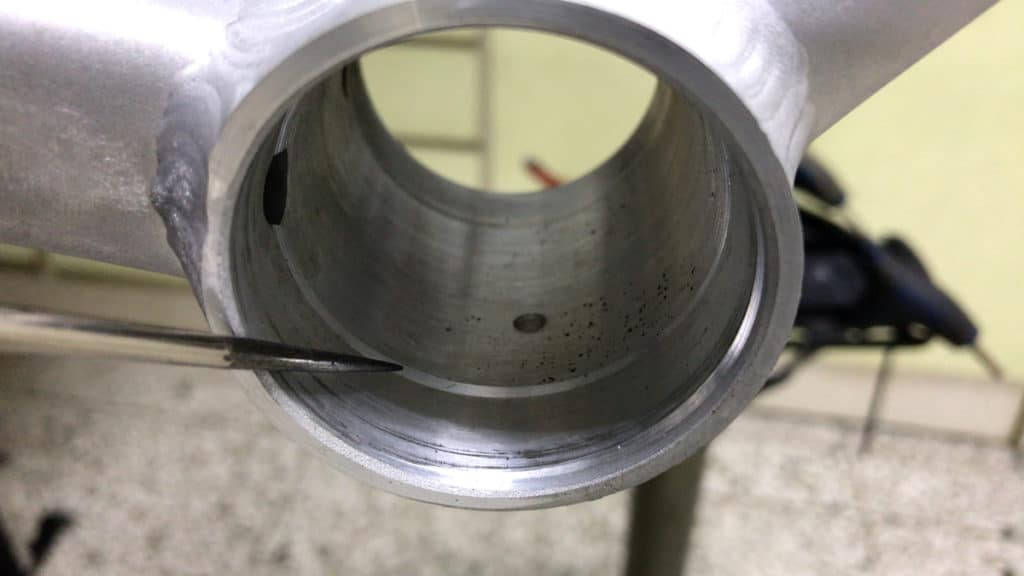
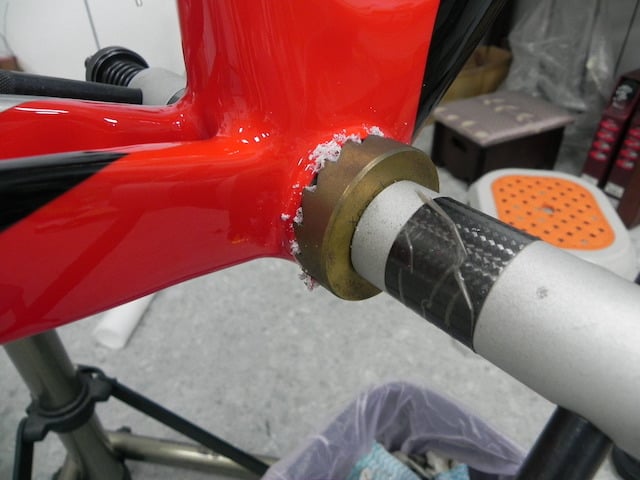
The bottom bracket shell’s outward facing edge accumulates frame primer and paint overspray when the frame is being painted.
Shaving this back to the surface of the alloy or the steel of the BB shell makes the left and right faces parallel to each other.
Parallel faces ensure the bearings are square to the frame and the cranks as a result.
That means longer bearing life and minimizes the possibility of bearing creak.
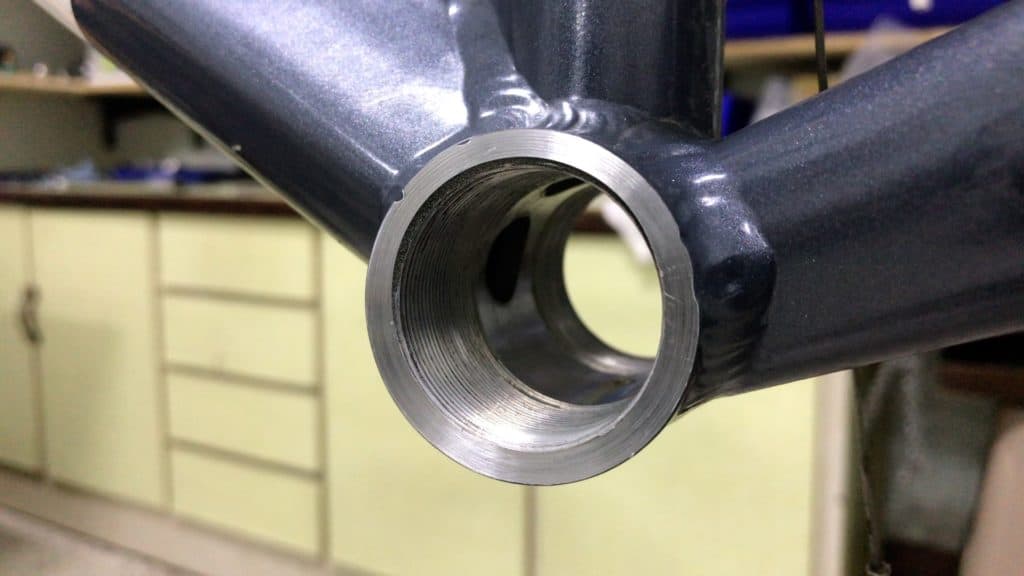
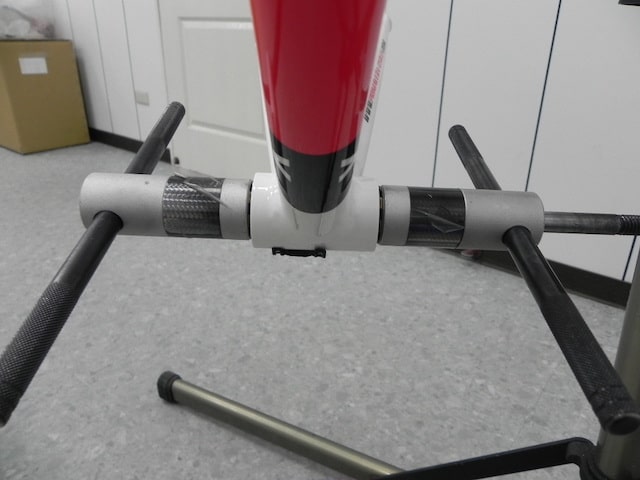
Bottom Bracket Shell
A bike frame’s bottom bracket shell is the smallest tube from the group of tubes (top tube, down tube, head tube, seat tube, seat stays, and chain stays) a frame factory welds into a frame.
Frames are constructed in batches or “productions”. They’re welded, straightened (the deformities are literally hammered out of them in the last instance), and at some stage during the final processing sent out to a specialist who cuts threads into the shell.
A finished frame’s paint job also includes the BB shell’s outside edge, adding as much as 2mm or more to the shell’s width on both sides, material which must be removed.
Outboard bottom bracket bearing cups can’t sit squarely against the BB shell’s face.
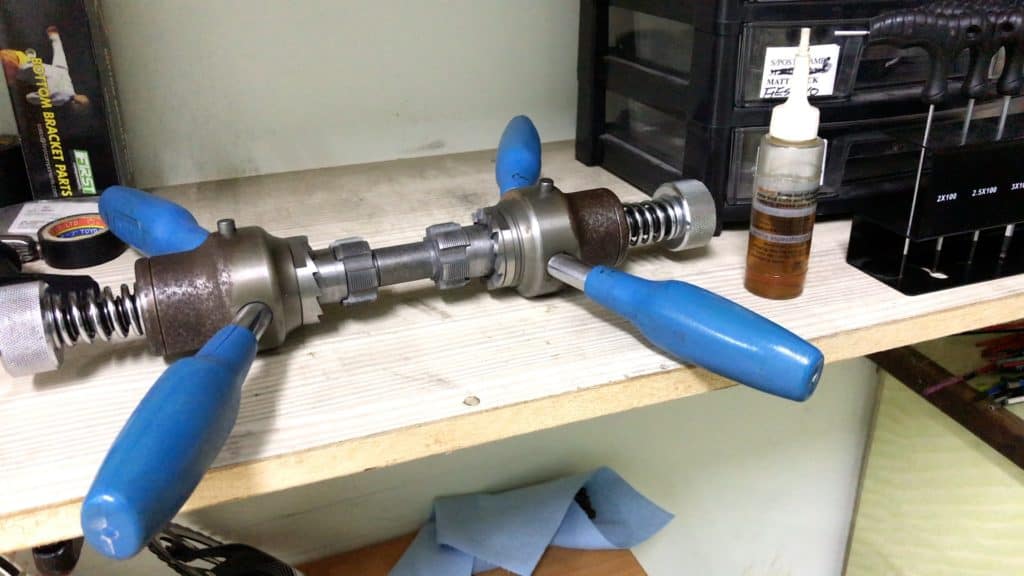
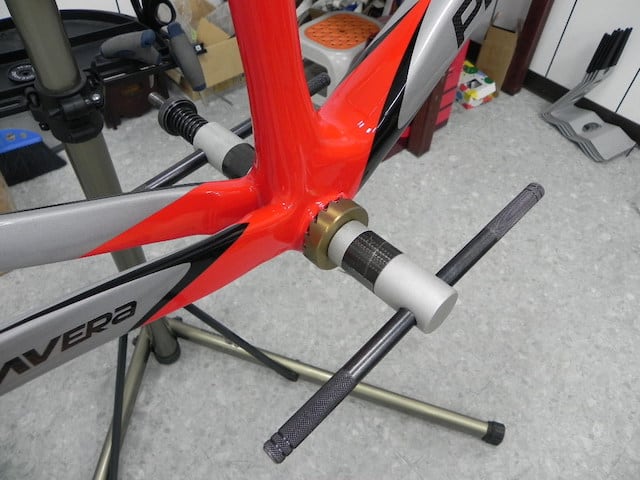
Tapping and Facing
This video shows a tapping and facing procedure from start to finish. The procedure is summarized below; the section also covers a different kind of tapping and facing tool for comparison and contrast.
Tapping and facing, or “dressing” a frame, as perhaps more senior bike professionals may refer to it, ensures the bottom bracket shell exactly conforms to spec—68mm for a road bike; 73mm for a mountain bike.
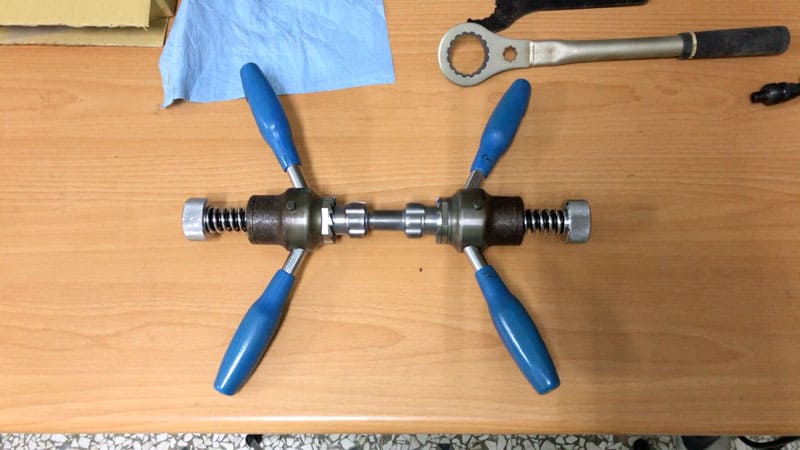
This type of tool is optimum for tapping and facing.
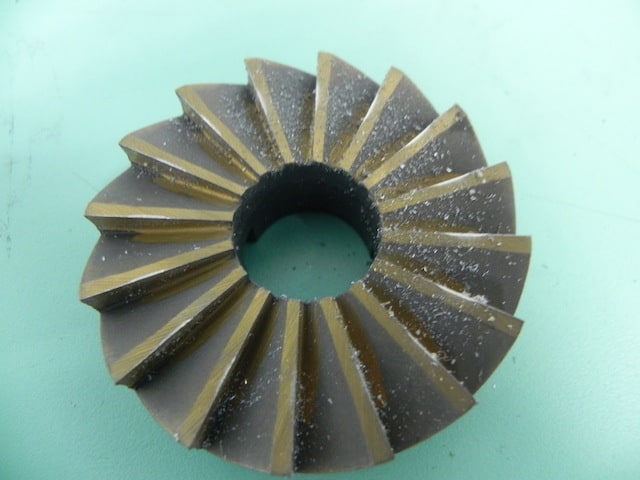
The cutting dies cut the threads as they feed into the BB shell. With the dies fully inserted, the cutters slot against the face and, what’s more, stay sharp for a lot longer.
However, this model is not cheap.
A cheaper way to go is with a tool that cuts the threads on both sides, but has just one facing cutter—you do one side, then move it over to the other.
A little more inconvenient. But it does the job.
Tapping the BB Shell
A road bike frame BB shell should be 68mm in width to within 0.3mm on the left and right side.
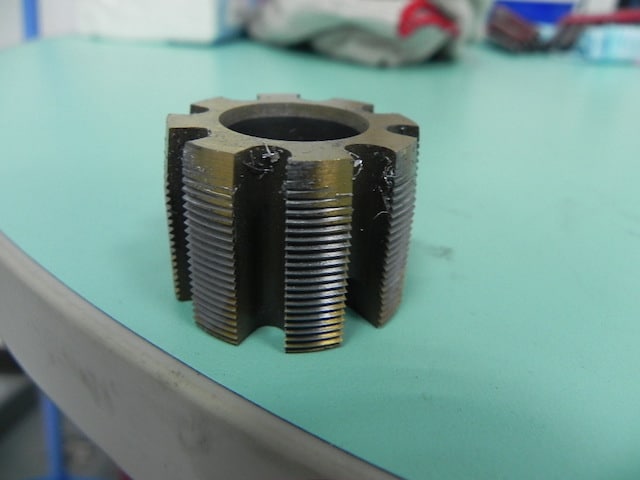
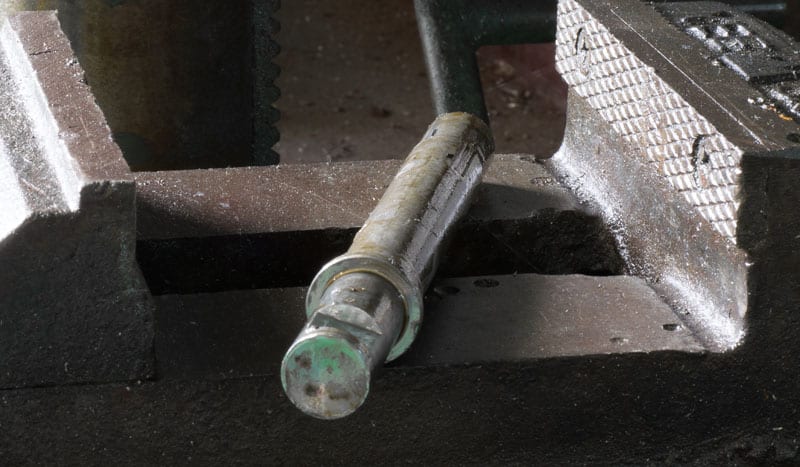
External cups or cartridge: 34.8mm die as part of a tapping set.
For a T47 threaded bottom bracket shell, a 47mm die is required. (You would need a tool on which you could mount these dies though).
The trickiest part of the procedure is starting the die into the BB shell. The dies on each side must be engaged squarely with the BB shell’s thread.
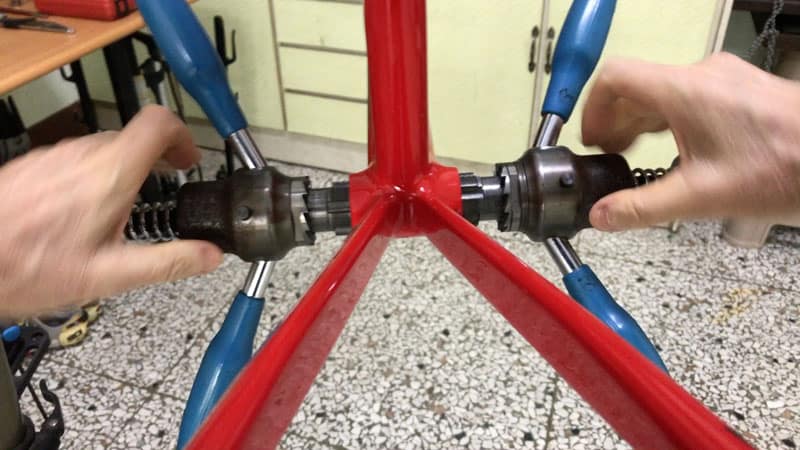
The goal is to slot each die into the bottom bracket shell’s first thread on each side simultaneously.
Sit the leading edge thread of each die inside the leading edge of the BB shell. Then turn each simultaneously 1/8 to 1/4 of a turn—there’s a knack to this which takes a little practice.
As long as you are certain the die threads are correctly engaged with the BB shell’s threads, there’ll be no problem.
Just keep in mind: the consequence of cross-threading a die is much worse than cross-threading a threaded bottom bracket into the shell.
Fortunately a tapping tool can repair even severely damaged bottom bracket threads, although it’s easiest to avoid the problem in the first place.
Cutting fluid protects the die’s cutting edges from the constant friction with the BB shells’ threads which, over time, reduces their effectiveness.
One Side at a Time
The technique is to cut one side at a time.
You turn the tool to the left in the drive side (left hand thread) and to the right in the non-drive side.
Factory-cut BB shell threads are generally excellent, so the cutters turn easily.
For those cases where the threads need quite a bit of cutting, the technique is to move half a turn or so, then turn back in the opposite direction, then push on into resistance for another half turn, then turning back in the opposite direction again.
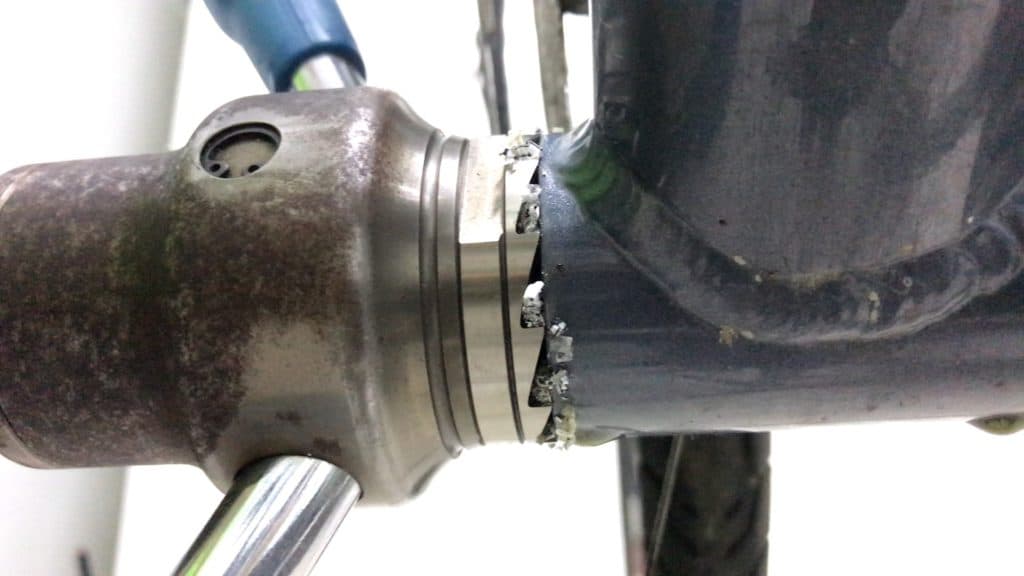
Once you’ve cut your way to the ends of the BB shell’s threads, you then release the spring-loaded cutter, tighten it to the shell face, then trim away the paint, one side at a time.
Using a cheaper tool that only has one cutter, the procedure is a little different.
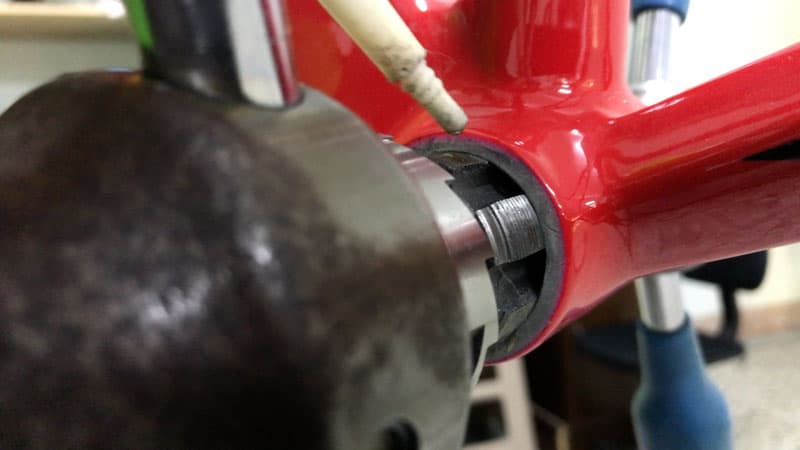
Facing the BB Shell
A better quality tapping and facing set enables-the tapping dies to be simultaneously inserted into both sides-the facing cutter to be mounted on the spindle along with the dies.
The operator increases the cutter’s pressure on the face by turning the nut against the spring.
If there is a lot of material to remove, the nut needs to be loosed so the detritus can be brushed away.
Then re-tighten the nut to continue.
When the paint has been removed from the face along with the tiniest portion of the BB shell’s alloy or steel, the job is done.
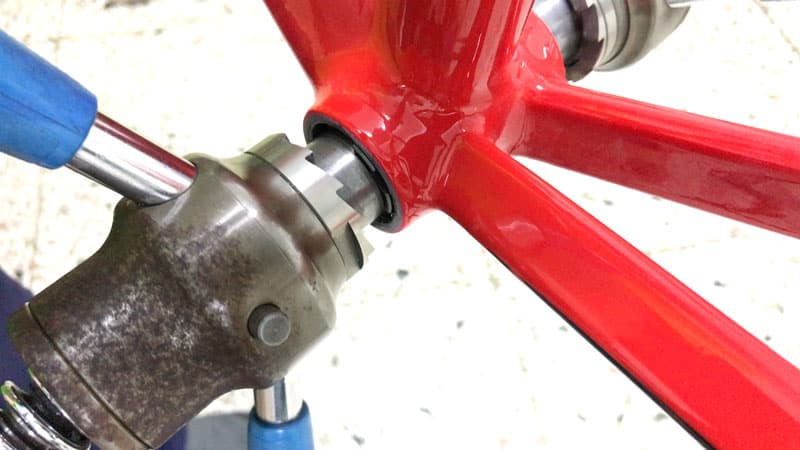
You can’t just stop though.
Finishing requires gradually relaxing the pressure on the cutter against the face as you continue to turn
If you stop the cutter dead, then remove it, you’ll leave slight ridges or steps on the face.
Releasing the cutter, gradually easing cutter pressure on the face over the course of two or three full rotations, prevents this problem.
One-Side Cut Facing-Tool
A tapping and facing tool such as this has just the one cutter, mounted against each face in succession.
The cutter sits on the side opposite to the tensioner nut and spring.
Having completed one side, you remove the tool, then reinsert it on the opposite side.
If you’ve only got the occasional facing job to do, this type of tapping/facing tool is all you’ll need.
If you consistently have to prepare frames, a tool with a cutter on both sides will save a lot of time.
THREADED BOTTOM BRACKET INSTALLATION
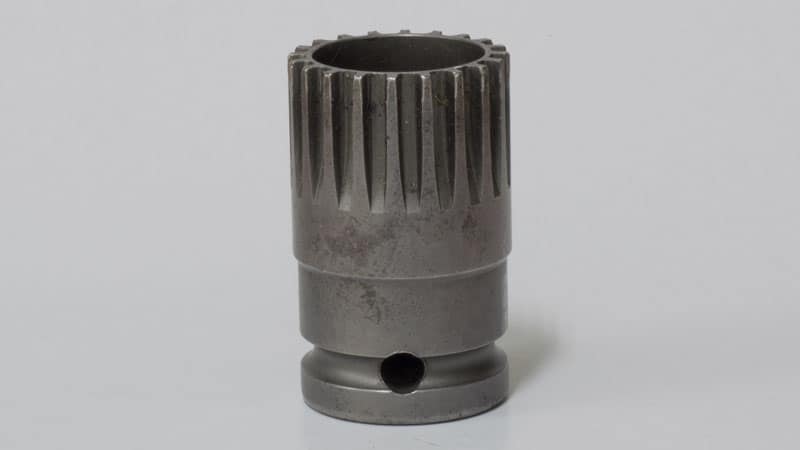
Threaded bottom brackets bearings are mounted -inboard in the case of cartridge BBs, or -externally in the case of integrated cranksets.
PATRONEN-TRETLAGER
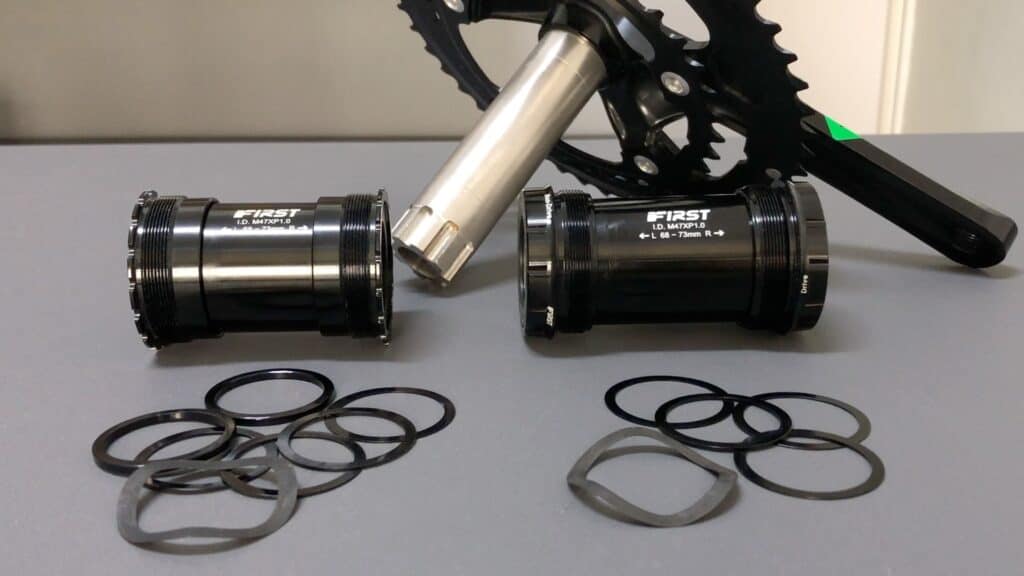
Cartridge bottom brackets combine the formerly individual bearings or bearing cages, spindle and lock rings into one unit.
Many older cyclists will remember their first bikes probably had a cottered spindle where tight cranks depended on keeping the cotter pin nut tight on the bolt.
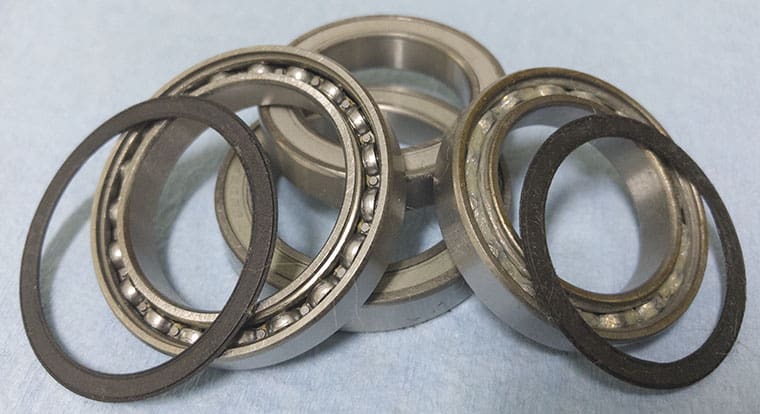
An important innovation cartridge BBs rely on is sealed bearings, which are bearings mounted in a cage pressed into the race. The outer open face of each is covered by a removable seal.

Threads are cut into the drive, or right hand, side of the cartridge; the non-drive side is secured by a lock ring.
A cartridge threaded bottom bracket’s casing is made of aluminum alloy which normally pairs with an alloy lock ring, although nylon lock rings are available.
Nylon is tough enough, giving you durable threads, as long as you don’t frequently loosen or tighten the lock ring.
Cartridge Install
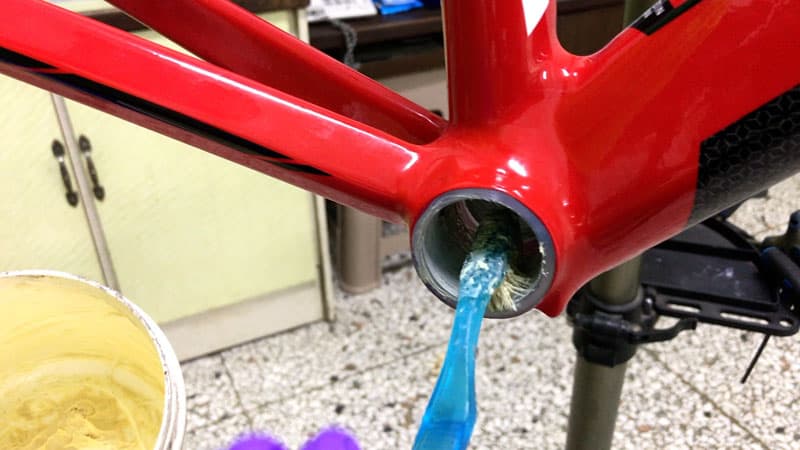
First the BB shell needs a good coat of grease the full length of the threads.
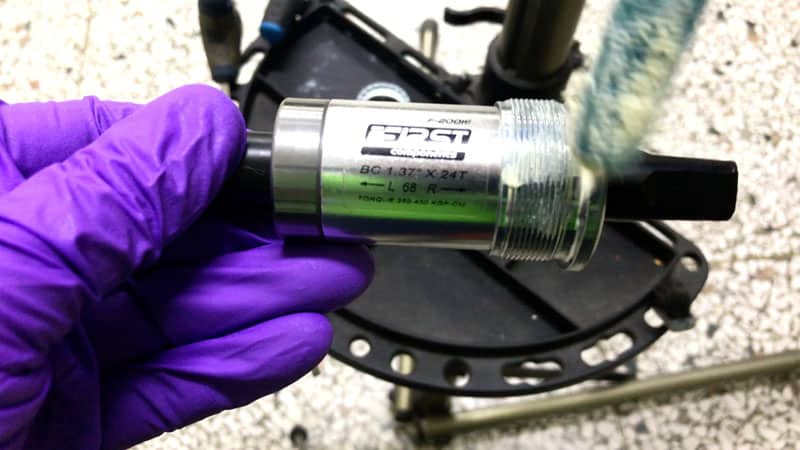
Then a coat of grease on cartridge threads as well as the lock ring.
You mount the cartridge into the BB shell, aligning the threads with the shell threads.
The trick is make sure the threads are aligned. If not, you will cross-thread the cartridge into the shell and irreparably damage the threads rendering the cartridge useless.
This technique is detailed in the video above.
A cross-threaded BB shell can be repaired with a tapping tool; a cartridge with stripped threads must be replaced.
Cross-threading a cartridge is much easier than external bearing cups (we look at these next) since the area available to handle the cartridge body is small: just the edge and the spindle.
Using the proper tool early in the process is essential.
Tightening
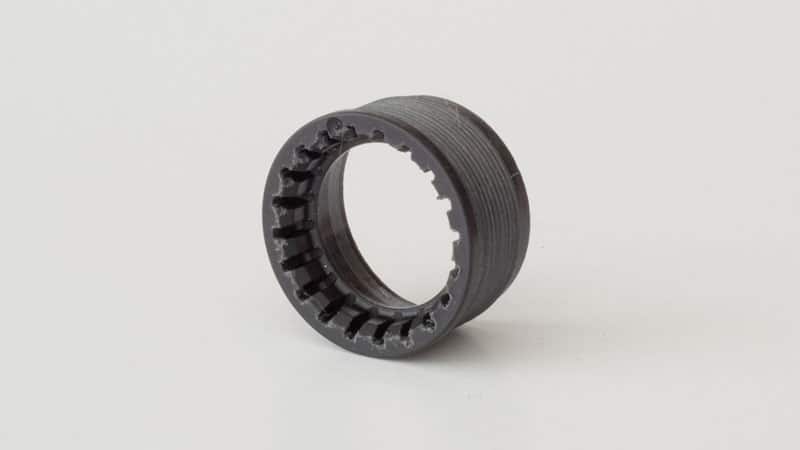
A splined drive is used to get proper purchase on a cartridge threaded bottom bracket.
Once the cartridge is turning smoothly into the BB shell and begins to tighten, the splined drive is required.
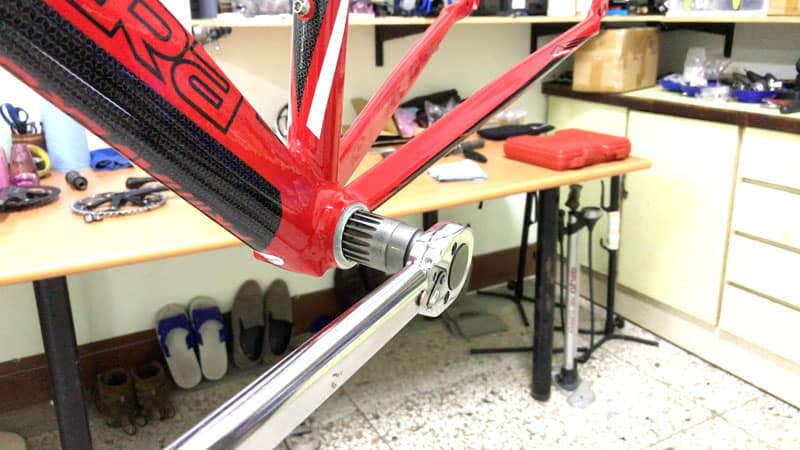
A half-inch drive with a wrench finishes the job—a torque wrench should be used to as the final touch of course.
AUßEN-TRETLAGER
The technique is much the same for external, or outboard, threaded bottom bracket bearing cups, designed for integrated cranks of course.
Plenty of grease on both the bearing cup threads and the BB shell threads.
Outboard bearings, by definition, have a larger surface area to hold onto; seating the the cup threads in the BB shell is much easier than the cartridge.
There’s much greater purchase on external bearing cups, so they can often be almost fully inserted as long as they don’t tighten up too much along the way.
There are a variety of tools available, from dedicated ring wrenches to dedicated 1/2 inch drive sockets.
Socket drives allow tightening to the correct torque, since they can connect to a torque wrench.
THREADED BOTTOM BRACKET MAINTENANCE
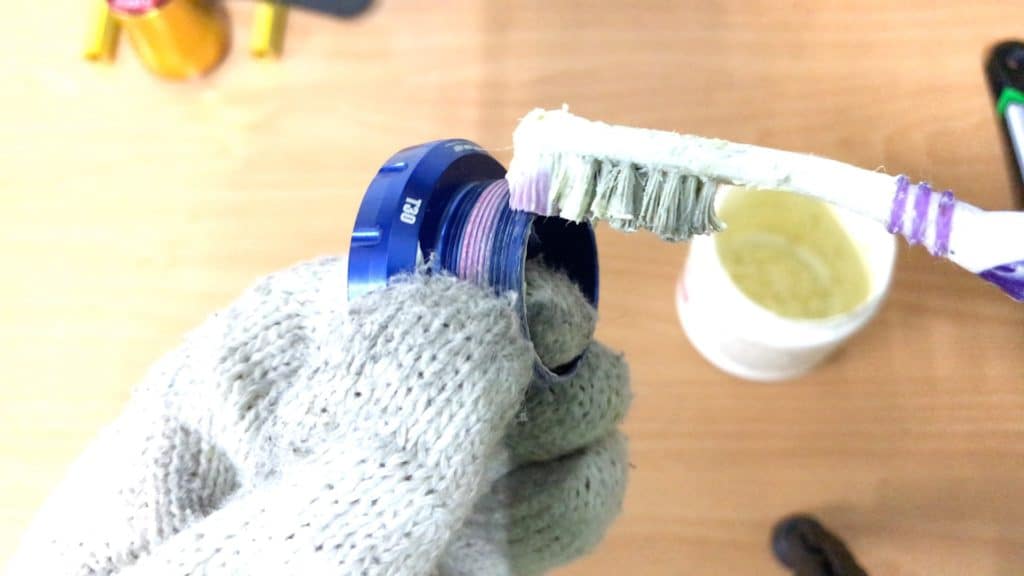
Removing, cleaning and re-installing threaded bottom brackets are tasks neglected by many cyclists.
You should remove the cups, clean off the old grease, degrease and thoroughly clean the BB shell, then re-tap the threads once a year.
Treat the install as you would for a new bike.
Following this procedure annually will make for quick and smooth BB replacement or upgrade when the time comes.
A FINAL WORD ON THREADED BOTTOM BRACKETS
Threaded bottom brackets were the original form of bottom bracket.
After more than a decade of dominance by press fit bottom brackets, we are possibly on the edge of a return to threaded bottom brackets in the form of the T47.
Sure, for low end bikes, threaded (square taper) is the norm. But with Trek and Specialized introducing T47 into their range in 2021, this is set to change.
The ebike revolution is also having a big impact.
Mid-drive motors either eliminate bottom brackets or, where a quasi BB assembly is included, it will be threaded. Ebikes with hub drives use threaded bottom brackets.
So, threaded bottom brackets: the bee’s knees; or an old technology we should have been completely rid of years ago? Yae or nae?
1 Kommentar zu „The Threaded Bottom Bracket Ultimate User’s Guide“
I read your article with interest and have been reading many postings in forums about threaded BB shells and welding distortion, which lifts the ends of the shell upward so that the drive-side axis and NDS axis are skewed. The distortion can also be slightly lateral not simply upwards, compounding the misalignment. When the threads are chased using a tool that brings the axes into alignment once again, the BB shell’s interior is no longer perfectly cylindrical but will have a slightly oval shape; if the distortion was too severe to begin with, there could be enough “slop” for the cups to move inside the shell during pedaling–movement imperceptible to the eye maybe, but still enough to erode the threads over time and to wear out bearings prematurely or enough for an annoying creak to develop. But how can the consumer assess, non-destructively, whether a newly delivered frame is too far out-of-spec and should be refused as a “lemon”? You can’t take a new frame to a local bike shop and get a definitive answer to the question “How bad is it?” There are no readily available tools for measuring the degree of thread misalignment (before any chasing is done) or for measuring an acceptable maximum distortion, such as a go/no-go gauge that fails to mate when the misalignment exceeds a certain tolerance.