The steering tube or steerer, connects the handlebars to the fork blades.
The steering tubes of a modern mass-produced fork are of a fixed length. Each is cut to fit a particular bike during assembly.
Steerers are either alloy or carbon, and the technique for cutting and installing either the star nut or expander — which anchors them to the headset — is different.
In the sections below, I detail procedures and tools used by many professional bike assemblers to cut, install, and secure forks — via steerers — into a bike frame.
Along the way I discuss various little-know aspects of steering tube and fork design.
CONTENTS
Steering Tube and Fork
ALLOY STEERING TUBE (incl the one thing you must NEVER do)
Preliminaries
Cutting Alloy Steerer by Hand
Cutting Alloy Steerer Using a Machine
NEVER install the star nut like this — Big Mistake
Star Nut Setter – Importance of Tool Quality
CARBON STEERING TUBE
Cutting Carbon Steerers by Hand
Cutting Carbon Steerers Using a Machine
Expanders vs Star Nuts
Final Comments — Safety Issues
STEERING TUBE & FORK
Bike forks consist of 4 components:
- Steering tube (steerer)
- Fork crown
- Blades
- Dropouts
Depending on whether a fork is carbon, alloy, or a combination of both, these components are often functional, rather than physically discrete, items.
The focus of the discussion here is modern forks which are designed to fit modern threadless stems.
Modern stems differ from quill stems, for example, which are anchored via a built-in expander into a threaded steering tube of fixed length.
Modern forks are manufactured with non-threaded steerers that are cut according to a rider’s handlebar height — or stack height — preference.
A monocoque carbon fork’s steering tube integrates seamlessly into the crown and blades with alloy dropouts embedded into the blade ends.
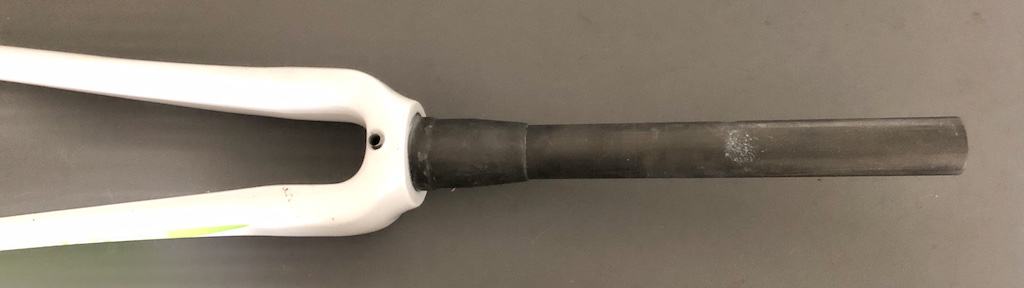
A cheaper, although slightly heavier alternative is to glue a pre-fabricated carbon steering tube into a receptacle built into a carbon fork crown and blades.
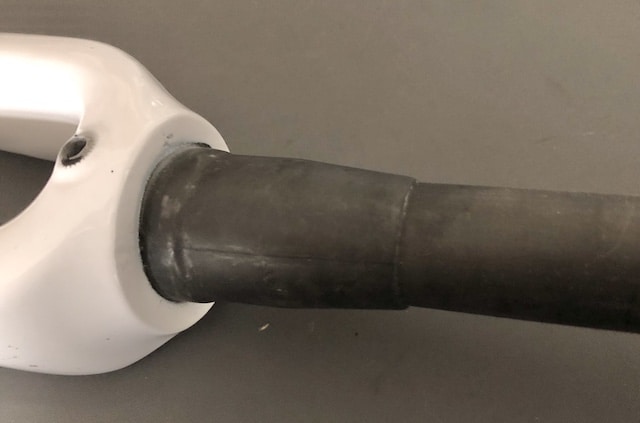
Note the fork crown’s conical receptacle—the steering tube slides in and is then glued into position.

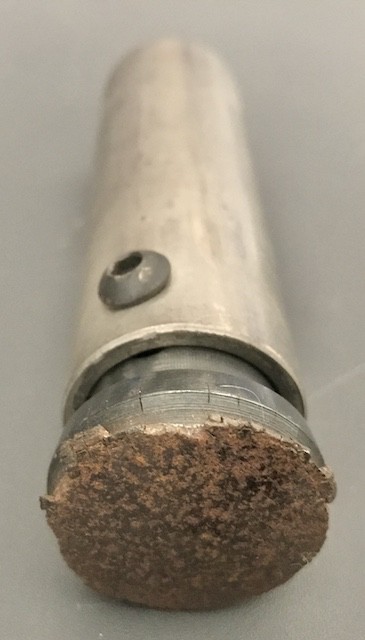
An even cheaper alternative is to glue an alloy steerer into a one-piece alloy receptacle then glue carbon blades to its base.
You can see the excess glue smoothed around at the top for a neat finish.
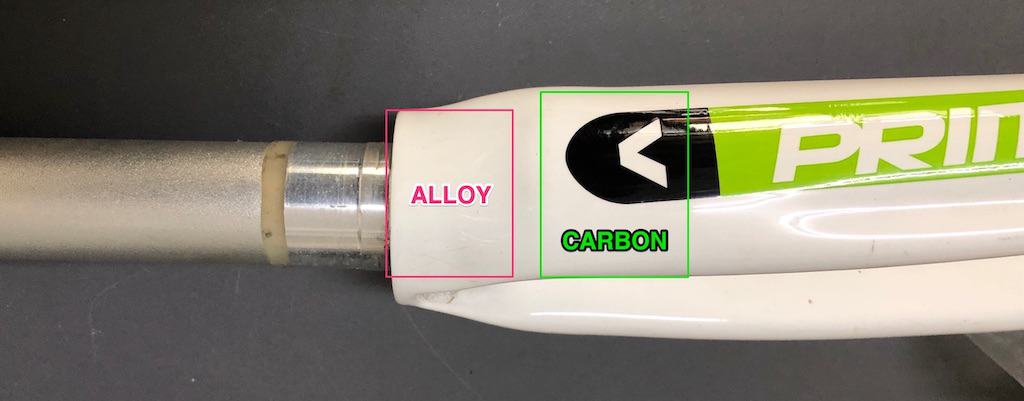
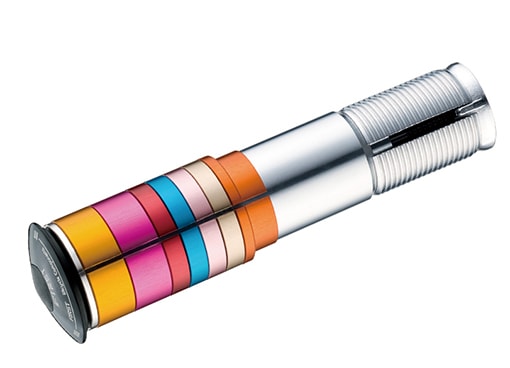
The image illustrates an early version of an alloy-carbon bonding design with separate steerer, crown, and blades bonded into one piece through a combination of glue and period of baking.
Later versions of this design incorporated the steerer and crown into one piece. The carbon blades are then bonded to the alloy stumps forming the base of the blade.

The aesthetic trick with this bonding technique is to blend the carbon into the alloy to create a seamless finish.
3K carbon weave blends into alloy on the right in the image.
Gluing carbon to alloy is a mature technique perfected back in the days when some specialist frame makers fused carbon seat stays into alloy frames as a weight reduction gimmick (naturally stiff aluminum frames became less stiff).
The resulting alloy upper and carbon blades forms a rock solid unit. Carbon composite forks have a greater history of failure (extremely rare, thankfully) than alloy bonded to carbon.
ALLOY STEERING TUBE
Although alloy steering tubes are easy to cut, they require a flanged nut — the star nut — to be set square to the steering tube’s walls at the right depth inside the tube.
The nut-setting tool is easy to obtain, but must be used in the right way to avoid damaging the fork blades, particularly the dropouts.
Alloy Steerer Preliminaries
Once you cut a steering tube, it stays cut—so ensuring that handlebar measurements are correct is essential (in addition to “measure twice, cut once”).
Using spacers gives a bike owner the option to adjust stack height to a degree.
You can have several centimeters of stem projecting above the top of the stem where you cover the steering tube with spacers above the stem rather than below.
A firm connection between the spacers and a headset’s top cap and tensioner bolt is all you need to ensure no play in the fork.
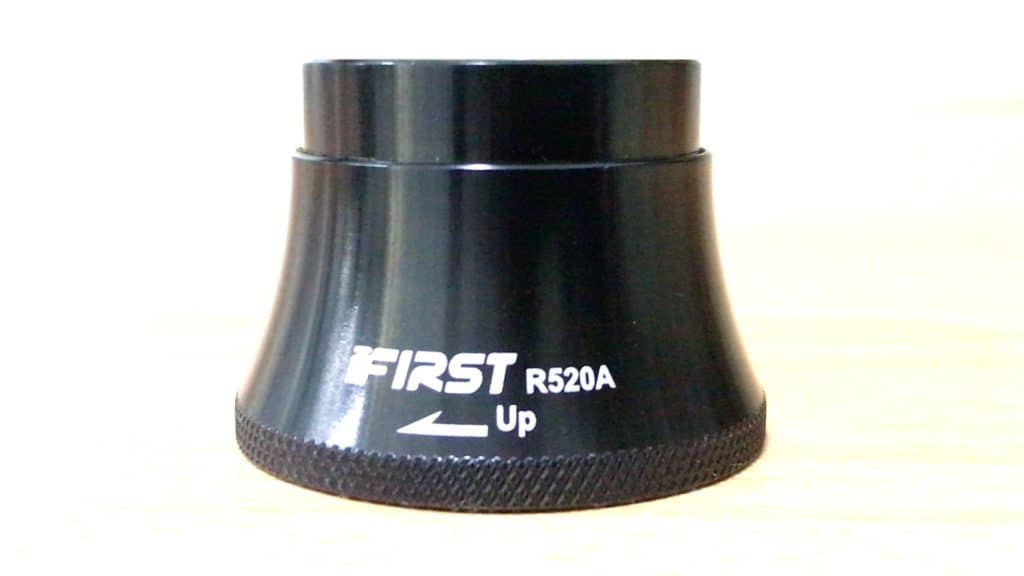
As an aside, FIRST’s adjustable headset allows fine tuning stack height with a few turns of the outer casing.
First’s stem adjuster is also an option for fine-tuning stack height by extending steerer length.
Cutting Alloy Steerer by Hand
A pipe cutter is fine for cutting through the 2mm thick wall of an alloy steering tube for cutting one or two forks every now and again.
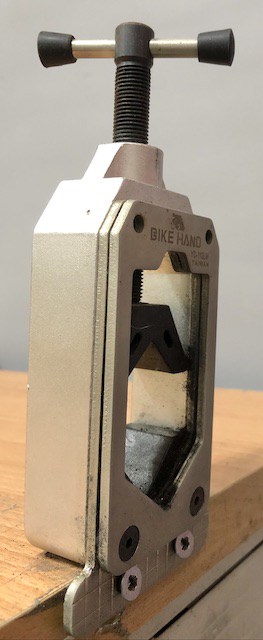
For frequent steering tube cutting, a clamp and hacksaw are the tools to use.
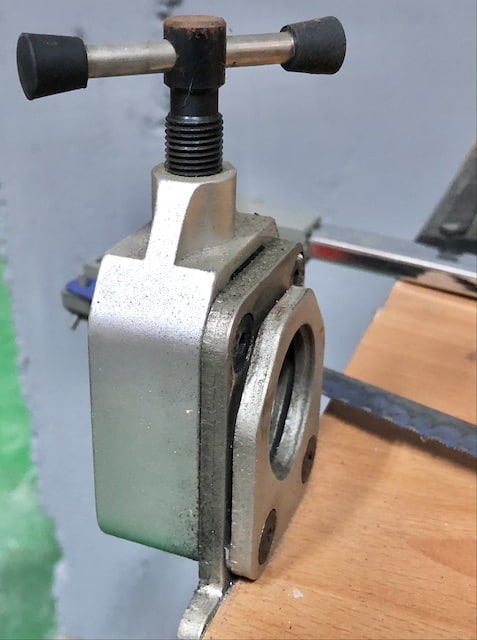
A steering tube clamp bolts onto a table through a bracket at the bottom.
The clamp works by means of an internal bracket that tightens against the steerer, preventing movement during cutting.
The guide on the outside is fractionally wider than a hacksaw blade, ensuring the blade stays square against the tube when beginning the cut.
If not aligned from the start, the rest of the cut will also be out of alignment.
Having scored a line on the steering tube marking the cutting position, you slide the steering tube in from the left, positioning the line in the center of the guide.
As you complete the cut, the excess falls onto the table. Unclamp the steerer, then slide it out.
Cutting an Alloy Steering Tube by Machine
Cutting a steering tube with a hacksaw is physically demanding—and time consuming.
If you’ve got more than one to cut per day, a pipe-cutting grinder is a good investment.
There are differences in cutting technique to take into account where the machine cuts on the right, rather than the left.
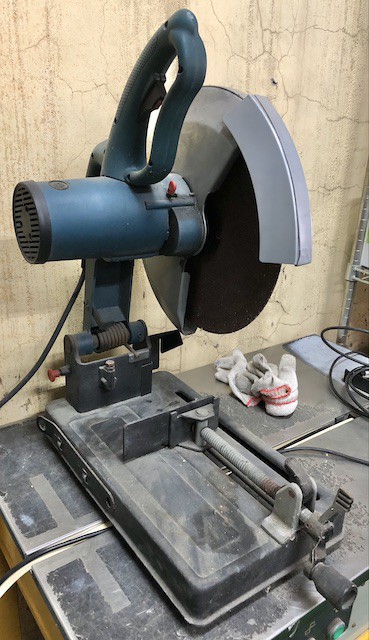
The platform is wide which rules out placing fork blades on it since they sit higher than the steering tube; the cut won’t be square to the steerer (flat on top).
Squaring the tube against the clamp bracket can only be done from the right hand side.
That means you must support the forks during cutting to prevent them dropping onto the table as the grinding disk completes the cut.
Since there’s no guide, the technique is to place the grinding disk edge not quite on the line marked on the steerer during measurement, but a fraction of a millimeter to its left.
A grinding disk also leaves burred edges, much more than a hacksaw blade. These require cleaning off with a hand file so the stem and spacers can slide onto the steering tube without obstruction.
The downside to using a machine is the likelihood of making a cut that’s not square to the steering tube.
This leaves a widening gap from one side of the headset’s top cap to the other because the cut is at an angle.
Anything more less 1° of skewness is not noticeable, and certainly not dangerous.
More than 1° is noticeable though. And for safety’s sake, better the top cap fully engages the top of the steerer all the way around than not.
Ensuring the steering tube is perfectly aligned on the cutting plate takes careful observation and calibration.
The Biggest MISTAKE You can make Installing the Star (Fangled) Nut
Do not place the fork blades against a hard surface to brace against the hammer blows as you hammer the star nut into position.
But, first things first.
You firstly require a star nut setter tool.

The tool consists of
- a pin that extends from a driver
- an inner sleeve (forms one piece with the driver on some models)
- an outer sleeve
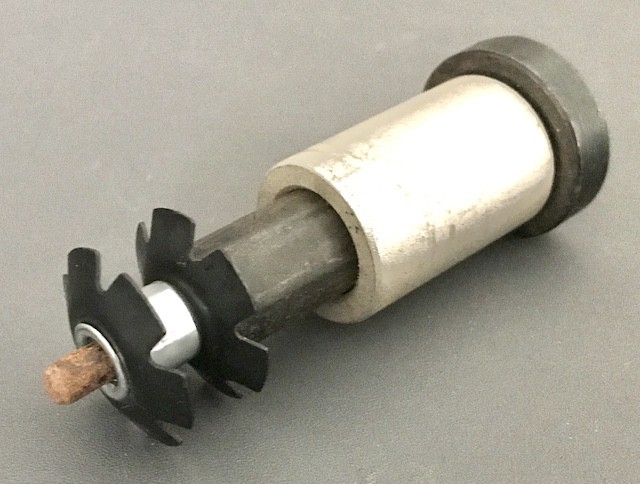
The star nut’s threaded core slips onto the nut’s threadless pin which is an; the top of the nut rests against the base of the driver.
Then you place the star nut against the top of the steering tube causing the outer sleeve to slip down over both the star nut and the top of the steering tube.
The driver projects above the outer sleeve—that length is also the depth to which the star nut is sunk within the tube.
Hammer the driver until it meets the top of the outer sleeve. Then remove the tool.
The pin holds the nut square to the steering tube walls leaving it perfectly positioned to accept the tensioner bolt.
NEVER brace the forks against a hard surface as a foil to the hammer blows.
Sure, you’ll have a rubber mat or piece of carpet to cushion the dropouts.
The force of the blows, however, can bend the alloy dropout jaws inwards a few fractions of a millimeter.
You’ll only discover the damage when you attempt to install the front wheel which won’t fit. You’ll have to file the inside of the dropouts until the wheel fits into position.
The easiest is to grasp the steering tube just below the tool and hammer away.
Good for the biceps, it’s also easier than it sounds.
A more complicated alternative is to anchor a bracket of some sort to the wall, clamp the fork to it, hammer away.
Star Nut Setting Tool Quality
Some nut setting tools are better than others and paying top dollar does not guarantee top quality.
This was the deluxe Park Tool star nut setter after two or so years of installing star nuts into steering tubes in a workshop.
The rubber hand-hold insulation wore out quickly.
Repeated impacts on the head of the driver also reveals that tool’s steel was too soft.
You’ll see in the image how it has begun to fragment around the edges.
Park Tool has done away with the rubber insulating cover in the most recent model. But it remains to be seen whether the steel is hard enough to endure the years of punishment a well-used tool is subject to.
CARBON STEERING TUBE
A carbon fiber steering tube must be managed differently to an alloy tube.
Carbon fiber “composite” steerers are not constructed from woven mats but from fibers layed end to end.
The fibers are bonded vertically along a steering tube, from the crown to the top. And whereas alloy dents, carbon fiber can be crushed.
You therefore need to handle carbon fiber steerers differently.
Cutting Carbon Steerer by Hand
You could use the same steering tube clamping tool you use for managing alloy steering tubes by wrapping cloth to avoid directly clamping the tube with the metal clamping bracket.
However, using a steering tube clamp with softer jaws designed specifically for carbon steerers is best.
This clamp bolts to a table the same as the alloy clamp; you also tighten the bracket onto the steering tube in the same way.
The guide holds a hacksaw blade square to the tube, which, being carbon fiber, is like cutting through a cake of soap. Much easier than an alloy steerer.
The one problem to be aware of, though, is that the fibers often splinter and peel away from the tube as the blade completes the last millimeter or two of the cut. The damage can be as small as one fiber torn away, or look like a chunk has been chopped out.
Although losing some carbon fiber mass right at the top or extending a fiber or two wide down the tube does not reduce its structural integrity, always aim for the best cut.
The technique: when a cut is within a few millimeters of completion, release the clamp then rotate the steering tube 180 °.
Re-clamp, place the blade where it would have emerged, then cut in the opposite direction. A few strokes completes the cut; the excess drops off cleanly with minimal or no damage to the steering tube.
Cutting a Carbon Steering Tube using a Machine
Using a machine is an option—well, a luxury.
The same considerations apply as with cutting an alloy steering tube.
On the plus side, the speed of the grinding disk minimizes the chance of fibers peeling away as the cut is completed.
The downside is — as with cutting an alloy steering tube — extra care must be taken to ensure the tube is clamped as square to the cutting disk as possible to reduce the skewness of the cut.
Expanders vs Star Nuts
The wings of a star nut are designed to dig into the alloy tubing of an aluminum steerer.
They do little damage to the tubing and never slip.
Carbon fiber has a higher strength-to-weight ratio compared to alloy. Yet the fiber-epoxy composite is much more delicate.
Hammering a star nut into a carbon steering tube tears into the fibers and the walls buckle outwards under the pressure.
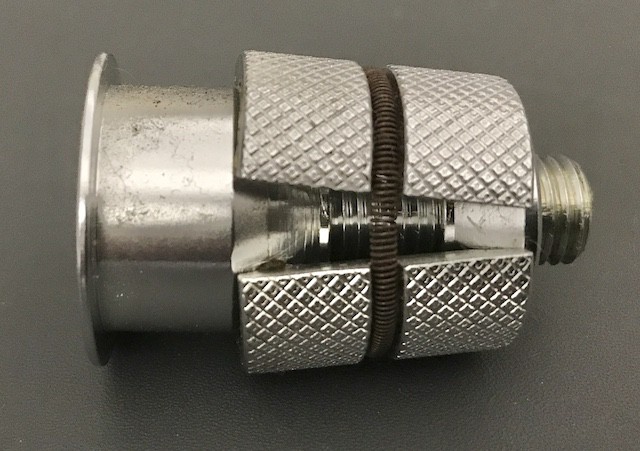
An expander, on the other hand, slips into the top of a steering tube.
Tightening the internal bolt forces serrated brackets on each side to press into the carbon of the steerer.
The brackets’ cross-hatching does not cut into the fibers since the serrations are not pointed.
The grip comes from the mass of relatively blunt edges of the serrations spread across the brackets’ broad surface area.
This ensures a non-slip anchor against the force of the headset top cap’s tensioner bolt.
How to Know if the Expander is Too Tight?
Too loose, and the expander slides around the steering tube as you attempt to tighten it.
The trick is to grip the brackets with your fingers, rotate the upper sleeve lightly until the brackets expand enough that you estimate you can slide the expander into the steerer with some resistance.
The slight resistance is enough for the brackets to hold the steerer—then a quarter of a turn or so tightens the expander into the steerer walls.
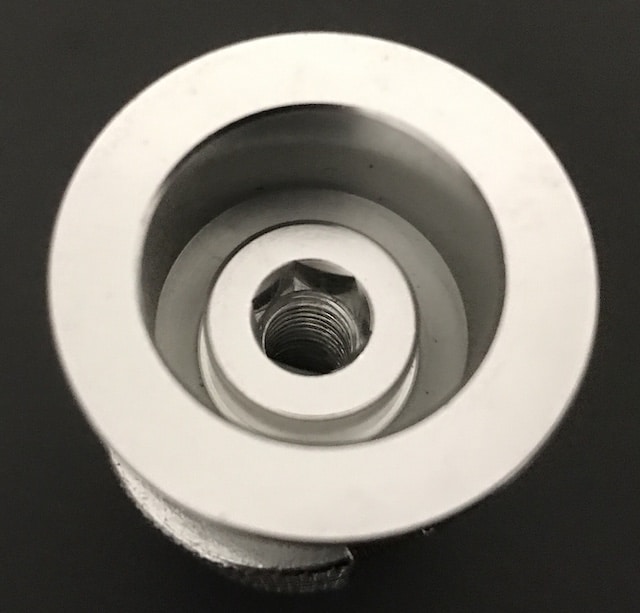
An over-tightened expander creates a bulge in the steering tube which prevents you sliding the stem onto the steerer.
The fix is to turn the expander’s internal bolt in the opposite direction, releasing pressure until the bulge has gone.
Overtightning won’t critically damage the steerer. But it’s better — and easy — to avoid in the first place.
FINAL COMMENTS – Safety Issues
The crucial issue for a steering tube is manufacturing quality, which can vary a lot more with carbon tubes compared with alloy tubes.
The main post-manufacturing steering tube issue on an all-alloy fork (steerer and blades) or alloy steerer with carbon fork is cutting it to length, since the processing of alloy in bike manufacturing is standardized.
It’s difficult to fatally damage a fork steerer; the overall manufacturing quality is key.
Carbon manufacturing processes are more variable. Steerer quality thus depends on the quality of carbon fibers, layup, baking, and other processing carried out by a particular manufacturer. Fork recalls are almost entirely for carbon forks, as are the incidences — which are rare, fortunately — of carbon fork failure.
Cutting the steerer is uncomplicated. As with alloy, the only potential problem is once a steerer is cut, there’s no going back.
If in doubt as to steering tube length for optimum stack height, leave it longer and use spacers above the stem. The same goes for alloy steering tubes.
The only other issue is ensuring the top of a cut steering tube is square. If it’s not, the top cap does not maintain full contact with the top of the stem.
Using a steering tube cutter with a guide ensures the cut is square.