Here’s what you need to know about BB30 to be able to
- take advantage of this standard’s benefits
- minimize the well-known disadvantages
- install a threaded, or “BSA30” to replace your 24mm spindle
And the 30mm diameter spindle is the star of this show. (Eclipsed perhaps by the recent 28.99 standard)
CONTENTS
Are BB30 and PF30 the Same?
BB30 History
Is BB30 Threaded?
BSA30 Adapter Installation
Tapping and Facing
First up, let’s look into a question that always comes up in relation to BB30—PF30
ARE BB30 and PF30 the SAME?
These standards are not the same. But nor are they so far apart.
The confusion is due to the “30” (mm) added to BB in one case and PF in the other.
~The Most AWESOME Guide to PF30 Bottom Brackets Around~
Let’s get it clear right now.
The “30” refers to
- the diameter of the spindle and
- the Internal Diameter (ID) of the bearing itself.
This detail is common to both.
What is also common to both is that the bearing or bearing cup is pressed into the bottom bracket shell.
Thus the BB30 standard which predated PF30 (PF30 was designed in reaction to BB30’s shortcomings) introduced the idea of installing bearings directly into the bb shell.
The radical element of this modification was doing away with a threaded bb shell.
Just as standard bike frames top tubes progressed from threaded headsets to threadless headsets, and then to integrated headsets, the same has happened with the bottom bracket shell.
In short, though, a PF30 bottom bracket system is arguably THE solution for getting a 30mm crank onto your bike, if you must have a press-fit system at any rate.
Of course, the advent of the 28.99mm standard promises to hit the sweet spot when it comes to taking full advantage of 30mm(-ish) spindles.
~Unique Alternatives to SRAM DUB 28.99 Bottom Brackets~
BB30 Bearings
Both BB30 and PF30 use a sealed bearing.
But whereas a BB30 sealed bearing is pressed directly into the bb shell, a PF30 system has cups that are pressed into the shell.
The drive and non-drive side’s bearings are pre-installed inside the cups.
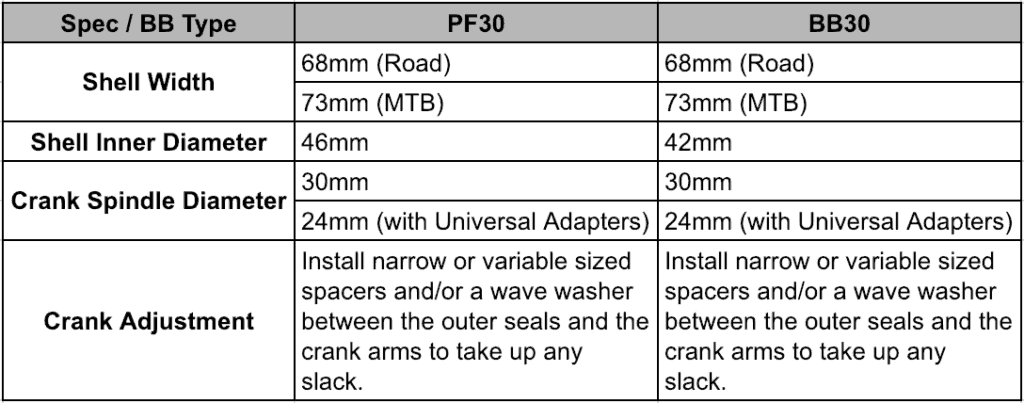
A key difference is in the size of the BB shell.
BB30 fits into a 42mm shell—a shell with an internal diameter of 42mm.
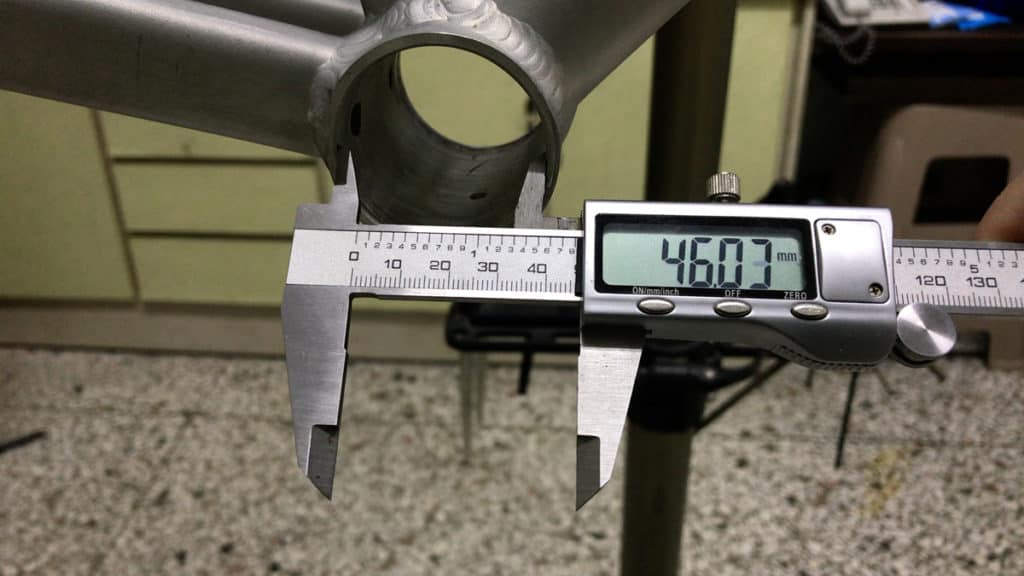
PF30 bearings fit into bb shells with an internal diameter of 46mm.
As for the sealed bearings themselves they are identified as 6806 bearings. This category of bearing has an
- ID (internal diameter) of 30mm which is the OD (Outer Diameter) of the crank spindle
- OD of 42mm
- Width of 7mm
BB 30: A Step Backwards?
If you happened to be trying to decide between the two, be aware that the PF30 design is probably the better choice due to the
- bearing cups
- larger bearings
- wider variance in tolerances
This last point is especially important.
As for bearings, the invention of outboard bearings with integrated spindles were a significant advance in bottom bracket and crank design.
Bearing durability increased with the bigger bearings this design allowed by bringing them out of the bb shell.
Overall weight decreased with the integrated crank that replaced the 3-piece spindle-plus-cranks system.
BB30 however brings the bearings back inside the bb shell.
Sure, the BB shell diameter is still bigger than on the standard BSA 34.9mm bottom bracket shell.
But compare this to PF30’s 46mm BB shell diameter and you’ve, theoretically, got a a less-then-optimal setup, a theory which has been born out in practice.
BB30 quickly gained a reputation for creaking.
The thing is, the BB shell requires extremely precise machining in order for the bearings to sit firmly in the shell.
You also need someone with a lot of experience to correctly install them.
You don’t want just anyone banging the bearings into the BB shell. The mechanic must carefully and gently press them into position.
There’s only around 0.025mm of tolerance to work with; the slightest mistake can mean a ruined frame.
Even if those tolerances have been met, small movements with the natural motion of your bike results in surface moving against surface—that will be your creaking, right there.
BB30 HISTORY
Cannondale in 2006 was the first to introduce the BB30 innovation to the cycling world. FSA went to market with BB30 Road and MTB cranksets in 2008.
The aim was to increase “pedaling efficiency”.
One way to directly achieve this is through decreasing the distance between the pedals for one thing—decreased Q-factor.
The larger spindle diameter reduces twisting thus conserving energy for another.
Stiffer is better.
Yes, energy loss in this way is minimal. But the longer and more intense your rides, saving even a little bit of energy has a noticeable effect.
Indirect efficiencies come from getting rid of supporting materials for the bearings.
You install the bearings, the C-clips/snaprings, no cups—voila . . . lighter.
You’ll find a good summary of the issues and the numbers right here.
IS BB30 THREADED?
What a silly question. After all is said and done so far—
NO
Actually . . .
YES, it can be, in spirit anyway, since the BB30 standard is characterized by a number of elements. We’ll get to that shortly.
If you’re sick and tired of an existing BB30 you can reconfigure your BB/Crank setup to accept a 24mm spindle., in the form of a “BSA30” setup.
Plus you also get the benefit of the bearing pre-installed in a cup. Simply install the the cups and you’re off to the races.
For Shimano, or . . .

for SRAM
The whole shebang, 3-in-1 Integrated BB Reducer, has got you covered for surely every contingency, should you need it.
So, what about threads?
The BB30 original concept was to do away with bottom bracket threads altogether. A great idea that proved a little trickier to realize in practice.
If the whole fad passed you by or you’ve always stuck with the BSA standard because ‘who needs threadless anyway?’ or something like that, you’re in a good place.
You can stay with that 34.99mm threaded bottom bracket shell yet still get full advantage of BB30’s 30mm spindle.
In other words, you can change out your square taper cartridge bottom bracket and upgrade easily and painlessly.
Oh yes, 30mm stiffness is yours for the taking whilst side-stepping BB30’s disadvantages.
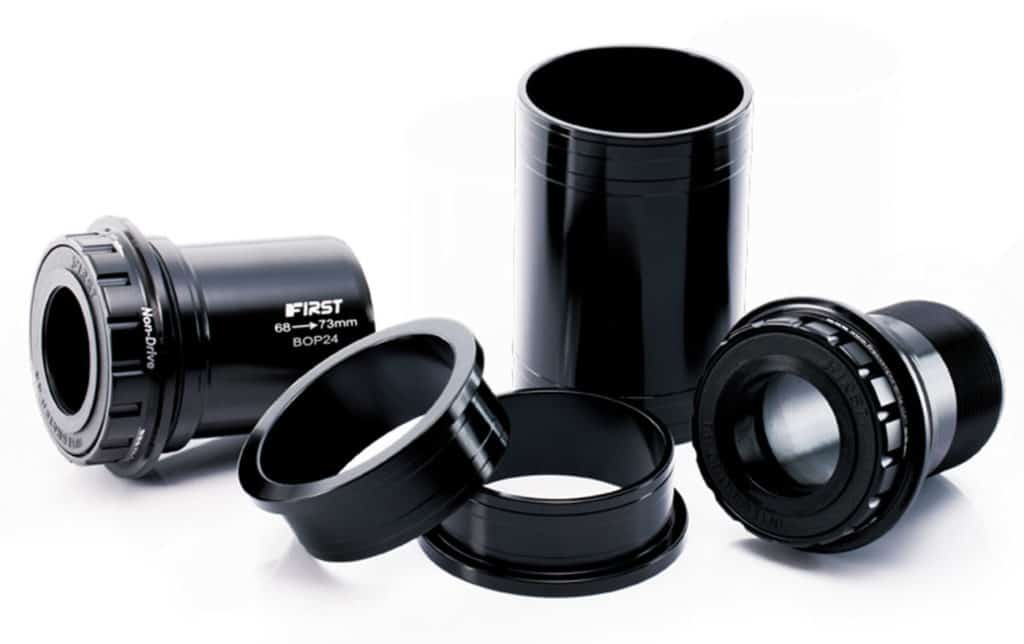
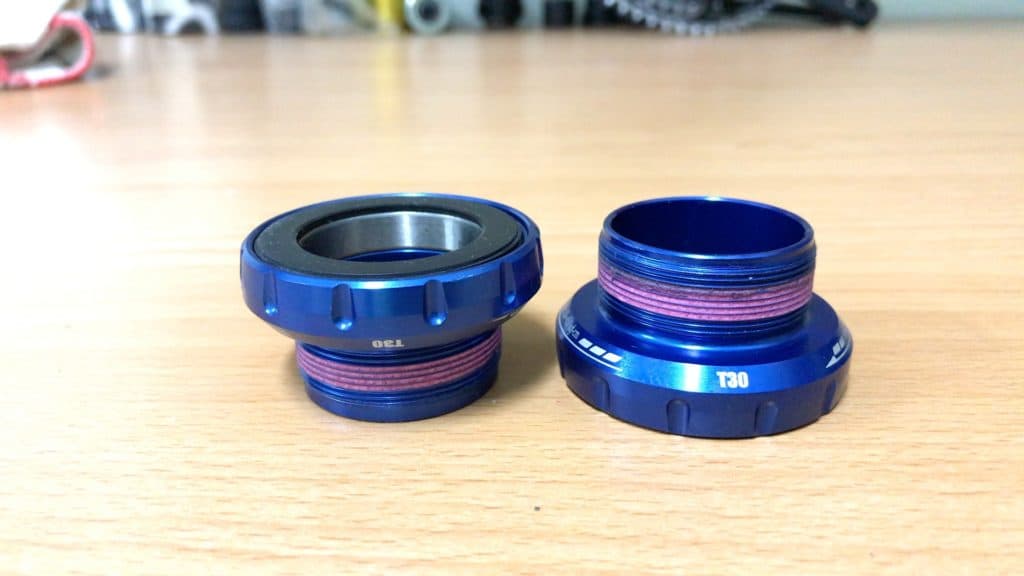
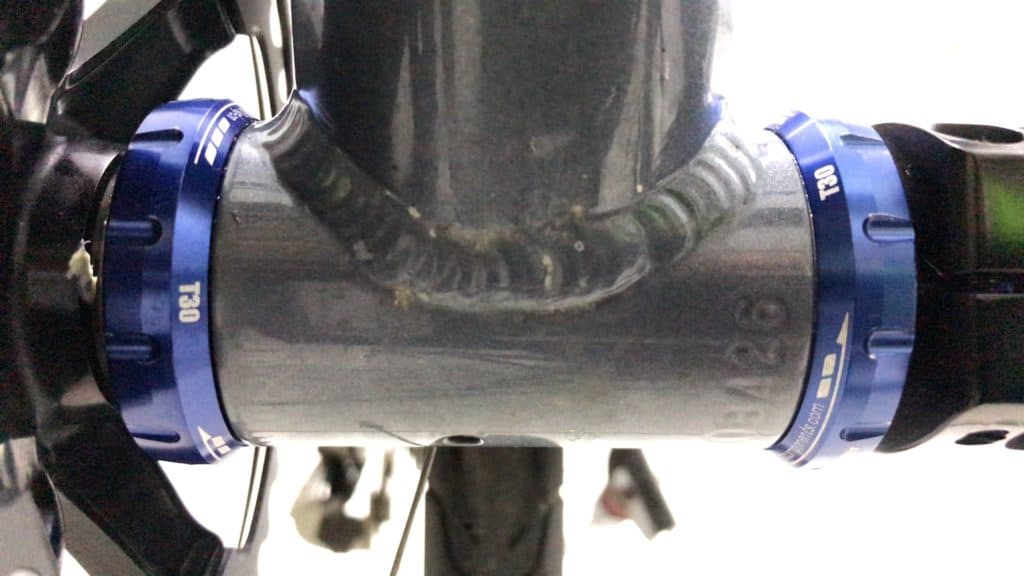
“BSA30” ADAPTER INSTALLATION
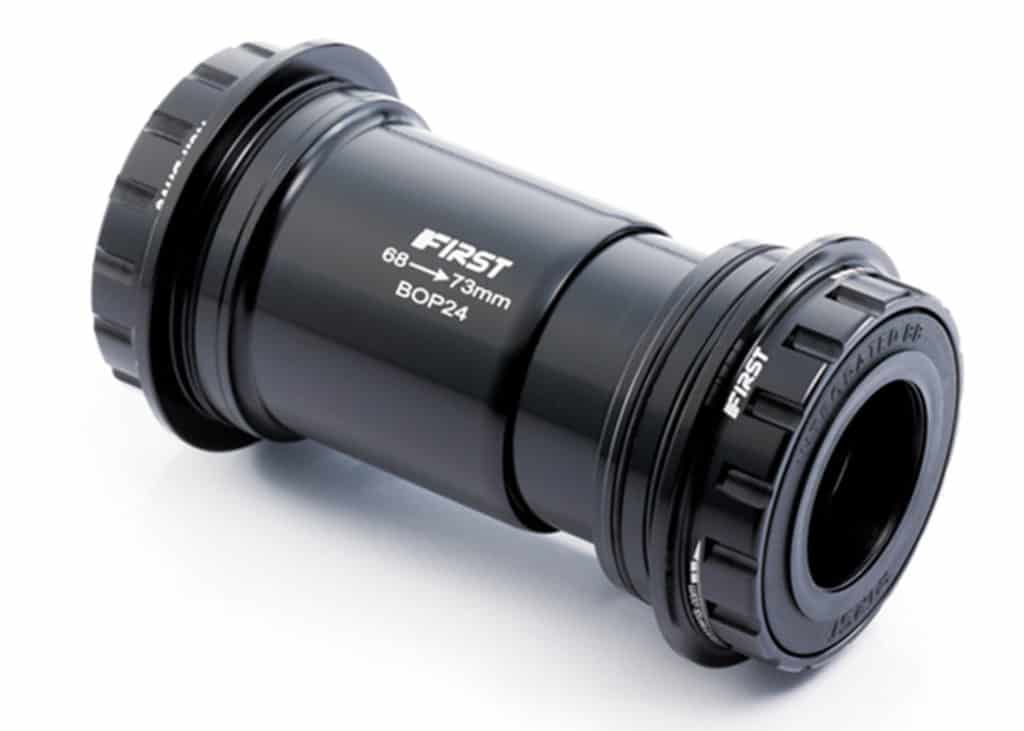
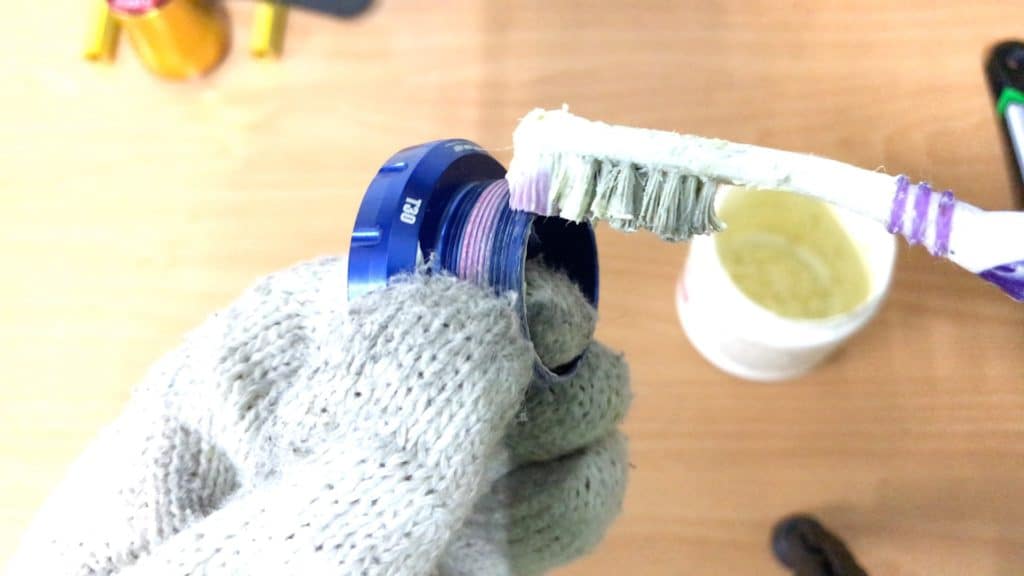
These bearing cups, FIRST’s T30 model allow you to fit a crank with a 30mm spindle.
Check out the video for the complete story told in intimate visual detail.
Or proceed with the summary below if you wish to skim through what is involved first.
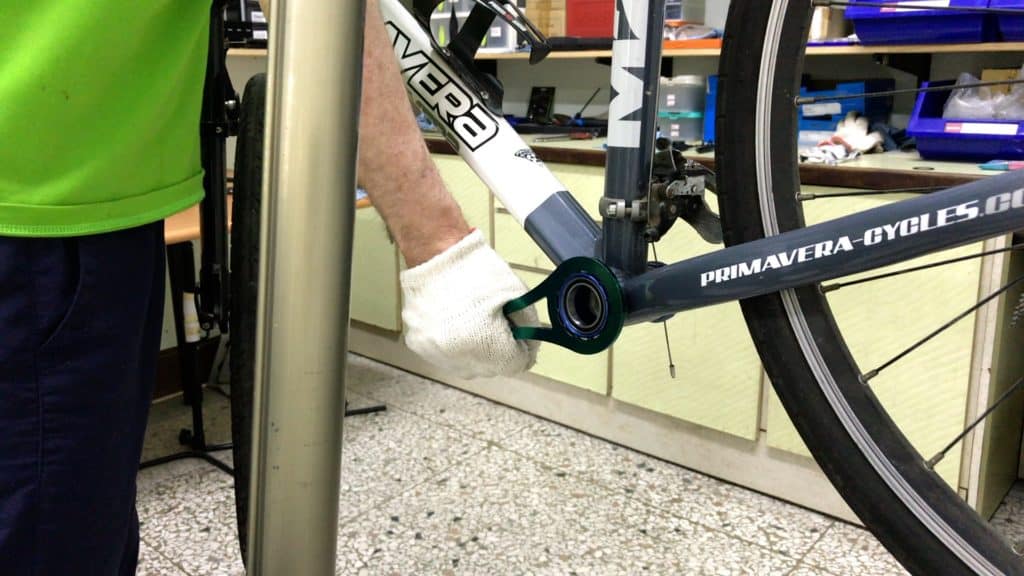
We assume you know how to remove a square taper BB.
If not, or you need a refresher, check out the following:
~The Ultimate Guide to Square Taper Bottom Brackets~
Tapping and Facing
An essential procedure when installing threaded bottom brackets.
Having removed the old bottom bracket there are several steps you need to take to ensure the T30 bearing cups install easily.
A really good idea is to tap the bb shell’s threads.
I would note that a yearly bottom bracket overhaul should be standard procedure. You should remove your cranks, remove the bottom bracket, remove the old grease from the BB and the BB Shell. Then re-install the lot.
Prior to re-greasing the BB shell tap the threads.
This way the BB shell threads will be aligned perfectly with the bearing cups about to be installed.
With perfect alignment there is almost no chance at all of cross-threading. You can be almost 100% sure that if there is resistance from the getgo, you have probably cross-threaded the bearing cup to the BB shell.
Rotate the bearing cup back out (it should not be in very far at this stage anyway) and start over.
We’ll cover a simple technique to make sure you get this right, below.
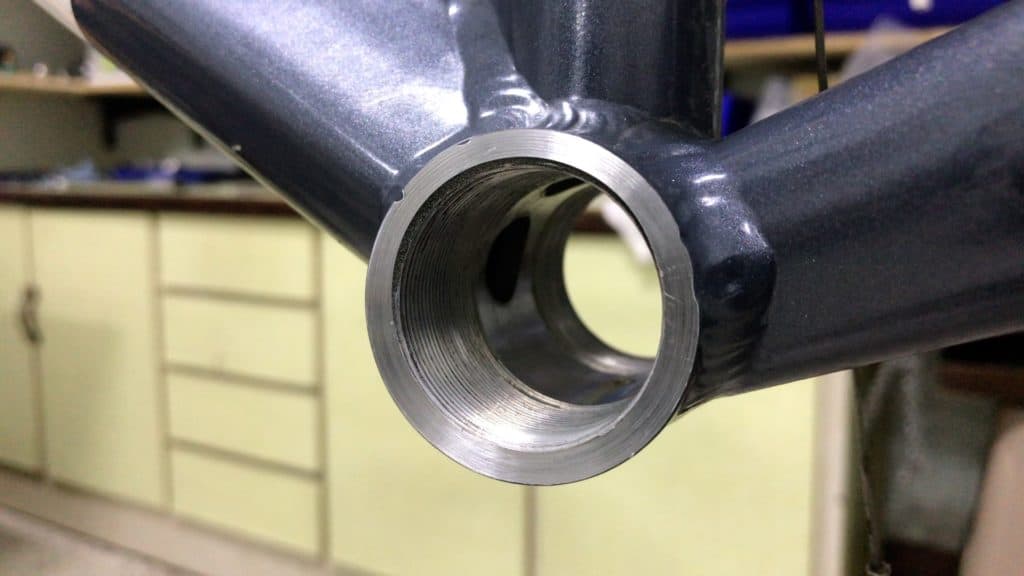
Because you are moving from an inboard bearing setup to an outboard bearing system you also need to clean or “dress” the BB shell’s face.
The externally located bearing cups interface directly with the BB shell. The bearing cups are precisely machined so the BB shell needs machining to the same level.
That way the bearings sit perfectly square with the bottom bracket shell. The crank will also, therefore, be perfectly aligned with your bike’s frame.
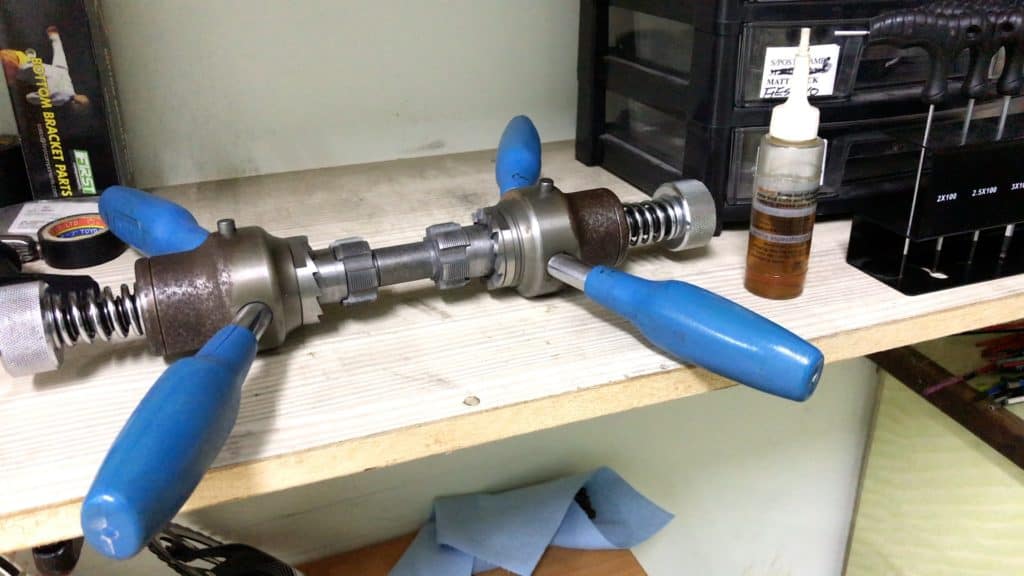
A tapping and facing tool is the way to achieve this.
Cutting Oil for the Tapping Dies and Facing Blades

Cutting oil protects each die from too much wear and tear. They also go in a lot easier.
You don’t need much oil either. Just a few dabs here and there.
If for some reason the threads are really tough and need a thorough cut (could be that tapping was never done on the original install), you may need to apply oil several times.
The main target, of course, is the BB shell face, visible where the die enters the BB shell.
When you’ve finished, that surface will be cleared of the frame’s clearcoat and painting overspray, ready to receive the bearing cup.
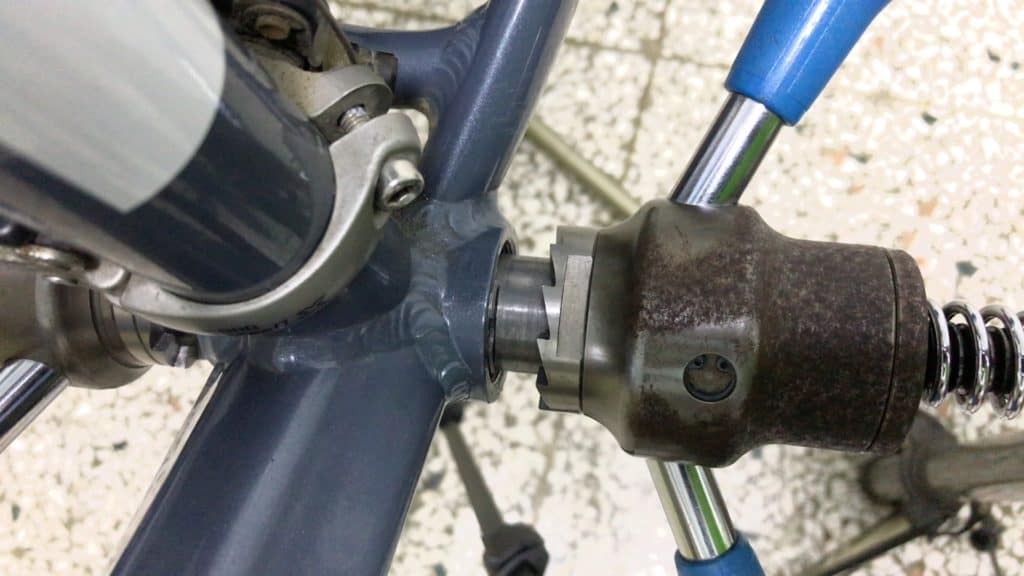
Once you fully insert the die on each side (or just one side if you have that type of tool), the next step is preparation for facing.
The Facing Technique
Smearing cutting oil on the surface to be cut smooths the cutting and helps preserve the cutters.
Then place the cutters against the BB shell face and slowly increase pressure via the nuts behind the tool’s handles.
The goal is to cut a maximum of 0.4mm of material away from the face. The 68mm or 73mm BB shell width should be preserved within 0.3mm of tolerance.
A clean face like this means mission accomplished.
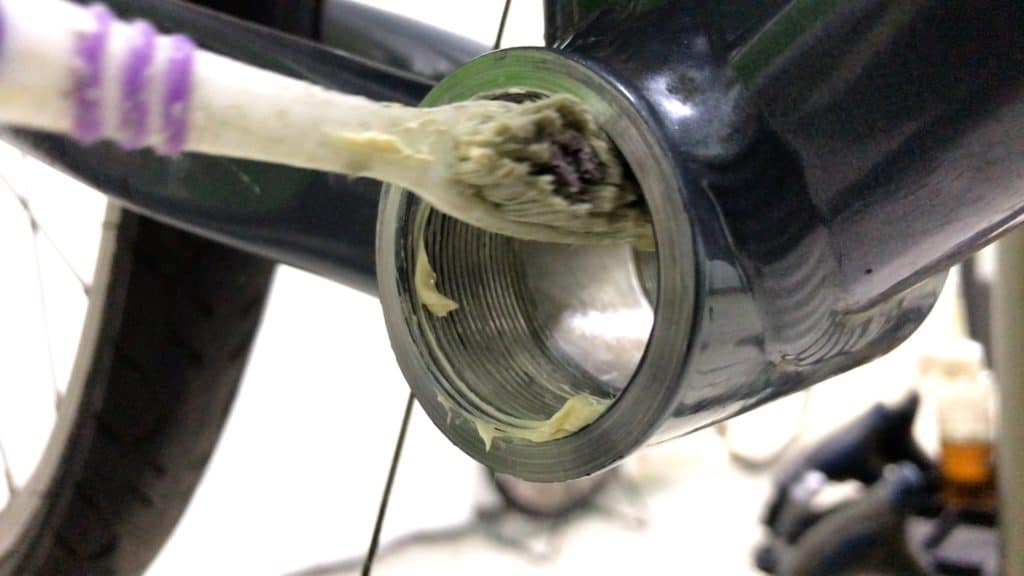
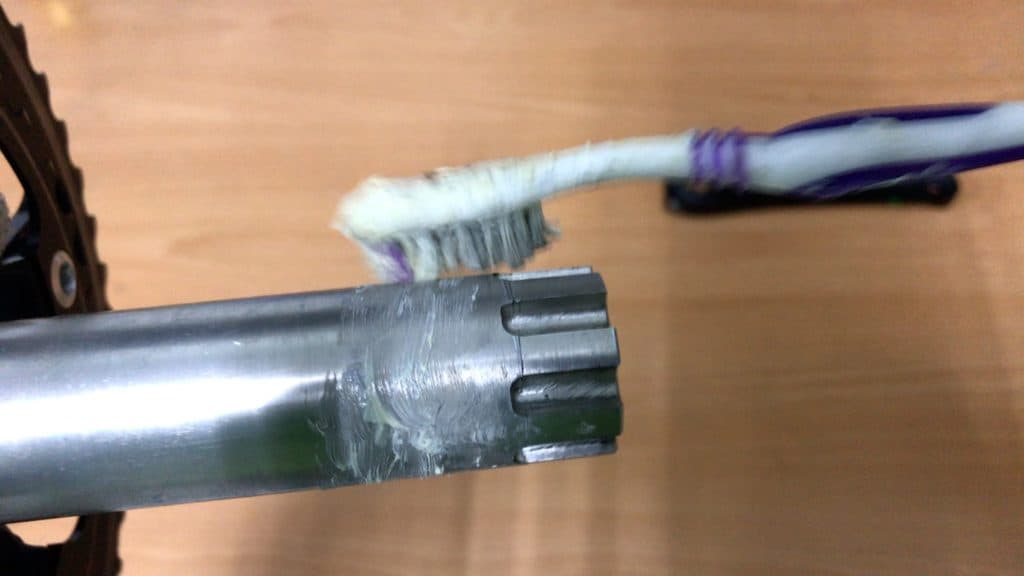
A coat of grease for the BB shell.
A coat of grease for each of the bearing cups.
Bearing Cup Alignment

Installing each T30 bearing cup into the BB shell will be smooth if you’ve followed the procedure.
Nevertheless seating the the cup exactly right in the shell at the very beginning is essential.
The problem is that cross-threading the bearing cup with the BB shell is very easy to do.
A cross-threaded bottom bracket will turn reasonably smoothly with slowly increasing resistance as you rotate the unit into the bottom bracket shell.
If the mechanic did not tap the BB shell on the original install, you might mistake this for normal resistance due to the natural variance in manufacturing tolerance from either the BB shell producer (manufacturers normally outsource thread-cutting) or the bottom bracket’s manufacturer.
Pushing ahead with the install will leave you with a badly damaged, even ruined, bottom bracket and BB shell.
The trick is to firstly seat the bearing cup in the BB shell threads.
Then turn it opposite to the install direction: right for the drive-side; left for the non-drive side.
Having rotated the BB 1 or 2 centimeters, you hear a “click” (and you’ll feel it too) as the threads slot into alignment. You’ll find turning the unit to the point of full insertion is easy.
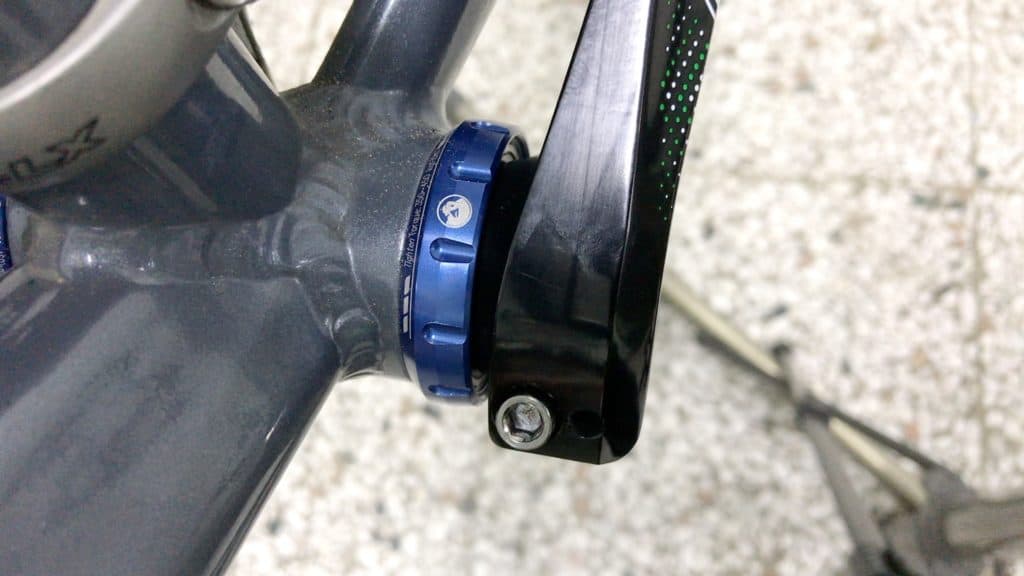
Tightening to Correct Torque Tolerance
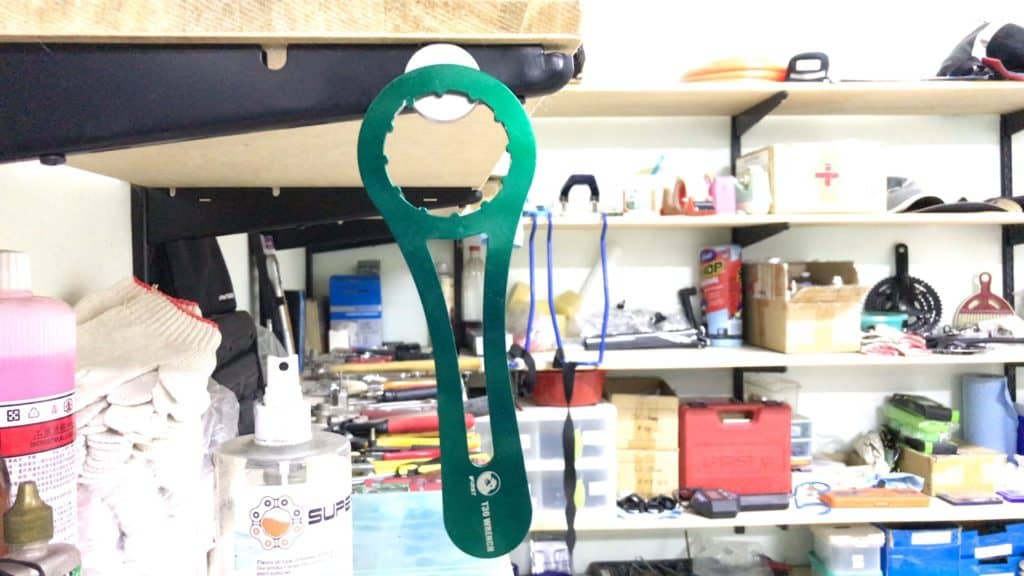
FIRST’s T30 bottom bracket BSA adapter comes with its own special wrench.
Recommended torque is in the range of 35 Nm to 45 Nm.
Turning the bearing cup with the wrench to the point where no more movement possible will give you a torque setting of between 35-38 Nm.
If you have above-average strength, you may reach 40 Nm or more. That’s fine. Achieving the minimum torque is the main thing.
A smear of grease on the crank spindle assists sliding it through into position.
Depending on what crankset you install, you’ll have the one crankbolt (typical on SRAM-style cranks) or the Shimano style twin pinch bolts.
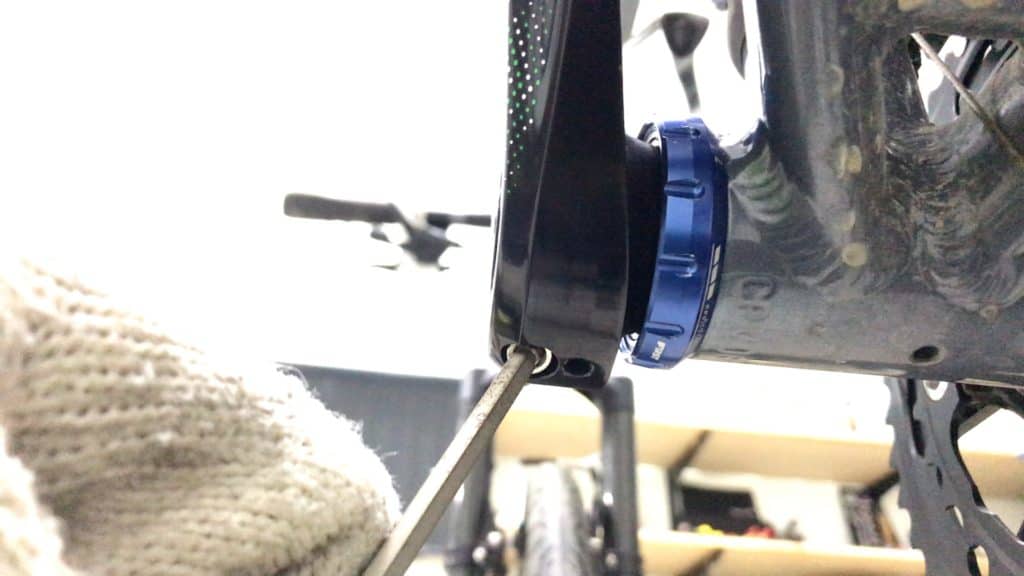
The crank pictured here is a FIRST Components model. The pinch bolts tighten to a recommended torque of 12-14 Nm.
And there you have it. A new BSA30 (“T30” for us) installed complete with crankset replacing a BSA bottom bracket setup without having to replace your frame or even the whole bike.
You can now enjoy the lightness and stiffness of the BB30 standard without the accompanying hassles.
Fixing a Creaking BB30 Bottom Bracket
Covering BB30 in any way, shape, or form would not be complete without mentioning what probably is the number 1 complaint about this standard.
A creaking bottom bracket.
And for many riders, nothing is more annoying.
Here are some ideas to help get rid of BB30 creaking issues.
First of all. The movement of one surface against another causes the creaking. Doh…you knew that of course.
But, here’s the rub (?) . . . you need to be sure that the source of creaking is not coming from somewhere else: pedals, chainring bolts, seatpost (particularly carbon on carbon although they make a loud, sharp cracking sound rather than creak).
The first component to check is the pedals. Did the assembler install a washer between pedal and crank? If not, there’ll be small movements and, thus, possible noise.
Light machine oil on the pedal threads ensures easier removal later and reduces the chance of creaks and squeaks.
Here is one theory from BB Infinite including a very comprehensive summary. They cover the conventional wisdom on what to do about this as well as providing novel insight.
- Remove the bearings and degrease the outer races along with the bottom bracket shell using a neutral light alcohol, not any form of degreaser
- Apply loctite to both bearings outer races
- Start the bearings by hand—ensures you seat them absolutely square in the shell
- The press tool should only engage the outer race:
Pressure on the inner race pushes the bearing assembly sideways—you’re certain to damage it. Even pressure on both sides. This really takes skill that comes only through practice with the tool. Should the bearings go out of square in the slightest, start over.
The thing is, the tolerances are so fine, quite a deal of professional skill is essential to get this right.
And as with all advice, you need to try suggested remedies out yourself and find which one works for you.
Every case is unique, despite commonalities, and you need to follow the road where it leads in relation to your unique setup.
Some Final Questions
Let us know about your experiences with BB30.
Was this only ever a solution in search of a problem?
What do you think about upgrading your BSA threaded bottom bracket setup to accept a 30mm crank?
Or would you just go for the new 28.99 standard?